Review Sessions
Powerful feedback tools with the Review Addon.
Last updated About 2 months ago
The Review Sessions is a premium addon included with the Studio subscription, or as an extra with a Pro subscription.
Streamline creative feedback with powerful, frame-accurate playback tools, designed for teams reviewing image and video work. Perfect for shot review, dailies, or edit approvals, all within your pipeline.
Key Features
🎞 Curated playlists
Organize shots and edits into playlists to review in a set sequence.⚡ Fast, precision playback
Seamless frame-accurate playback with zero lag between edits.✏️ Creative drawing & laser pointer: Pressure-sensitive annotations and real-time, user-color-coded laser pointer broadcasting.
👥 Real-time sync
Draw, scrub and comment in perfect sync with other participants. Take over as Presenter to get full control of the session.👁🗨 Held frame annotations & ghosting
Let annotations persist across multiple frames or fade in and out across time, giving you more flexibility for dynamic, expressive feedback—ideal for animation notes and motion reviews.🆚 Advanced comparison: Compare shots side-by-side or overlaid with versions from any folder or product in the project.
✅ Guest review & formal approvals: Invite external stakeholders via passwordless magic links to leave comments, formally approve versions, or request changes.
⏩ Skippable handles
Watch edits with or without head/tail handles for focused review.🎛 View controls
Flip, flop, add guides or mattes to frame shots exactly how you want.
The Review Addon is a paid addon extra and requires an AYON Subscription.
Creating Review Sessions
A review session is a playlist of versions you want to review. There are three primary ways to create a review session:
1. From a Selection of Entities
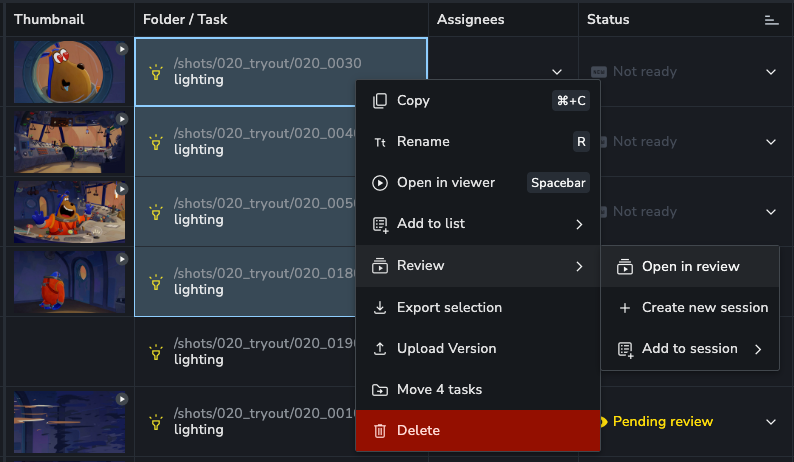
The fastest way to create a review session is by right-clicking one or multiple folders, tasks, or versions in AYON and running an action from the Reviews submenu:
Open in review: Opens multiple selected clips directly inside the review player.
Create new session: Generates a new review session containing the selected items.
Add to review list: Appends the selected clips directly to an existing review session.
From Folders and Tasks
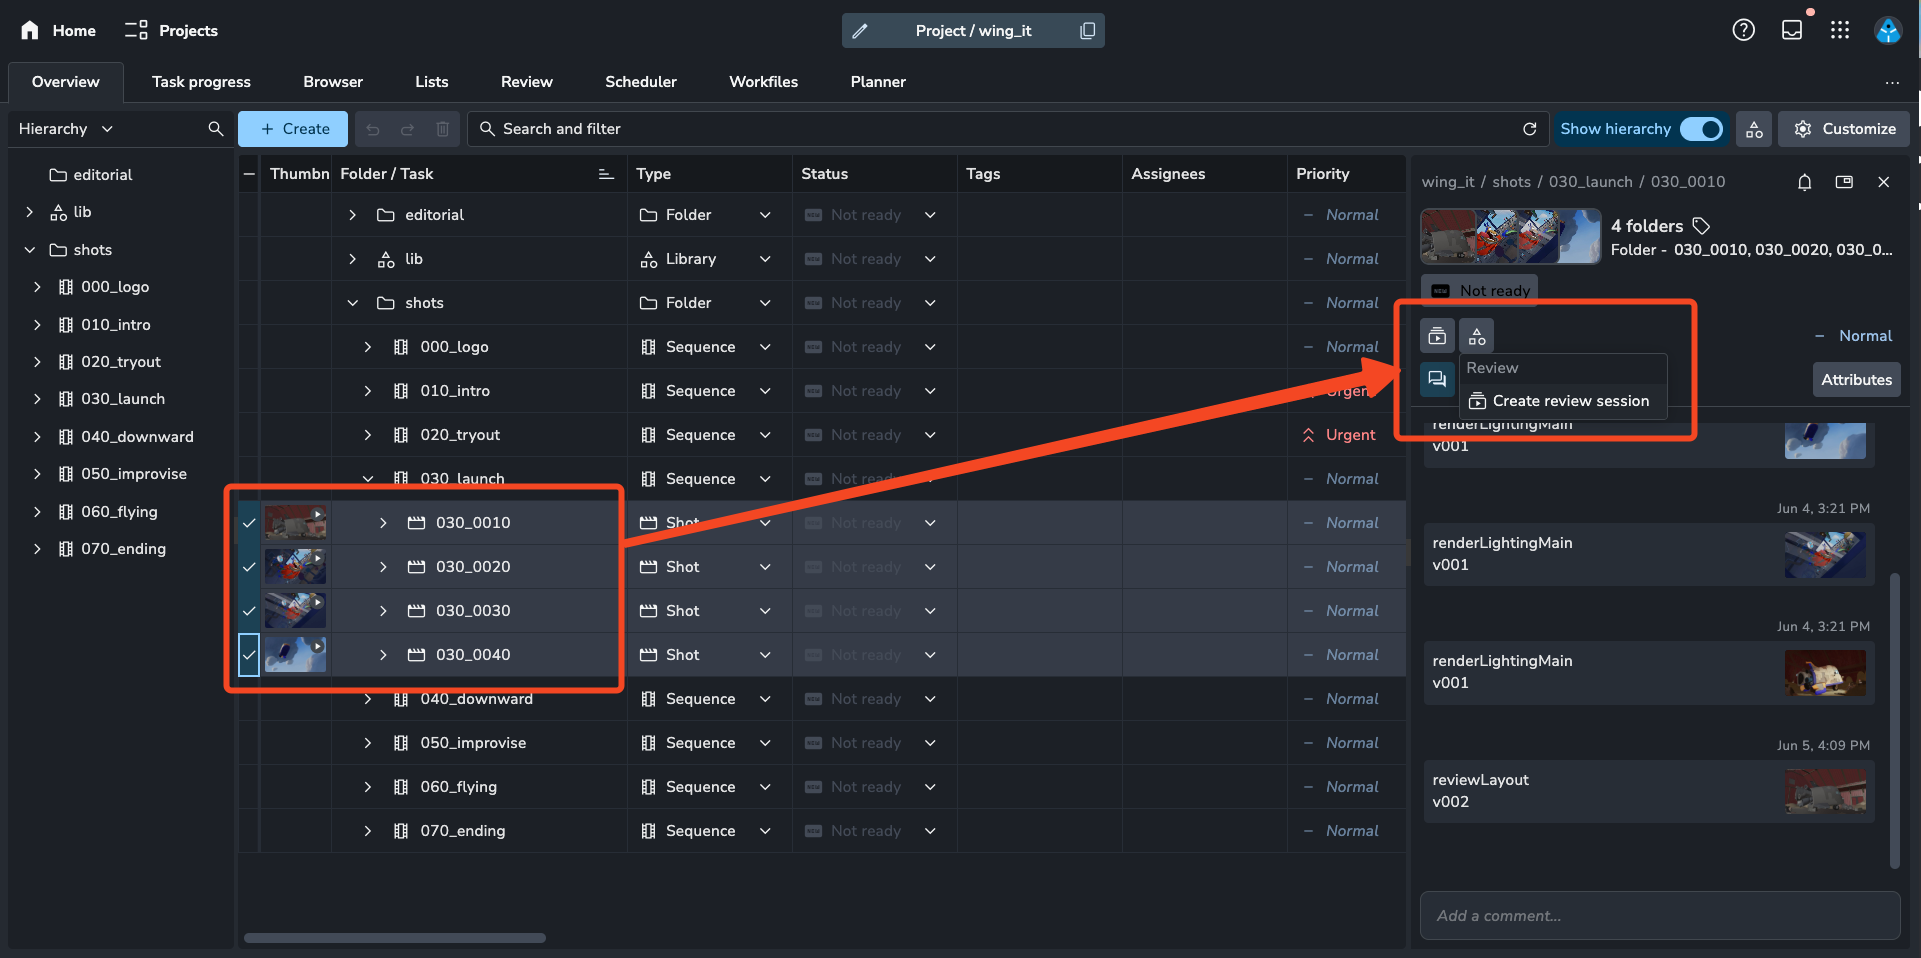
If you select folders or tasks, the system will automatically pick the latest uploaded version for each selected folder or task to include in the review session. This is particularly useful for quickly reviewing the most recent state of a sequence of shots. For example, selecting 10 folders will result in a review session with 10 versions, each being the latest from its respective folder.
Temporary Review Sessions
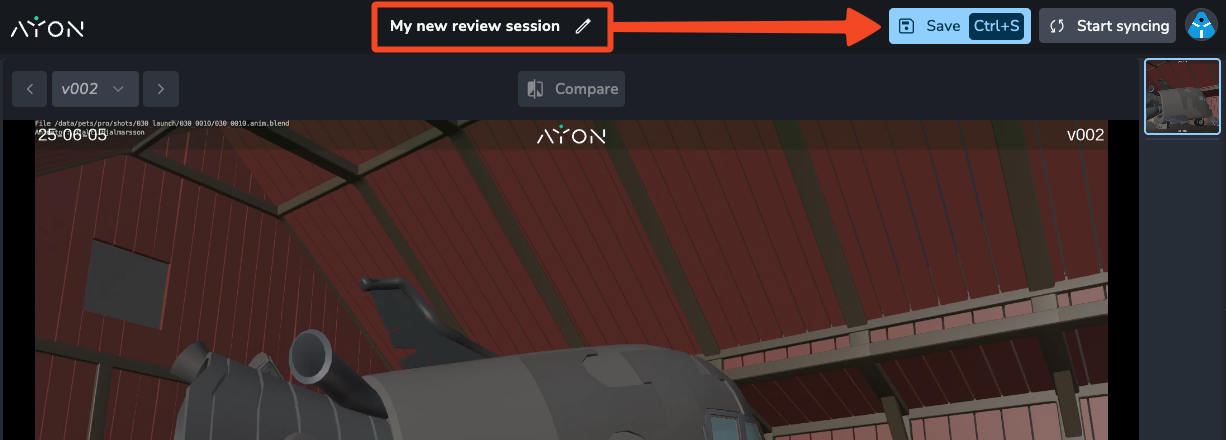
When you creating a review session through the actions menu, it will automatically opened as a temporary session. This means the session is not saved permanently by default. However, you can make a temporary session permanent by giving it a name and saving it. If you close the tab before saving, the session will be lost.
2. From an Existing List
You can create a review session from a pre-existing Lists of entities within AYON. Lists are collections of entities of the same type (e.g., a list of tasks, a list of folders, or a list of versions).
Creating a review from a list:
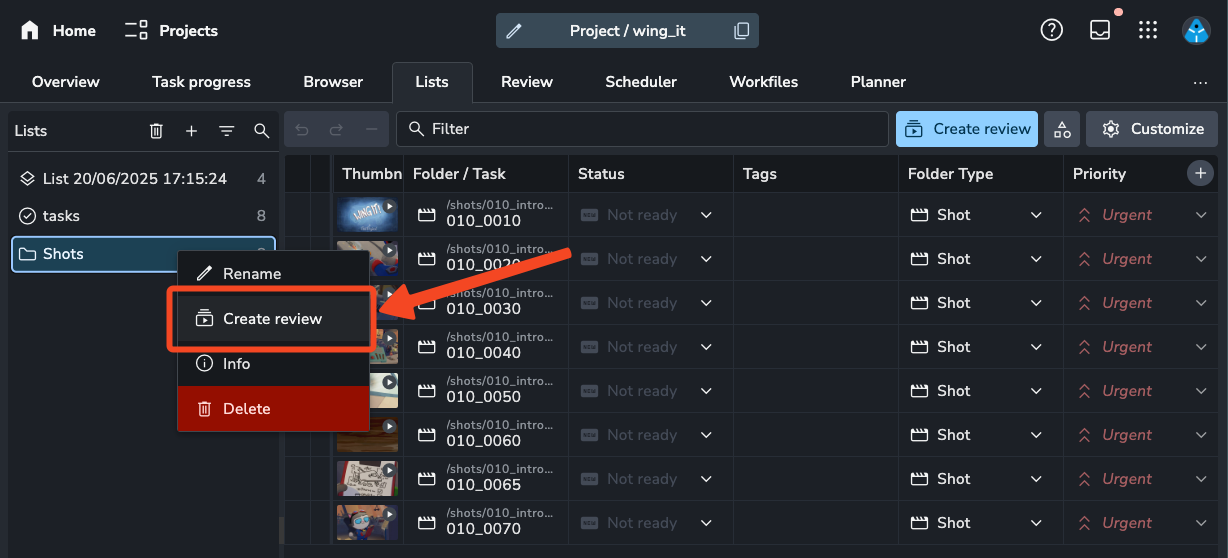
Action on the List: You can run the "Create Review Session" action directly on a list.
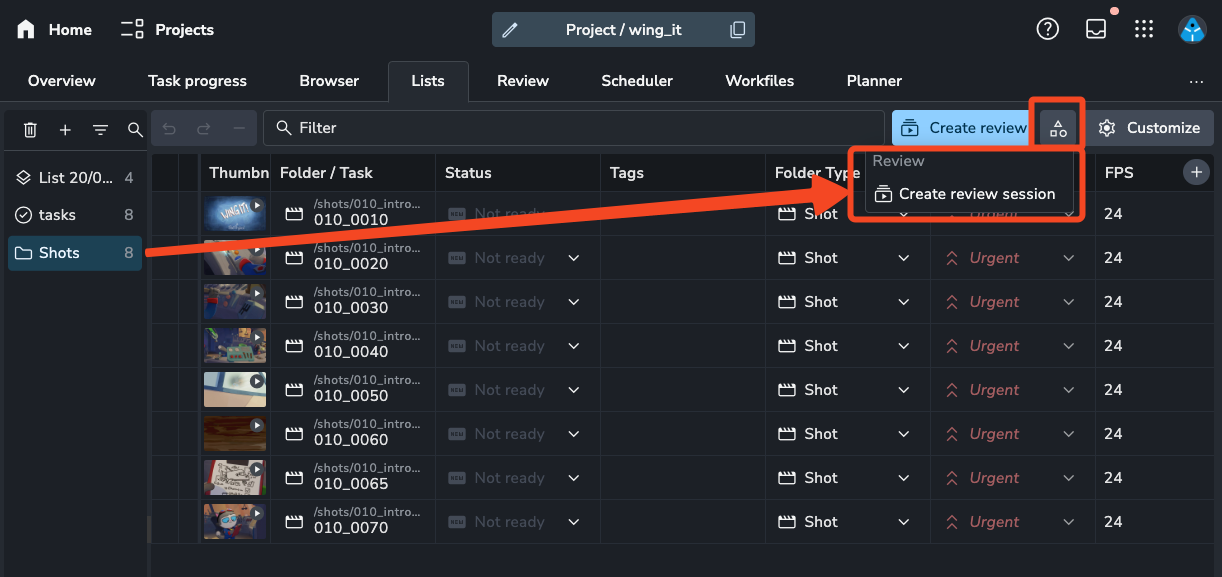
Right-Click Menu: Right-click on the list itself and select "Create Review".
Create Review Button: Look for a "Create Review" button within the list interface.
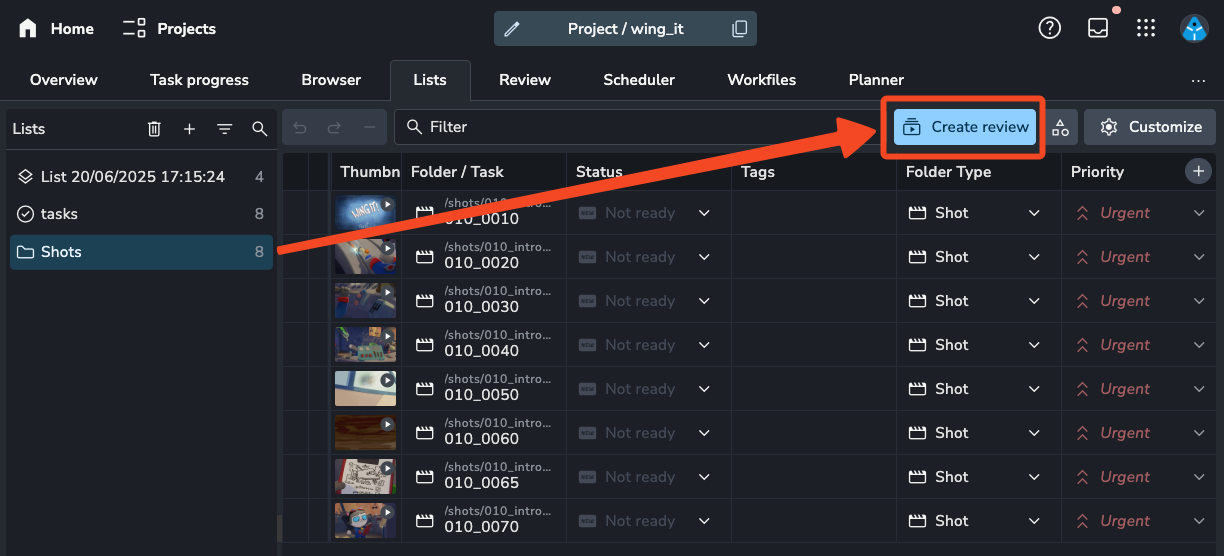
When creating a review session from a list of folders or tasks, the system will find the latest version for each item in the list and add it to the review session.
Reviews created using the right click and dedicated button will have permanent sessions created. Reviews creating using the action will be temporary.
3. From the Review Tab
The dedicated Review Tab provides another way to initiate a review session.
Creating from the Tab: Within the Review Tab, click the "+" button. This will display a list of all your available lists. You can then select a list to convert it into a new review session.
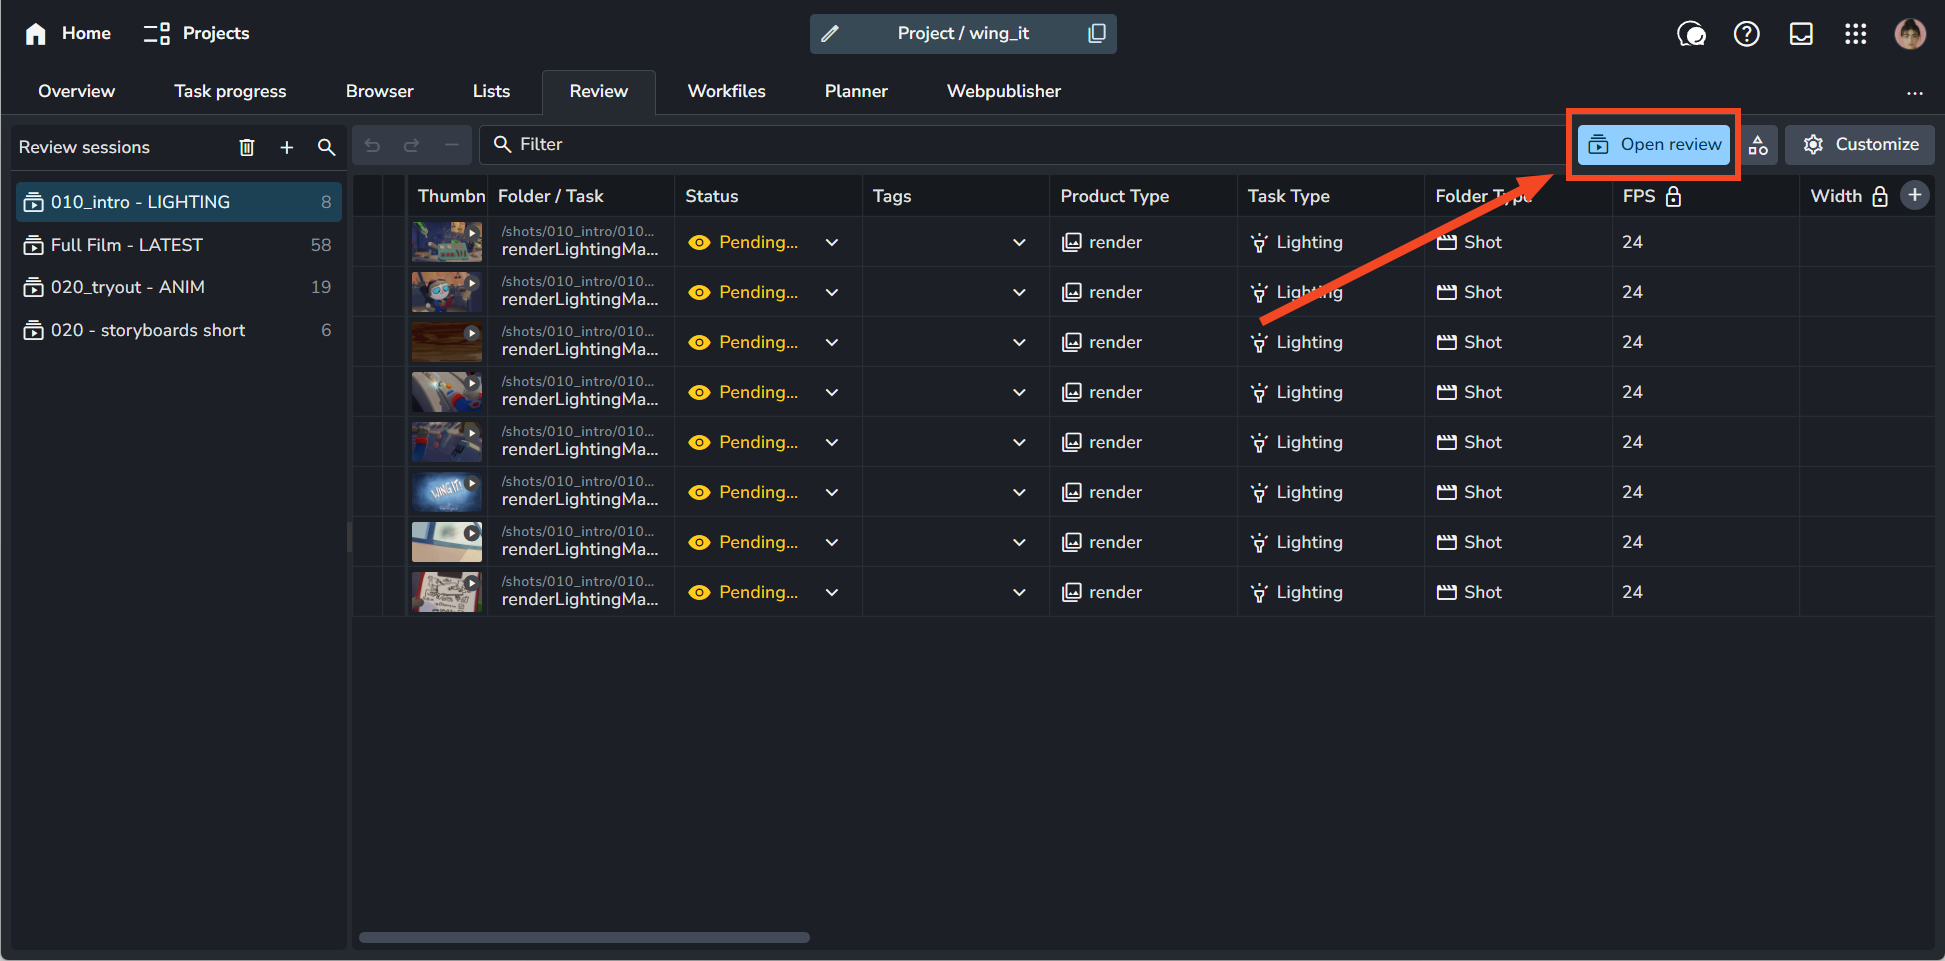
4. Updating Review Sessions
Once a review session has been created you can:
Add additional versions to the session
Remove versions from the session
Re-order the versions
Real-Time Sync and Presenter Mode
Collaborate in real time with synchronized playback, viewing controls, and annotations across all participants in a review session.
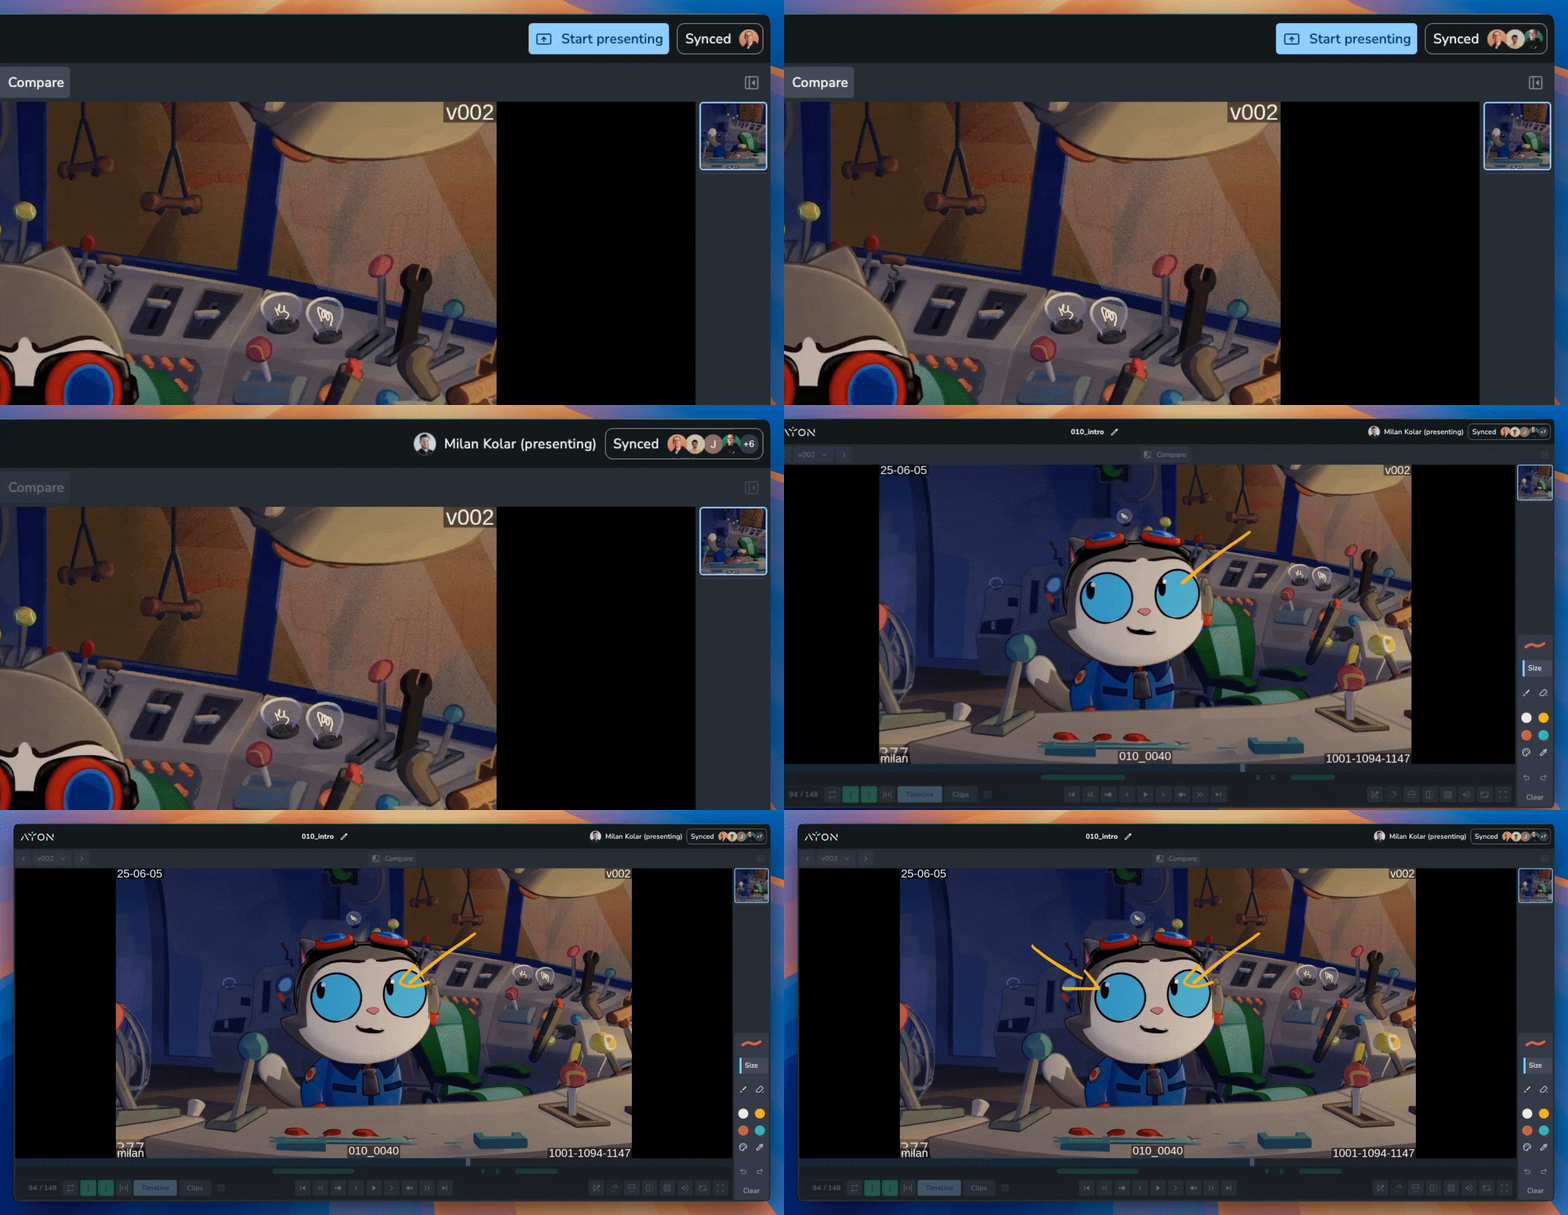
Joining and Leaving Sync
De-Synced Default: All users enter review sessions de-synced by default, allowing team members or external guests to browse playlists independently without interrupting playback for others.
Live Sync Notification Banner: A non-intrusive banner appears at the top of the interface whenever a live sync session is active, allowing you to join or leave the sync at any time.
Manual Sync Controls: Hover over the Synced indicator to leave or rejoin the live sync at any point.
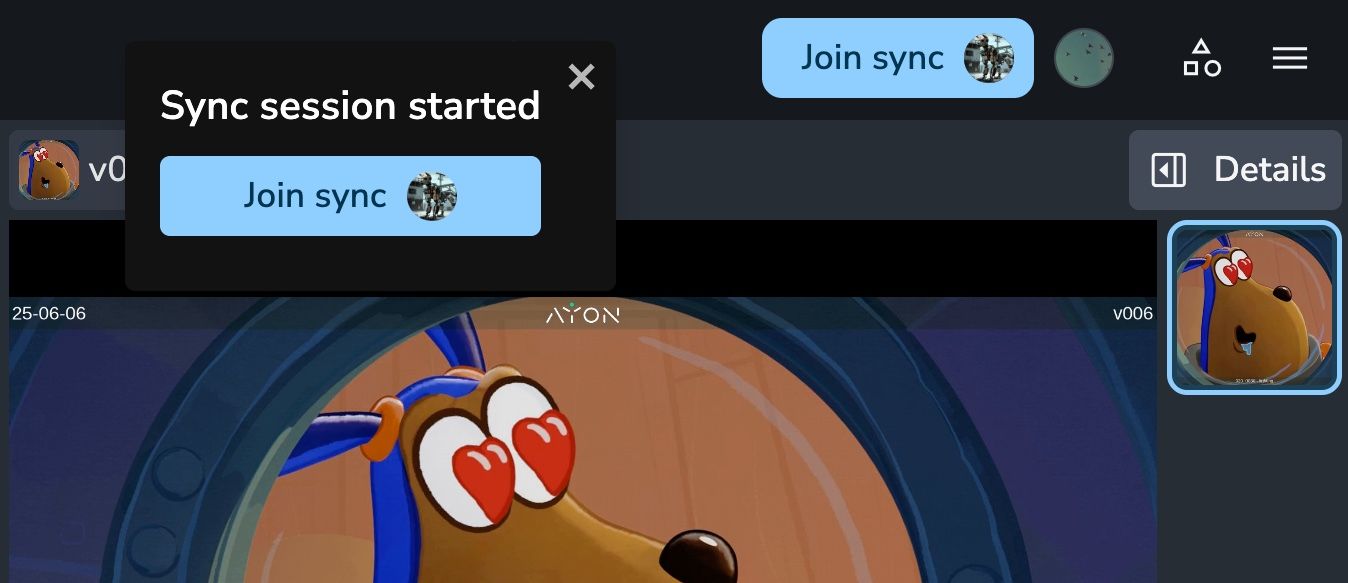
Sync Control Modes
Standard Real-Time Sync: By default, any participant can control navigation. Performing an action (such as scrubbing the timeline) temporarily blocks other users' controls for a brief cooldown period to prevent conflicting inputs. The active user's name displays in the top-right corner.
Presenter Mode: Click Start Presenting to take exclusive control of playlist ordering, timeline scrubbing, frame navigation, and sequence playback for all synced participants.
Participant UI Locking: While synced with a presenter, timeline navigation, scrubbing, and playback controls are locked for participants to prevent session interruption. Personal display settings—such as Theater Mode (
F), Fullscreen view, laser pointer, drawing annotations, and individual panning or zooming—remain fully accessible.
Managing Participants (People Tab)
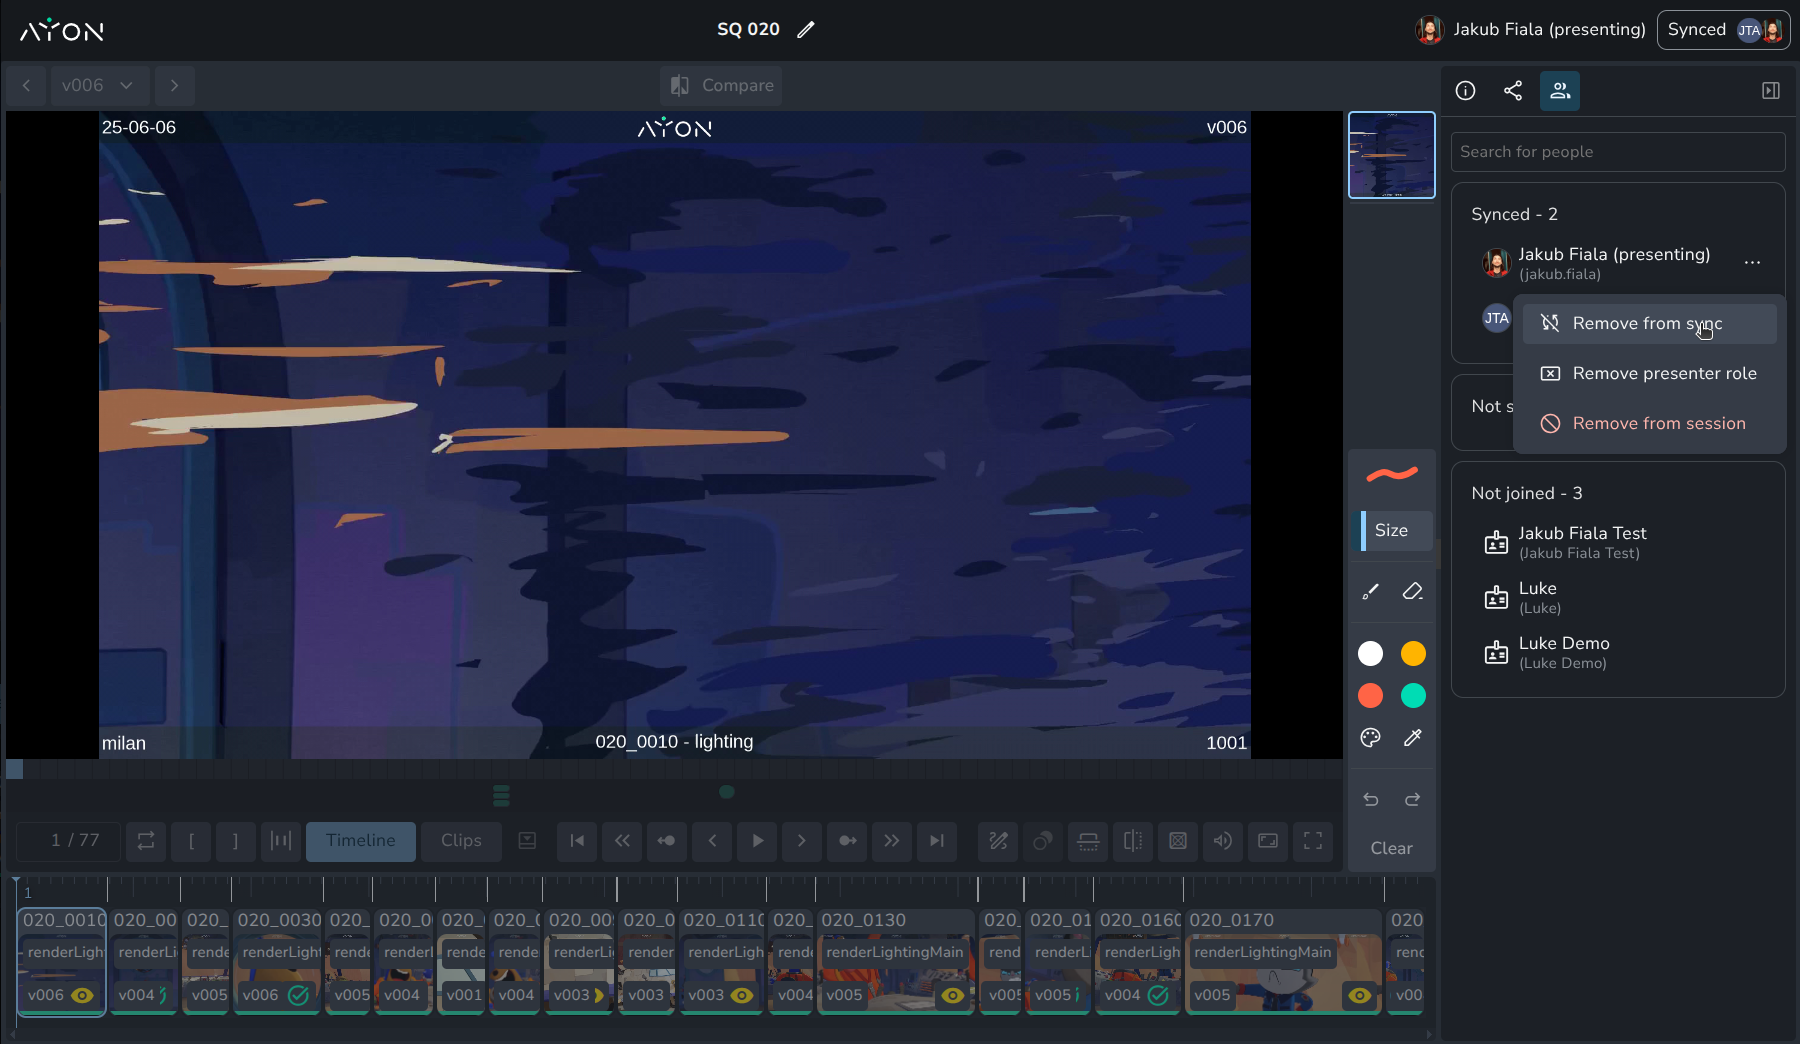
Open the People Tab or hover over the Synced indicator to view active participants, synced users, and guests:
Assign or Remove Presenter: Grant presenter privileges or select Remove presenter role from a user's context menu.
Remove from Sync: Select Remove from sync to disconnect a participant from the live sync session while allowing them to continue reviewing independently.
Remove from Session: Select Remove from session to remove a user or guest completely. Internal team members return to the AYON Review page, and guests are redirected to the main AYON login page.
Timeline Options
The review session features two primary timeline options at the bottom of the screen:
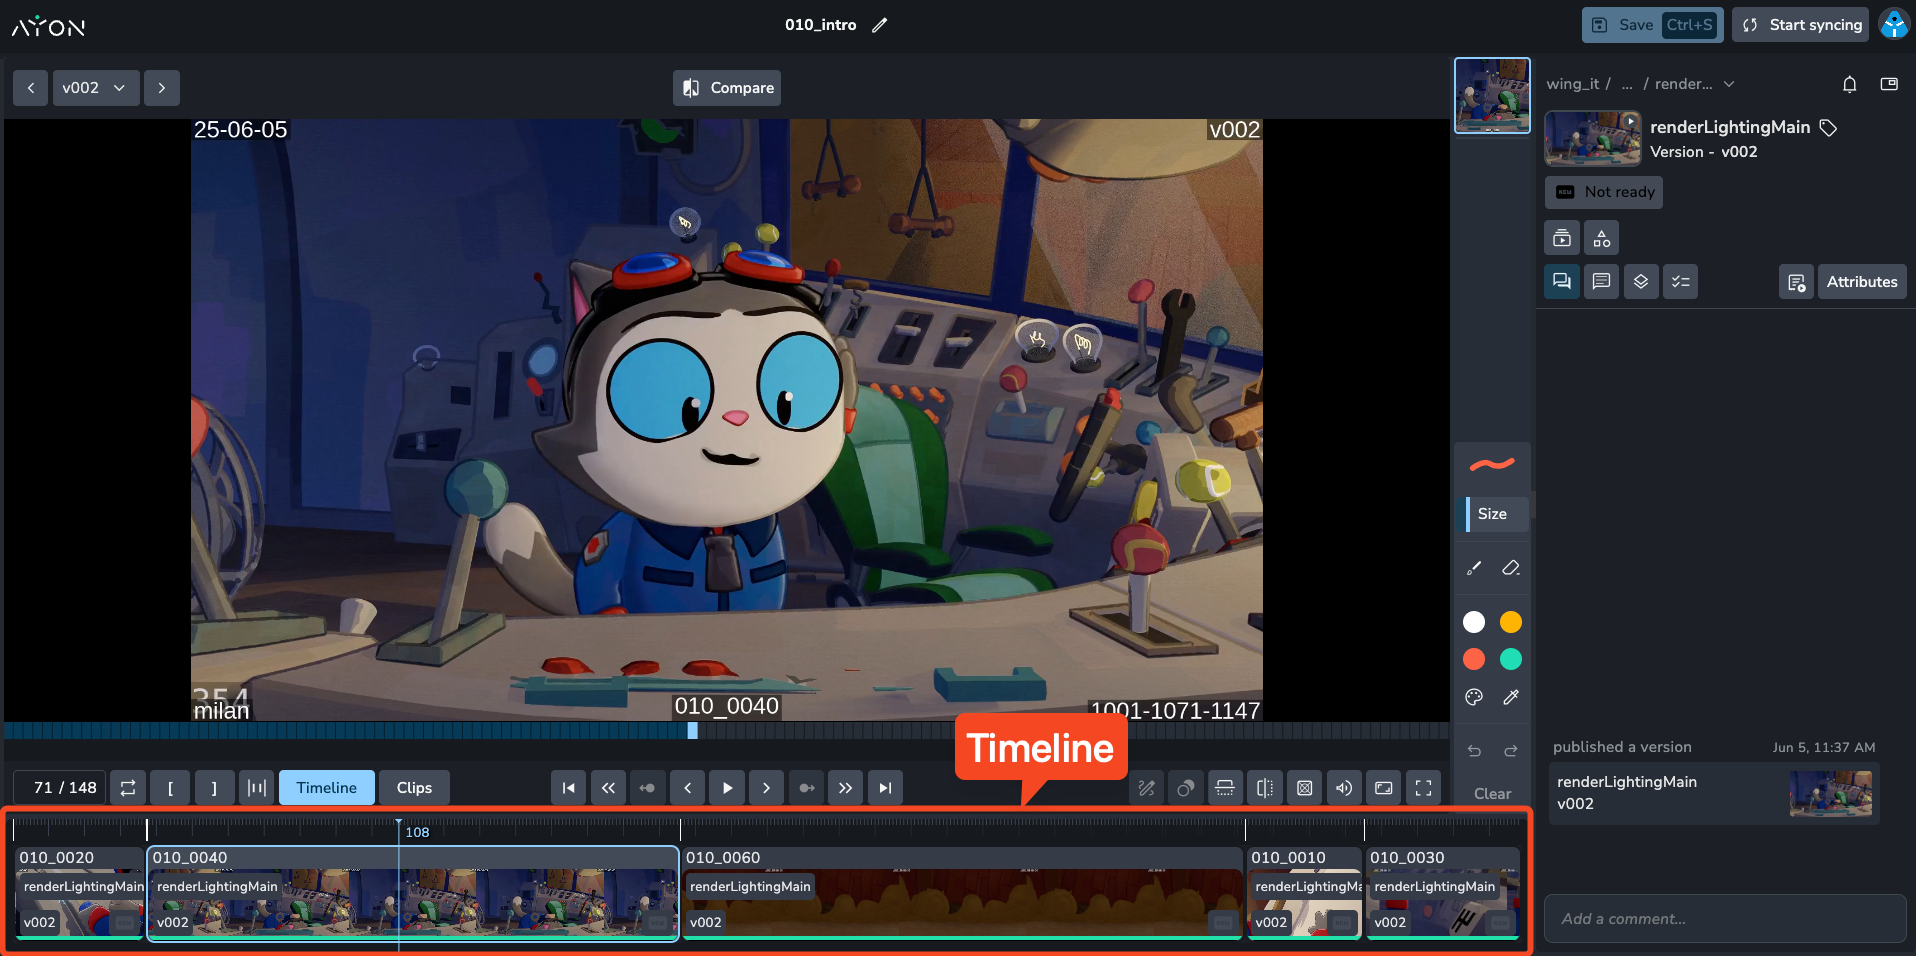
Timeline (Default)
This view shows a full and relative length timeline of all clips together. You can see the exact duration and frame count of each clip.
Navigation: Drag along the timeline to navigate.
Zoom: Zoom in and out to adjust your view.
Selective Clip Playback: Hold
Ctrl/Cmdand click individual clips on the timeline to select and isolate them. During playback, the player automatically skips unselected clips to test non-continuous sequence cuts.
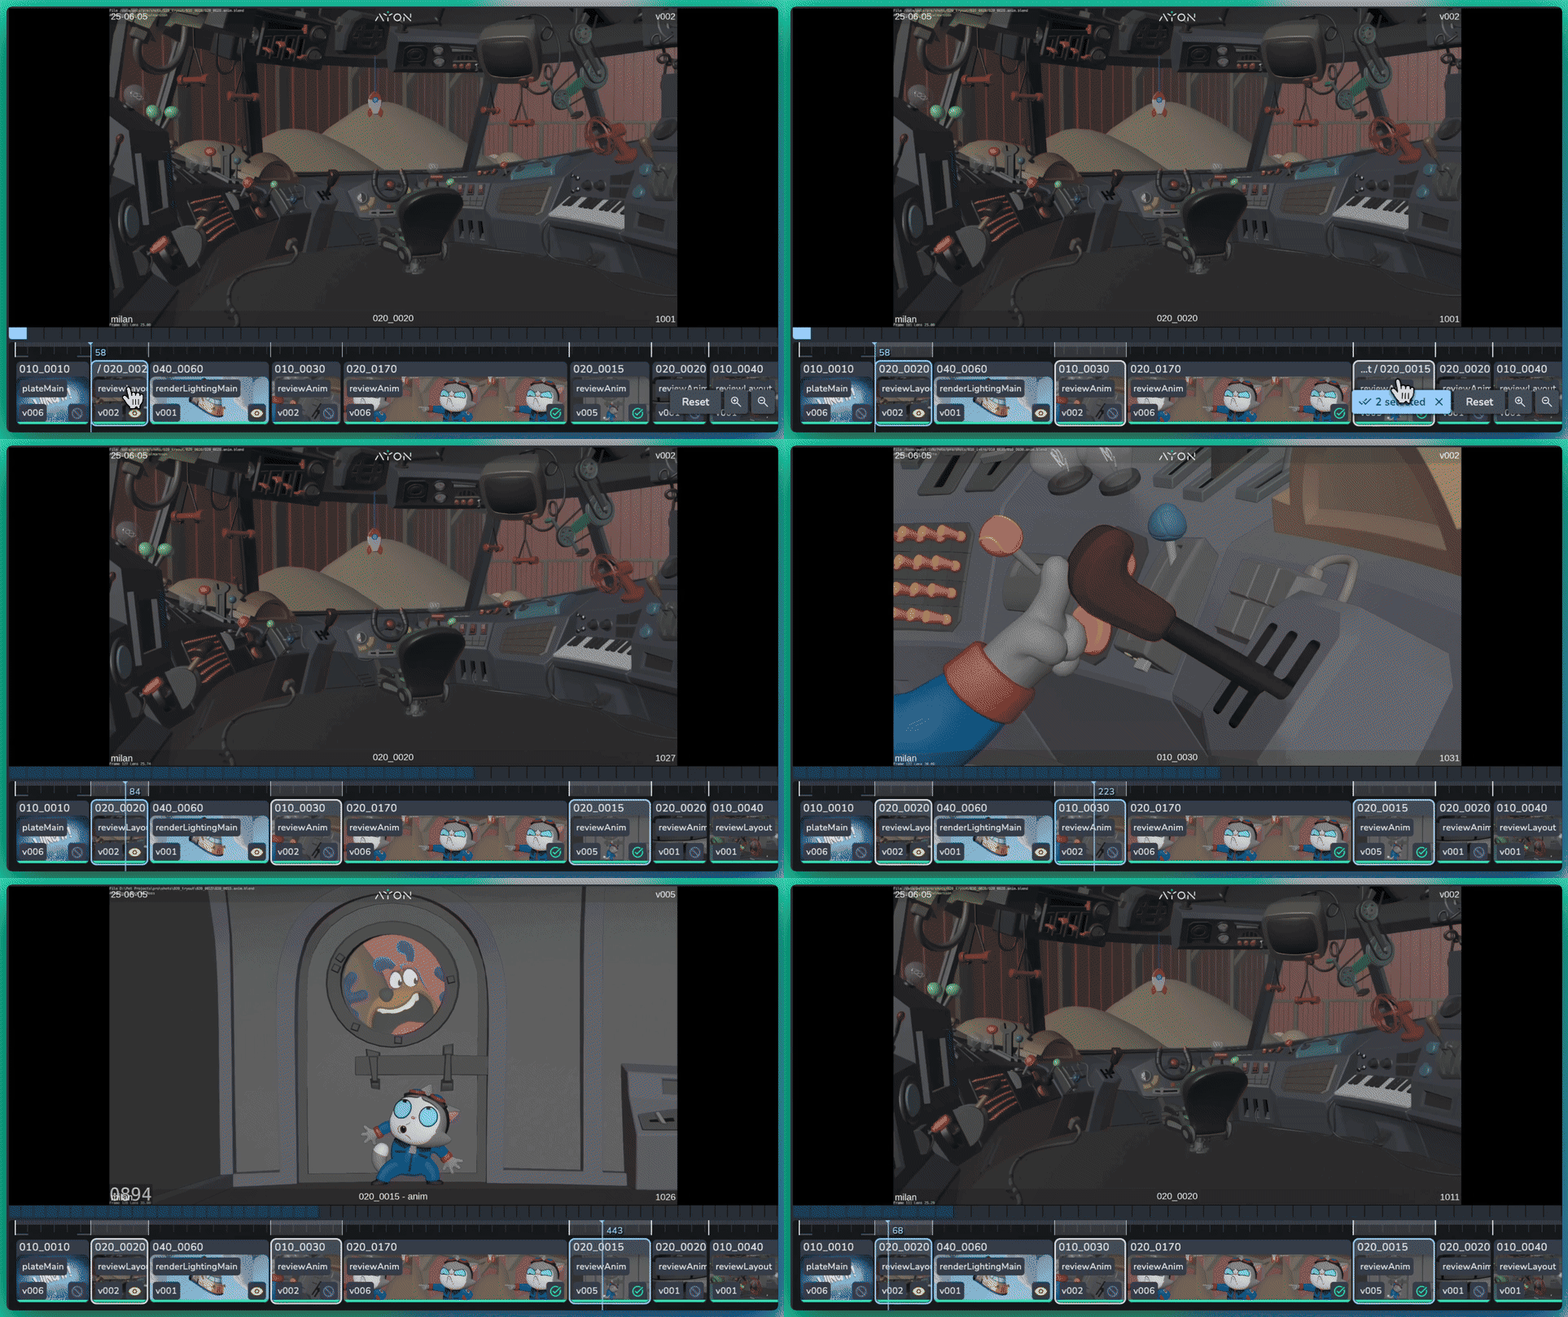
Setting In/Out Points: Press
IorOto set the in and out points directly to the current playhead frame (or click on individual clips). PressingIorOupdates the marker to the playhead frame.Playback speed: Set the playback speed ranging from 0.25x to 2x.
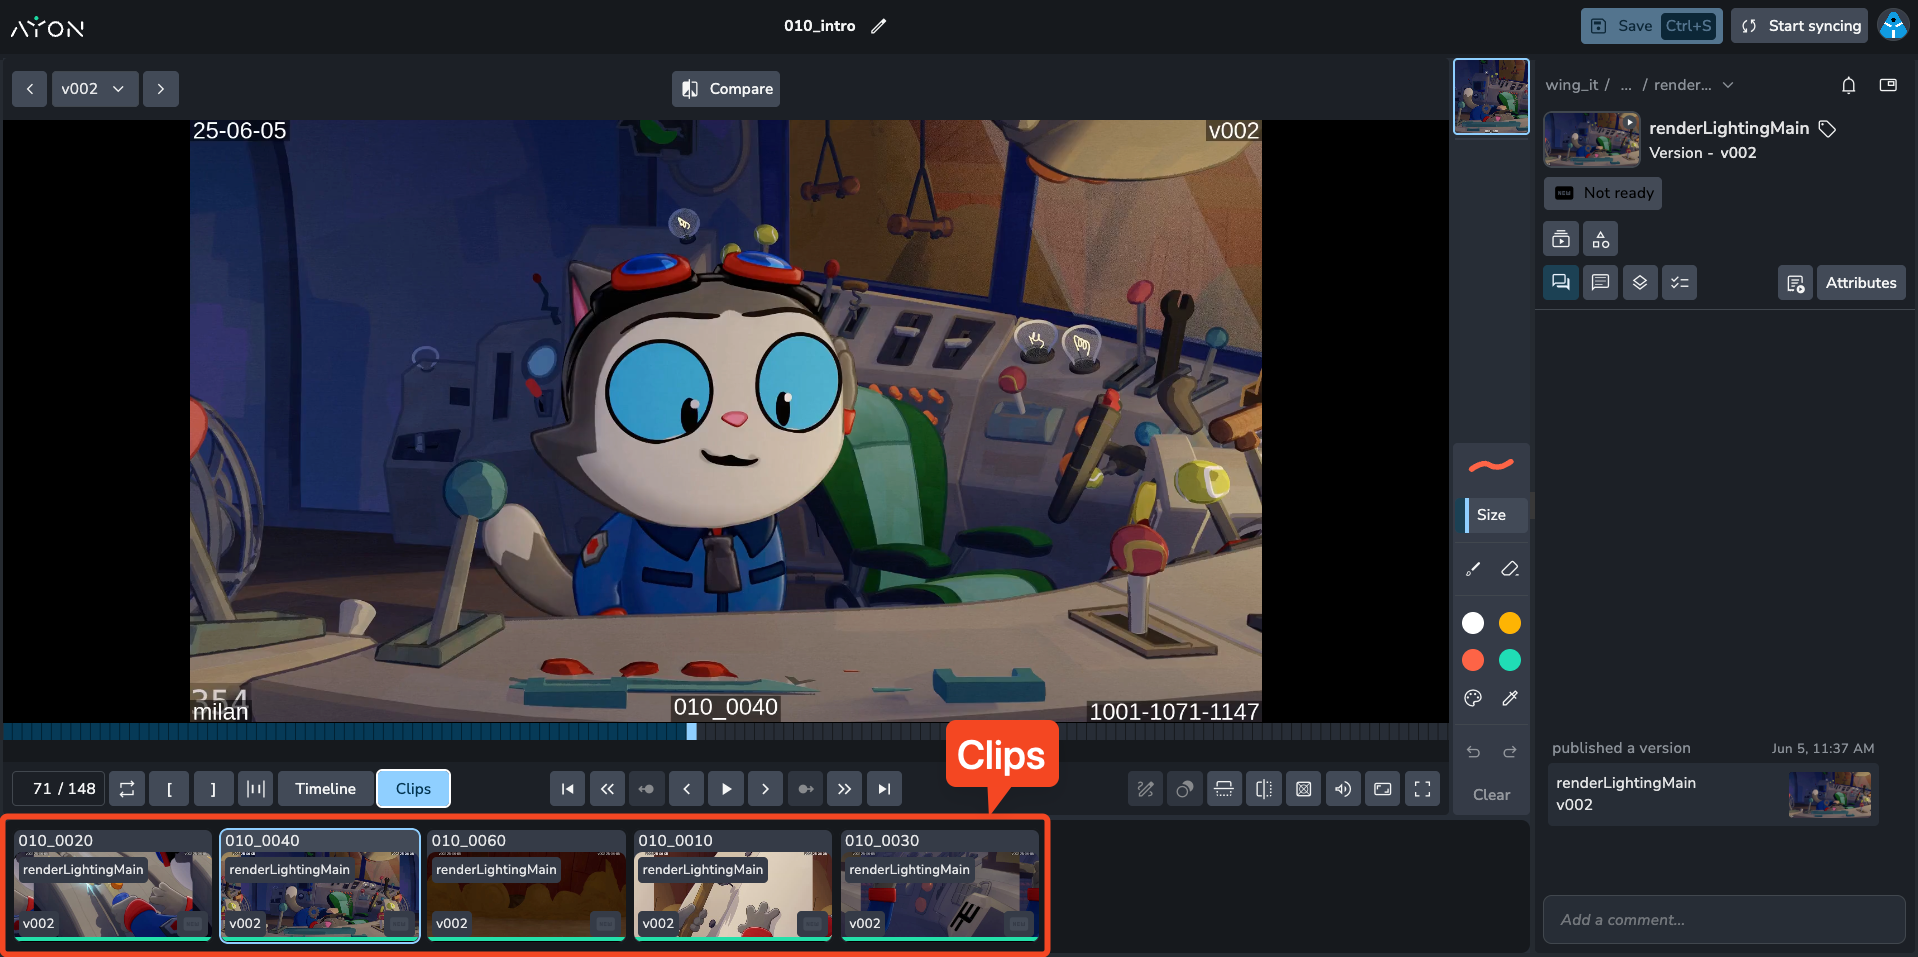
Clips
This view displays each version as an equally sized tile, without frame information. It's ideal for reviewing assets or content where sequential playback is not critical. Clicking a card will take you to that clip in the viewer.
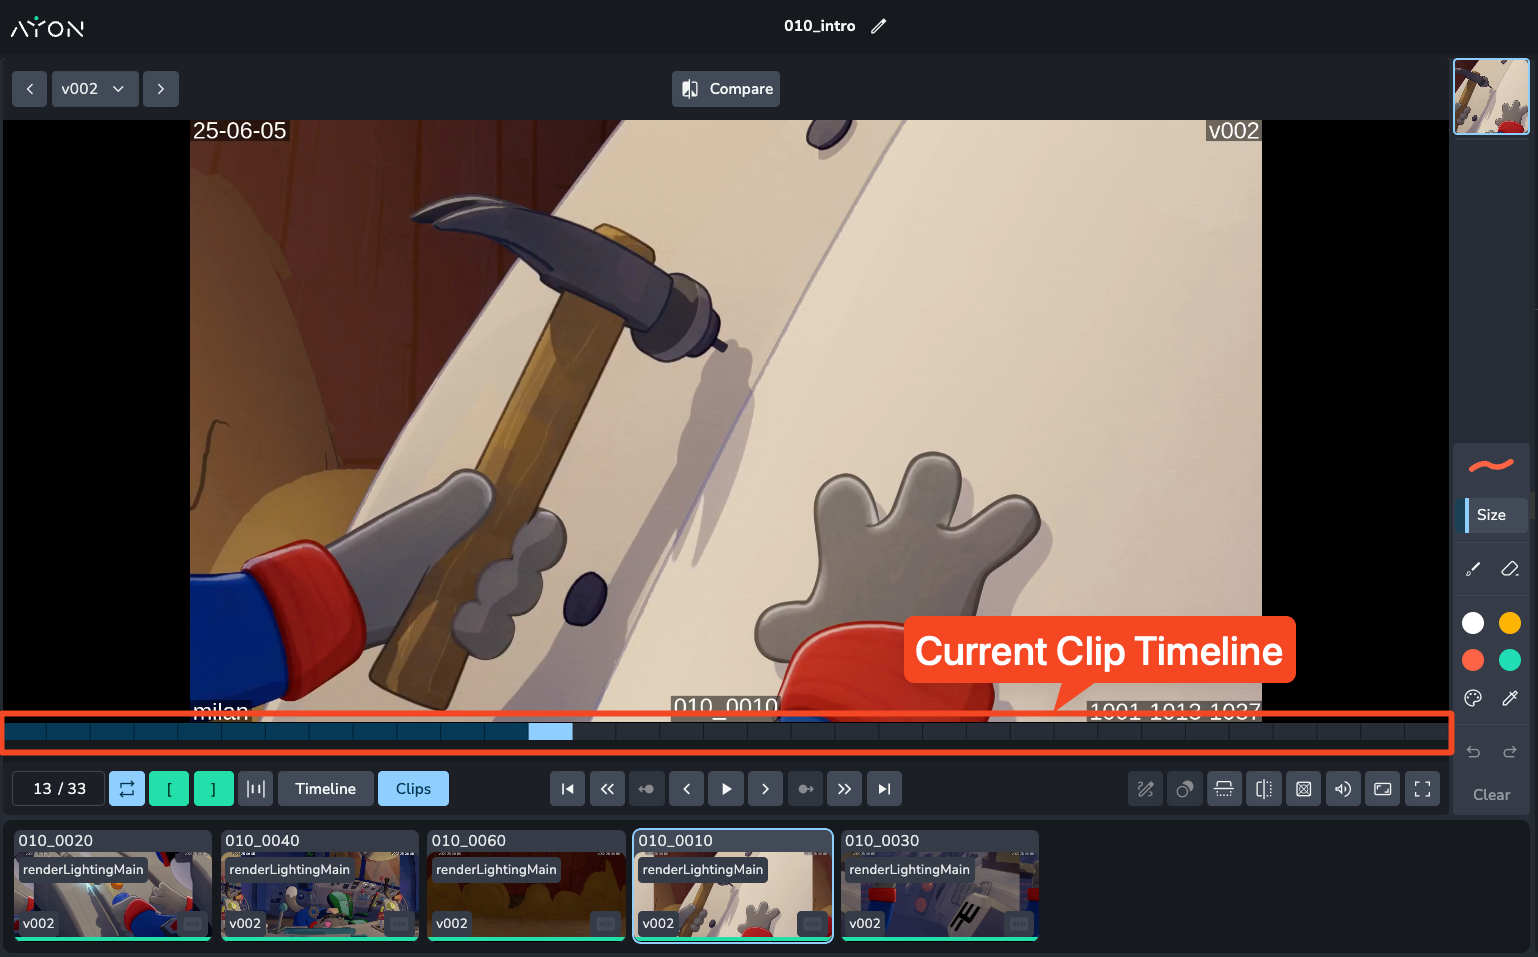
Clip-Specific Timeline
Above the main timeline, there's a smaller timeline dedicated to the currently selected clip. This timeline always represents the length of the individual clip you are watching, allowing you to easily navigate to different frames within that specific clip.
Basic Playback Controls
Play/Pause: Use the Spacebar or K shortcut.
Frame Backward/Forward: Use the Left/Right Arrow keys to move one frame at a time.
Next/Previous Clip: Use Shift + Left/Right Arrow keys to jump between clips in the session.
Go to Start/End: Jump to the very beginning or end of the entire review session.
Volume Control: Adjust clip-level audio volume using the volume slider on the control bar.
Timecode & Frame Offsets: Toggle timecode display formats and custom frame offsets.
Image Playback: Playback automatically pauses when scrubbing or jumping to static image files, with native support for alpha channel transparency.
Viewing Controls
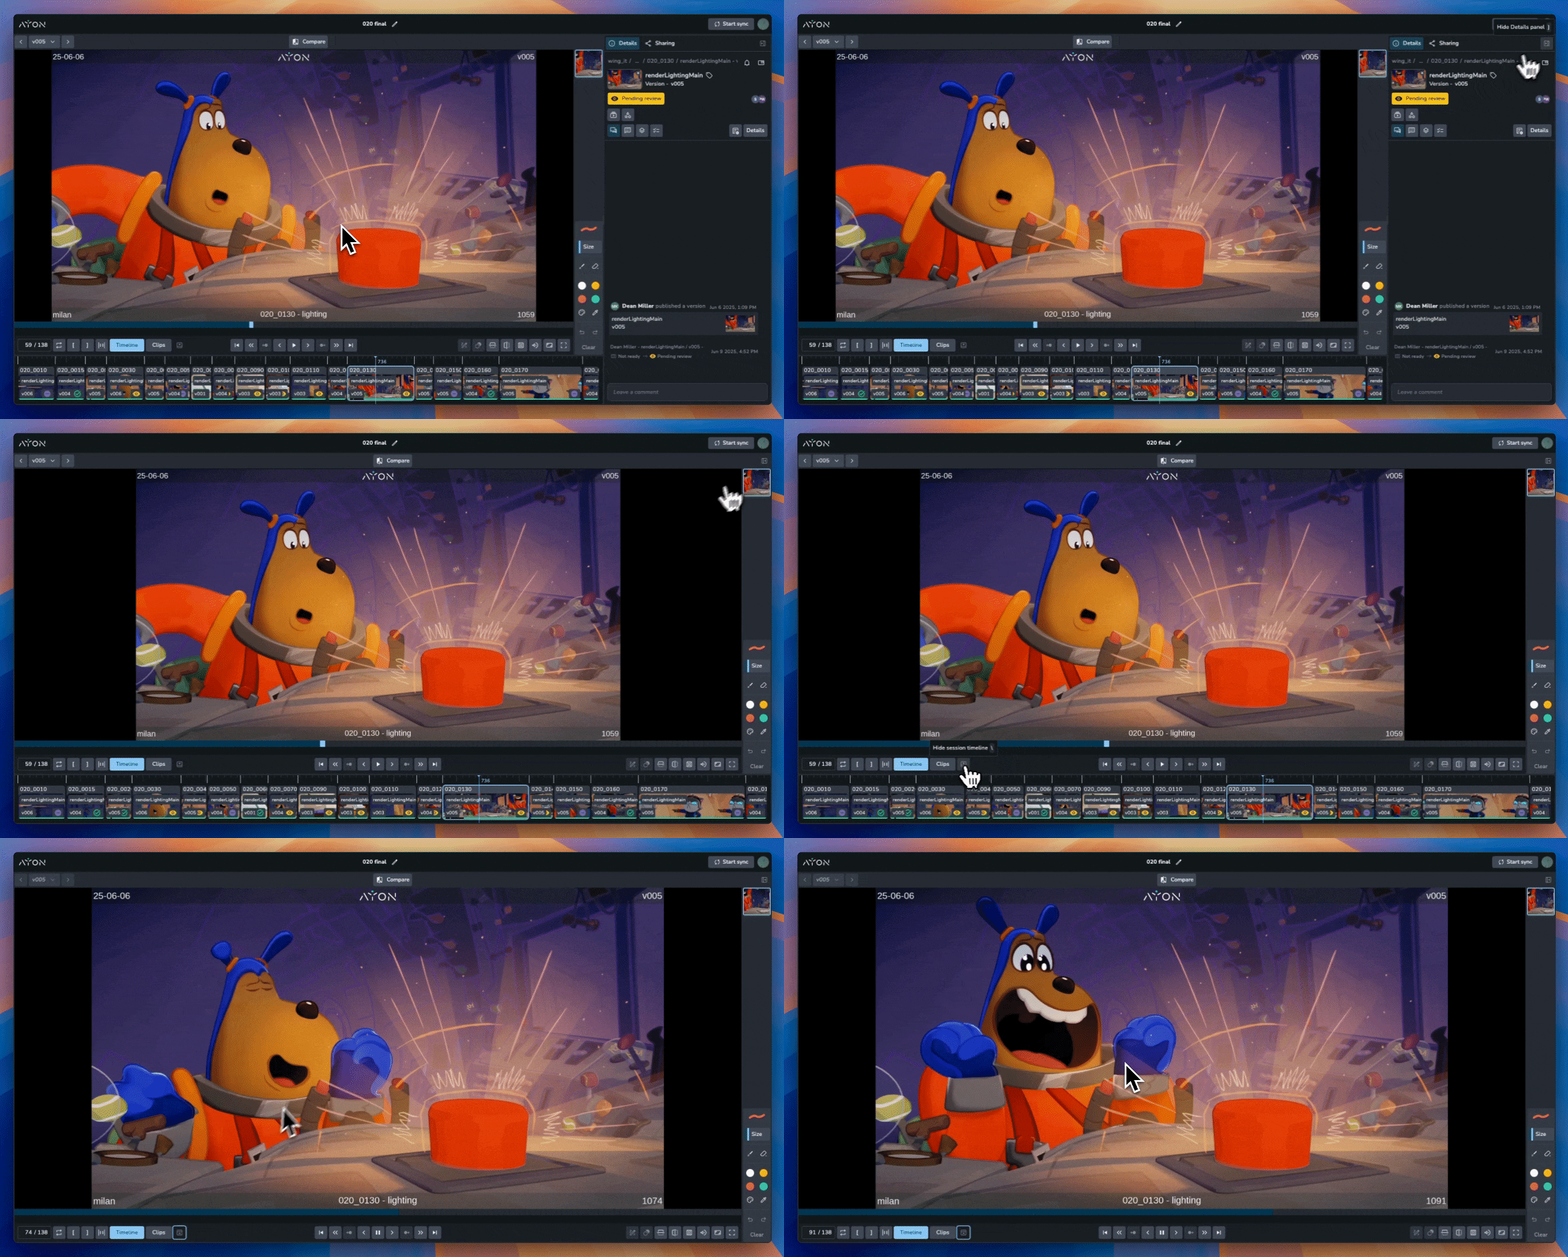
Theater Mode & Fullscreen (F): Press
Fto cycle through Default View / Theater Mode / Fullscreen Mode. Theater mode clears browser clutter for a larger viewing area.Collapsible Panels: Press
,or.to collapse or open side panels independently.Flip Vertical (Y) / Flip Horizontal (X): Vertically or horizontally flip the image.
Guides and Mattes (Shift + G): Toggle overlays and mattes at different aspect ratios.
Mute/Unmute (M): Mute or unmute the audio track.
Pan: Hold Option/Alt and click-drag to pan around the image.
Zoom: Hold Control/Cmd and click-drag to zoom in and out.
Reset View: Double-click to reset the image to its default view.
In and Out Points, Looping and Handles
Setting In/Out Points (I for In, O for Out): Press
IorOto set In and Out markers directly to the current playhead frame.Loop (L): Toggle looping between the defined in and out points.
Handles (H): Press
Hto toggle the visibility of start and end handles.
Playlist Management
The Playlist Panel is your primary tool for navigating and modifying the session content in real-time.
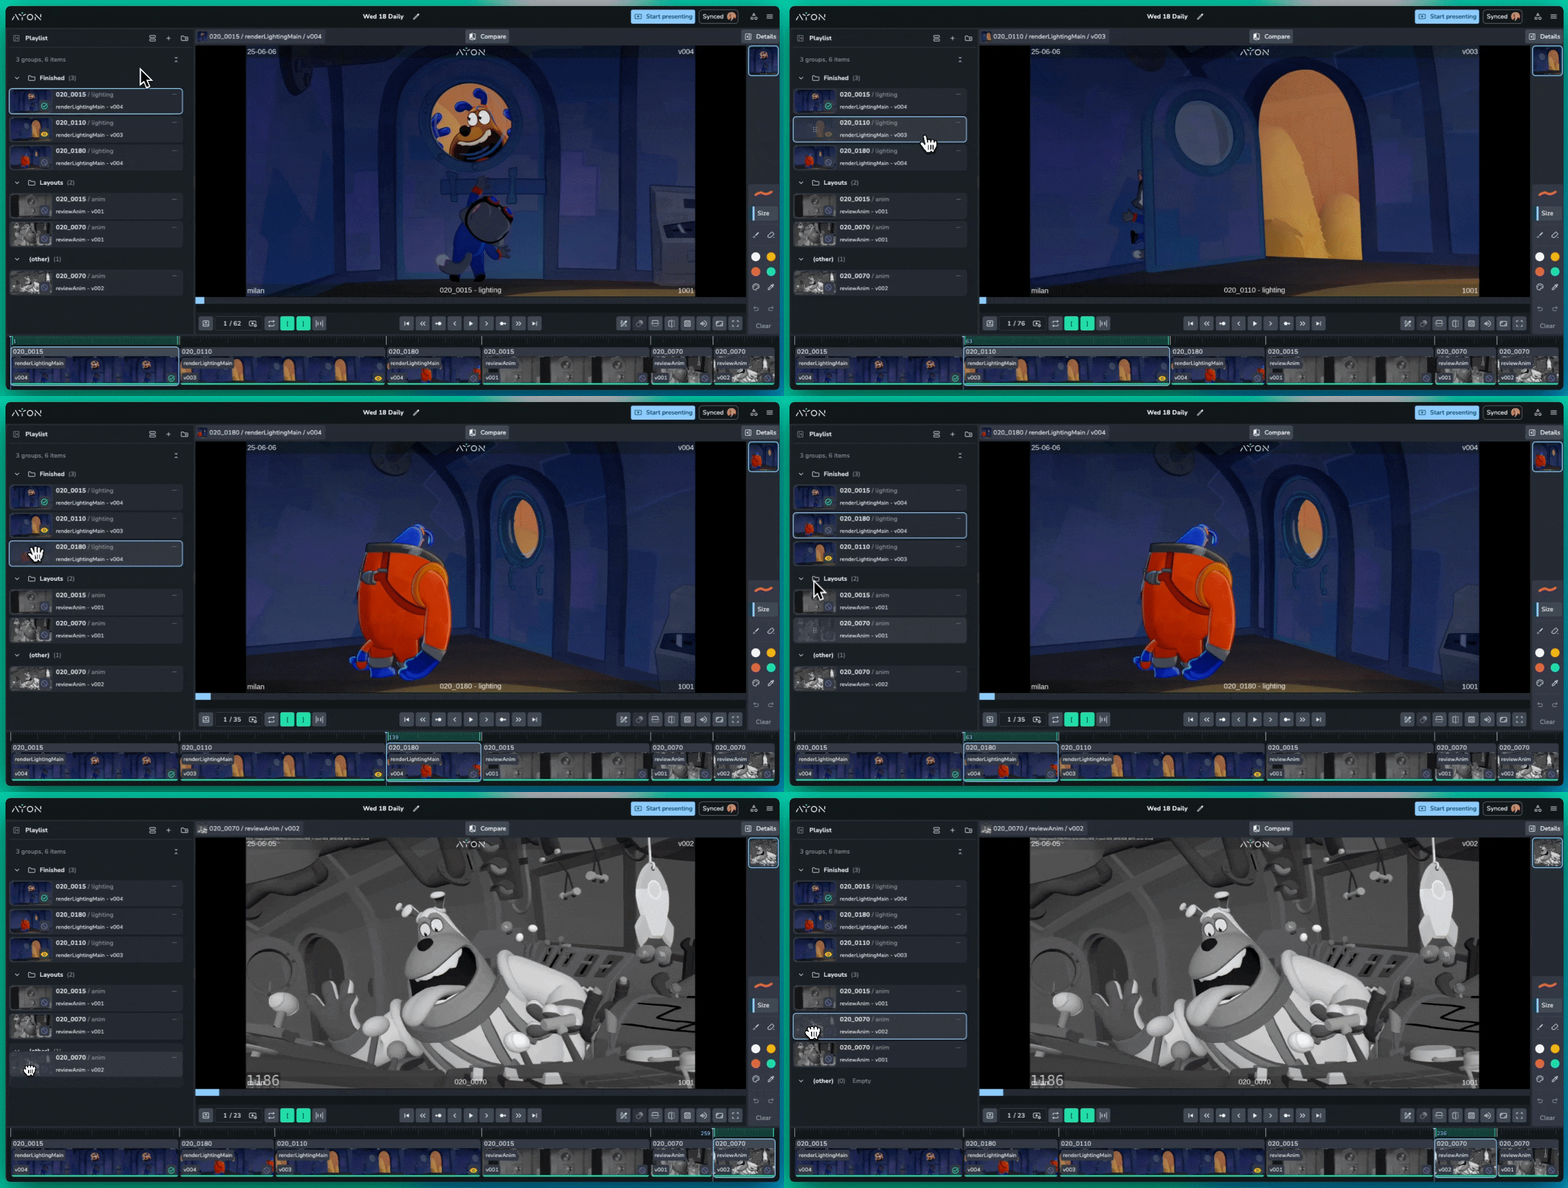
Adding Clips: You can now add new clips to your session directly from the interface. Use the Add Clip button to browse the project and insert additional versions into your sequence without leaving the player.
Version Management: The Replace Version feature (found in the three-dot menu) allows you to swap a clip for a different version of the same product or a completely different asset from any folder in the project.
Reordering: Drag and drop clips by their thumbnails to change the playback order.
Sync & Auto-save: By default, all playlist changes are automatically saved and synced to all participants. You can disable Auto-save in the settings menu (top-right) if you wish to experiment with the order privately.
Organizing with Sections
Sections allow you to break a flat list of clips into meaningful, collapsible groups. This is essential for navigating long review sessions and keeping different departments or sequences focused.
Common Use Cases for Sections:
Asset vs. Shot Review: Separate "Assets" (characters, props, and environments) from "Shots" (animation and lighting) to ensure the team stays focused on one department's specific needs at a time.
Sequence-Based: Organize by sequence (e.g., "Seq_001," "Seq_002") to review the narrative flow of the project.
Priority Levels: Create sections for "High Priority/Finals" and "Lower Priority/WIPs" to ensure the most critical items are addressed first.
Reviewer-Specific: Divide the playlist into sections like "Director's Selects," "VFX Supervisor Notes," or "Client Feedback" to track different stakeholders' requirements.
Click Add Section in the Playlist panel to create a header, then drag and drop clips into it.
Attribute Grouping
Beyond manual sections, you can dynamically group clips based on any available attribute or metadata in the system.
Grouping by Status: When grouped by status (e.g., "Pending," "In Progress," "Approved"), you can drag a clip from one group to another to automatically update the status of that version on the server.
Grouping by Task: Quickly view all clips categorized by their task types, such as "Animation," "Lighting," or "Compositing," to review department output in batches.
Custom Attributes: You can group by any other published attribute—such as Author, Resolution, or Custom Tags—to find patterns or issues across the session content.
Guest Access and Client Review
Share specific review sessions with external stakeholders, clients, or vendors without granting access to the broader project. Guests receive email invitations containing passwordless "magic links."
How to Grant Access and Invite Guests
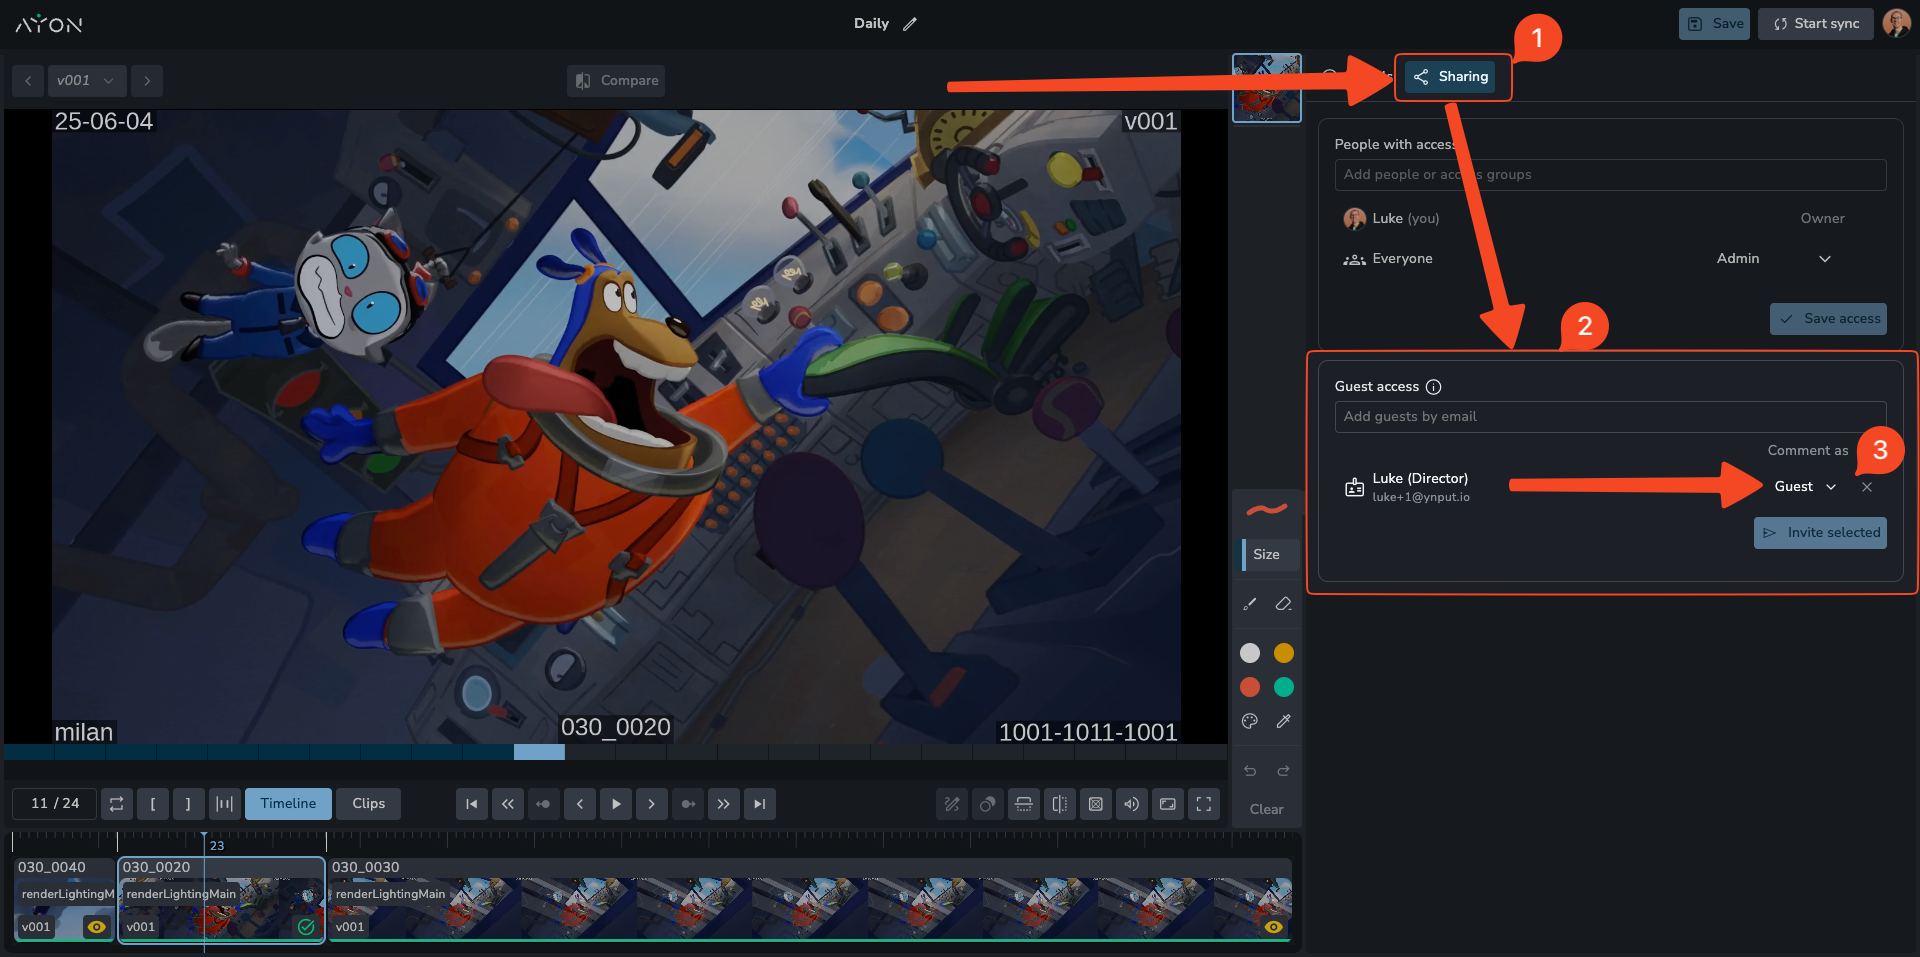
Step 1: Grant Access
In your review session, go to the Share tab.
In the guest management area, you can search for an existing guest (by name or email) or add a new one by typing in their email address.
If you add a new guest, you can give them a name for easier tracking (e.g., "Client Director").
Assign a Comment Category: This is a mandatory step if you want the guest to be able to leave comments. The category you select (e.g., "Client") controls their commenting ability and visibility. See the "Guest Commenting" section below for critical details.
Once added to the list, the guest now has access to the review session, but they have not been notified.
Guests are saved at the project level. The next time you invite the same email address to a review in that project, AYON will remember their name.
Step 2: Send the Invite
The guest will not receive an email until you manually send the invitation.
Select the guest (or guests) from the list.
Click the Invite button.
This will send the "magic link" email to the selected guests. You can re-send this email multiple times if the guest loses the original or needs a new link.
Revoking Access
You can revoke a guest's access at any time.
Simply select the guest from the list and remove them.
Once removed, they will no longer be able to access the review session, even if they have a previous invite link.
The Guest Experience: Login & Access
Secure, Passwordless Login
Guests receive an email with a unique, one-time "magic link."
Clicking this link automatically logs them into the AYON review session. No password is required.
For security, this link expires after one use. If a guest's session ends, they can use the original link again, but they will be prompted to receive a new email link to log back in.
This system prevents unauthorized link or password sharing.
Scoped Access
Once logged in, the guest has a highly restricted view. They can only access the specific review session they were invited to and its associated versions. They cannot browse any other part of your project.
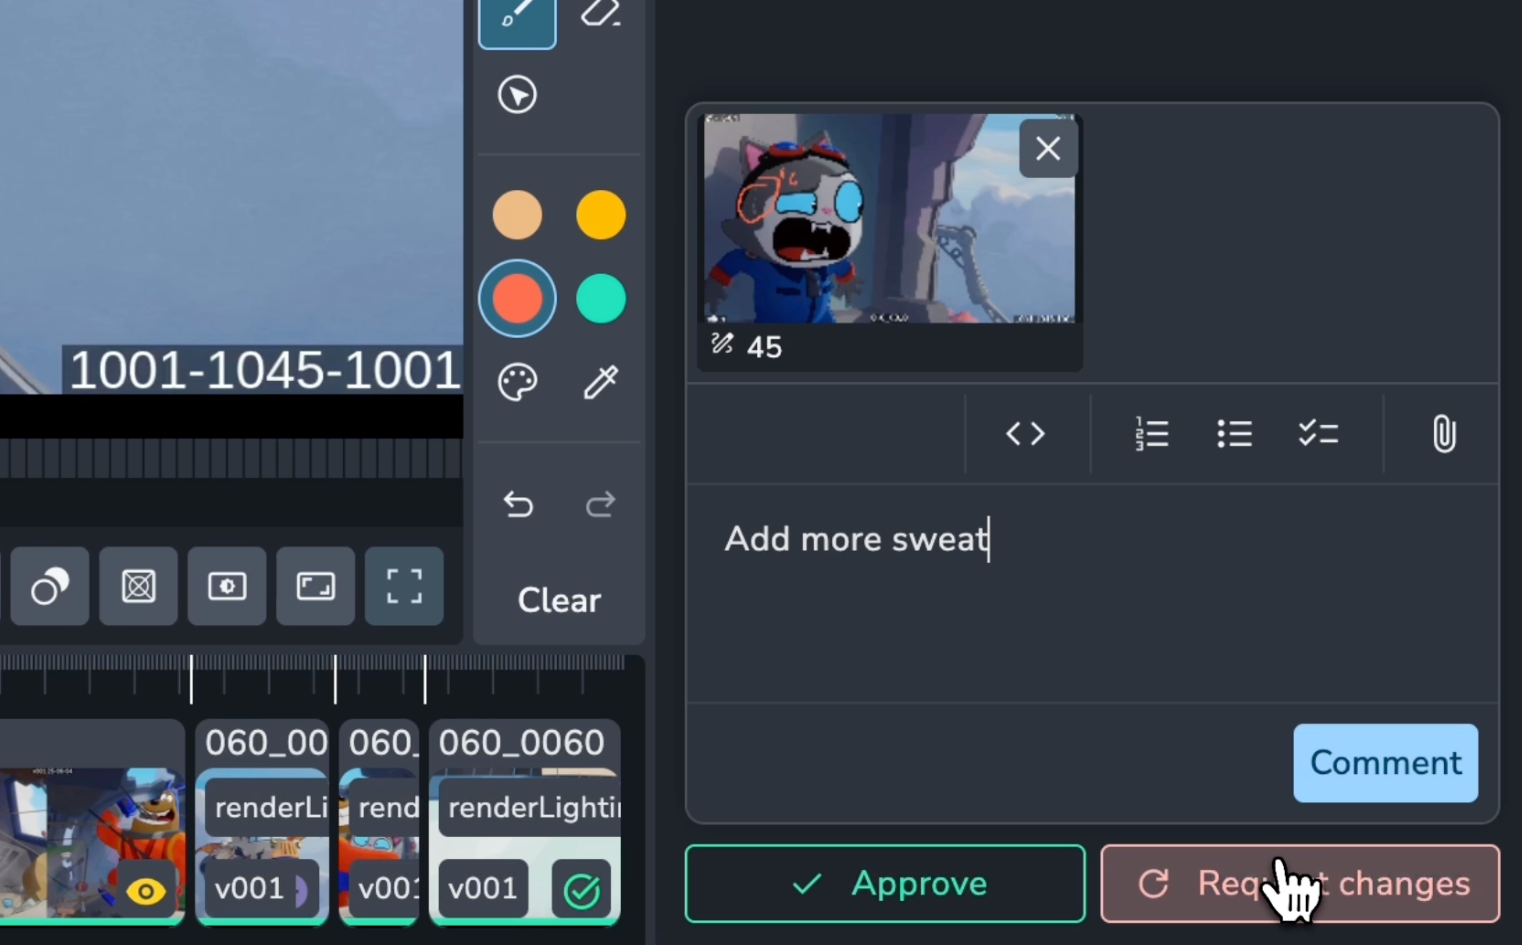
Guest Approvals & Request Changes
Guests can formally submit an Approve status or Request Changes on reviewed versions:
Submissions post directly to the version's activity feed on the server.
Review submissions trigger instant notifications to internal leads and update version status history.
Guest feedback remains scoped strictly to their assigned comment category.
Guest Commenting and Visibility
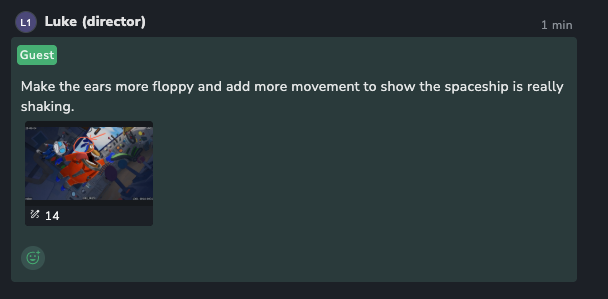
A guest's ability to comment is controlled entirely by Comment Categories.
Enabling Comments: To allow a guest to comment, you must assign them a Comment Category (like "Client") with Creator permissions when you grant them access. If no category is assigned, the comment box will be disabled, and they will have view-only access.
Locked Category: Guests are locked to their single assigned category. When they type a comment, it is automatically tagged with that category. They cannot see or select any of your other internal categories.
Filtered Comment View: A guest's view of the activity feed is filtered for security and clarity:
They can only see comments made on the versions within that specific review session.
Of those comments, they can only see comments that match the category they were assigned (e.g., "Client") or comments with no category ("Standard").
This automatically hides all historical internal discussion.
This system allows for granular control. For example, you can invite a "Client" and a "Vendor" to the same review session. By assigning them different categories, they can both leave notes without seeing each other's private feedback, while your internal team can see everything.
Internal Access Control
By default, Review Sessions are visible to project members. You can further restrict or manage who on your internal team can access a specific review session.
Annotations, Laser Pointer, and Comments
The review addon provides robust tools for drawing on images and leaving feedback.
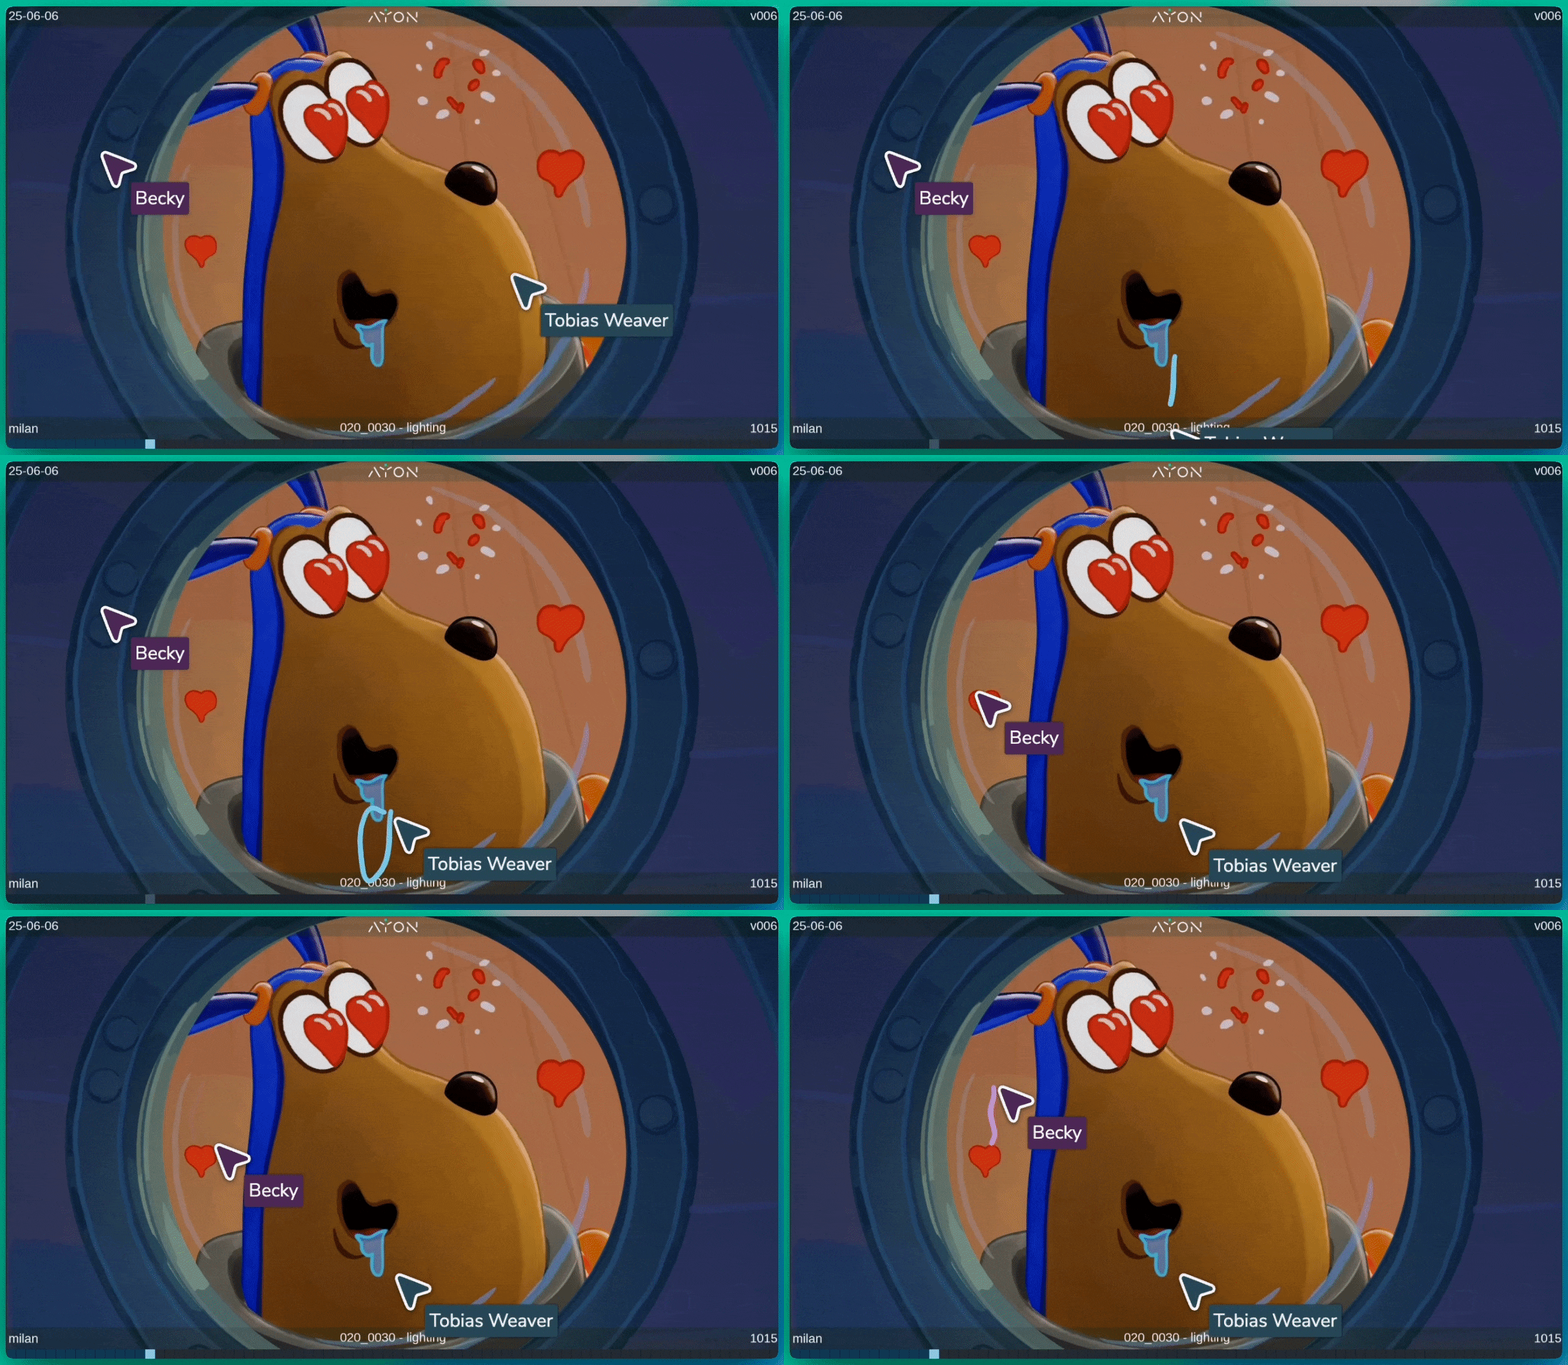
Laser Pointer Tool
The Laser Pointer tool allows participants to broadcast their cursor position in real time during synced sessions and draw temporary shapes on screen. Laser pointer brush colors automatically map to individual user profile colors.
Drawing and Markup Tools
Brush Tool
B: Draw directly on any frame with tablet and stylus pressure sensitivity for smooth, responsive input.Geometric Shapes: Highlight details and frame areas of interest using dedicated shape tools: Arrow, Circle, Square, and Line.

Opacity Slider: Adjust stroke transparency to overlay notes without obscuring underlying media.
Pencil Hardness Slider: Fine-tune edge hardness to switch between crisp callouts and soft marks.
Color Picker
Q: Select colors directly from the image or preset palette.Brush Size
[and]: Decrease or increase brush size using shortcut keys.Eraser: Hold right-click while using the brush tool to temporarily switch to the eraser.
Held Frame Annotations
When you create an annotation, a small green dot will appear underneath the clip timeline.
Single Frame Annotation: Click and drag this dot to different frames to reposition a single-frame annotation.
Held Frame Annotation: If you click and drag slightly outside the handles of the green dot, you can create a held frame annotation. This allows your annotation to be visible over a range of frames. You can set the start and end frames for the held annotation.
Comments and Annotations Relationship
Starting a Comment: When you create an annotation (or held annotation), a comment is started. The comment is not fully created until you submit it, with or without additional text. The annotation image along with its associated frame range (e.g., a single frame or a range like 10-15 frames for a held annotation) will be attached.
Multiple Annotations per Comment: A single comment can have multiple annotations linked to it, even on different frames or the same frame. This allows for comprehensive feedback within a single comment.
Multiple Comments: You can create multiple comments, each with its own set of annotations across various frames.
Viewing Annotations
Play Annotation (Play Icon): Each attached annotation on a comment will have a play icon. Clicking this will play the annotation within the viewer.
Expand Button: An "Expand" button will show you a rasterized image of the annotation on top of the comment.
Download Annotation: You will always have access to the annotation image as a downloadable file.
Visibility (Default): By default, annotations are not visible during playback.
Show All Annotations (/): To automatically display all annotations from all comments during playback, use the forward slash (/) shortcut or click the corresponding button.
Viewing Specific Annotations: To see a specific annotation, either click the green area under the timeline associated with that annotation or click on the comment itself, which will highlight the annotation.
Navigate Annotations: Buttons are available at the bottom of the viewer to jump to the next/previous annotation in the timeline.
Comparison Tools
Since each clip in a review session is a version, the addon offers powerful comparison capabilities to see how different versions stack up.
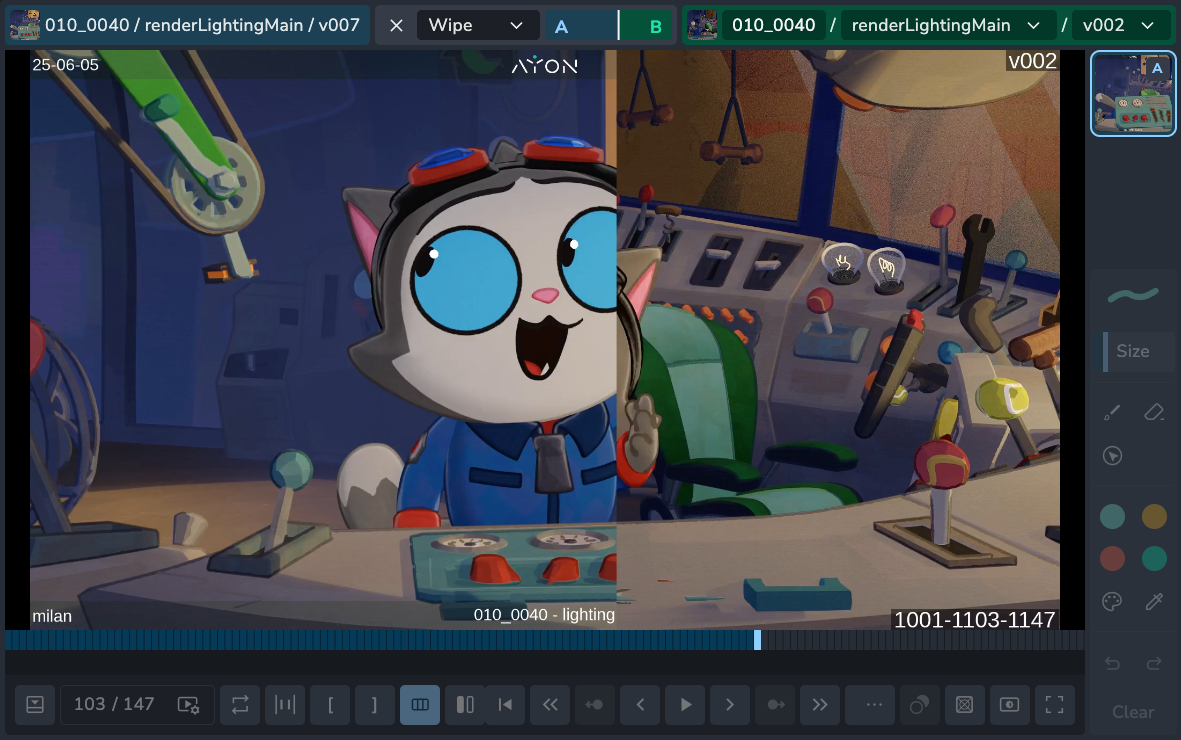
Accessing Comparison: Click the "Compare" button at the top of the viewer or use the C shortcut.
Cross-Context Comparison: Clips can be compared against any version from any folder or product in the project.
Flexible Workflows: This enables comparing a lighting render against original concept art, or checking continuity between two different shots side-by-side.
Comparison Modes
Swap: Replaces the current version with the comparison version.
Overlay: Overlays the comparison version on top of the current one, allowing you to fade between them using an opacity slider.
Split: This mode allows you to view a portion of one version and another of the other, providing a direct side-by-side comparison within a single view.
Side-by-Side: Shows both versions completely separate, next to each other.
Multiple Comparisons
You can have multiple comparisons active on different clips simultaneously within the same review session. This allows for complex comparative analysis across various parts of your content.
Review Session Name and Editing
At the very top of the review session, you'll see its name.
Edit Button: An "Edit" button is available next to the name, allowing you to update and save the review session's name.
Saving Transient Sessions: If you started a temporary (transient) review session, giving it a name and saving it through this interface will convert it into a permanent review session that you can access later.
Managing syncing participants
Open the People tab to see a list of users in the sync, as well as those who joined without syncing, and the remaining guests.
Removing a user from the sync: click on the three dot menu button to the right of the user’s name and choose Remove from sync.
Removing the presenter role: click on the three dot menu next to the user with the “(presenting)” indicator. Choose Remove presenter role.
Removing the user from the session altogether: If you need to remove a user completely, choose the Remove from session option. The user will automatically leave the session and return to the review page in AYON. Guests will be redirected to the AYON front page.
Managing Review Sessions
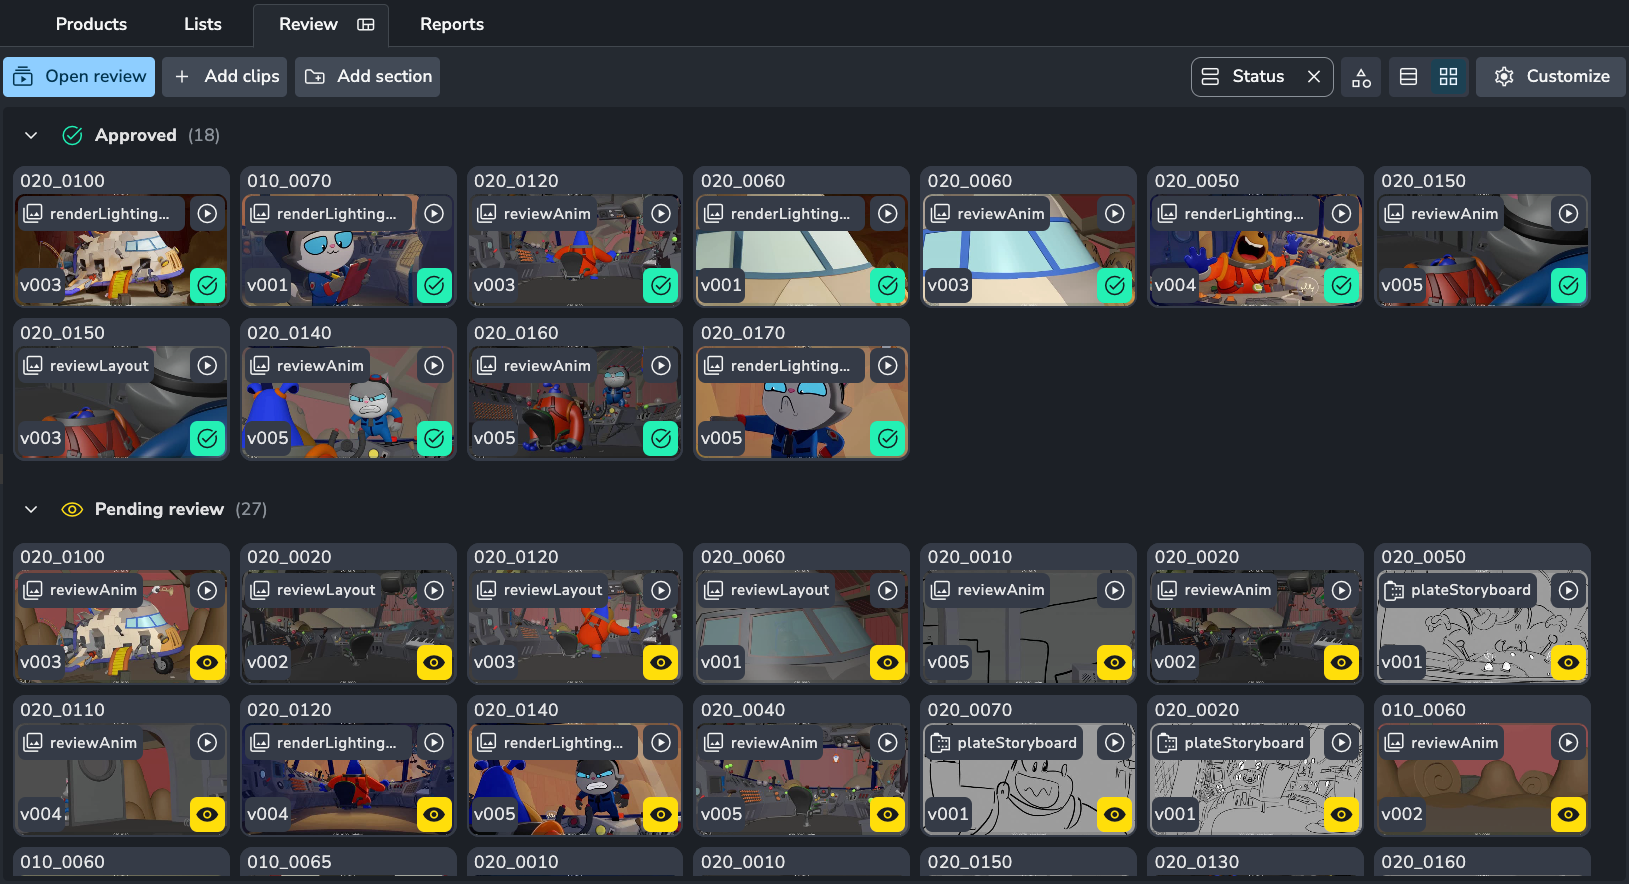
Managing Sessions in the Review Tab
The Review page is a dedicated space for managing your review sessions in detail. This interface allows you to not only organize your sessions using folders but also to interact with the content within them.
From the Review tab, you can perform several key actions:
View Versions: Expand a review session to see all the versions it contains.
Add and Reorder: Easily add new versions to a session or reorder existing ones to fit your presentation needs.
Rename and Edit: Rename review sessions for clarity and see detailed information about each one.
Organize with Folders: Just like with lists, you can use folders to group and manage your review sessions, keeping your workspace tidy and efficient.
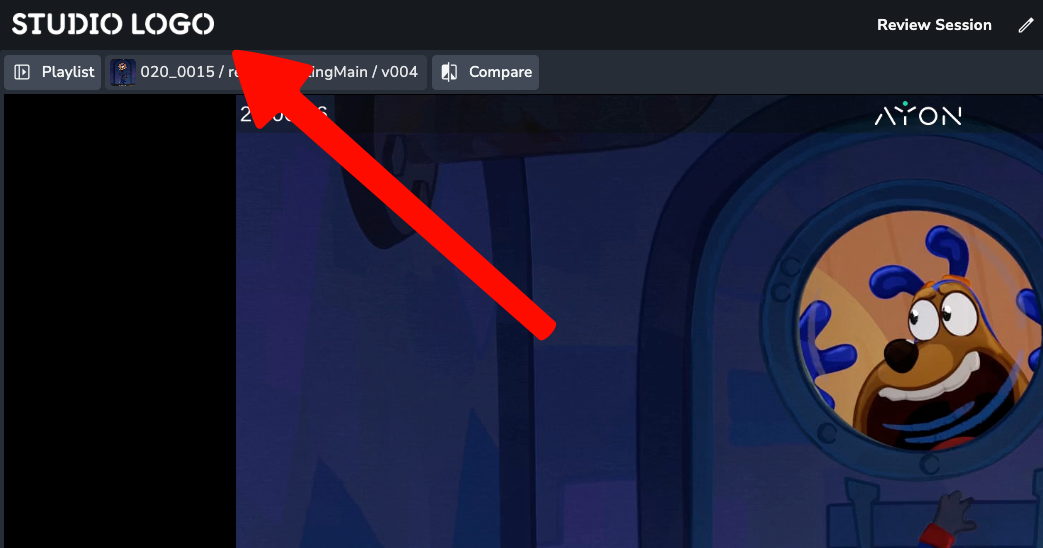
🎨 Studio Branding Logo
You can now display your custom studio logo directly in the top-left corner during review sessions for cleaner, consistent studio branding.
AYON Review Sessions will only work over HTTPS connections and will not work over insecure HTTP connections. If you experience issues loading the addon, please check the protocol of your AYON URL.
Visuals in this article “review sessions” are from "Wing It!" by Blender Studio (CC BY 4.0) – studio.blender.org.
Was this helpful?
Still need help? Ask the team