Planner - Plan (Bookings)
The Plan tab is the studio-level timeline where you book resources, manage capacity and check workload.
Last updated About 5 hours ago
The Planner is a premium addon included with the Studio subscription, or as an extra with a Pro subscription.
For an introduction to the Planner, see Planner - Addon Overview. To set up the people, rooms and other resources you book, see Planner - Resources. To turn bookings into dated production tasks, see Planner - Schedule Tasks.
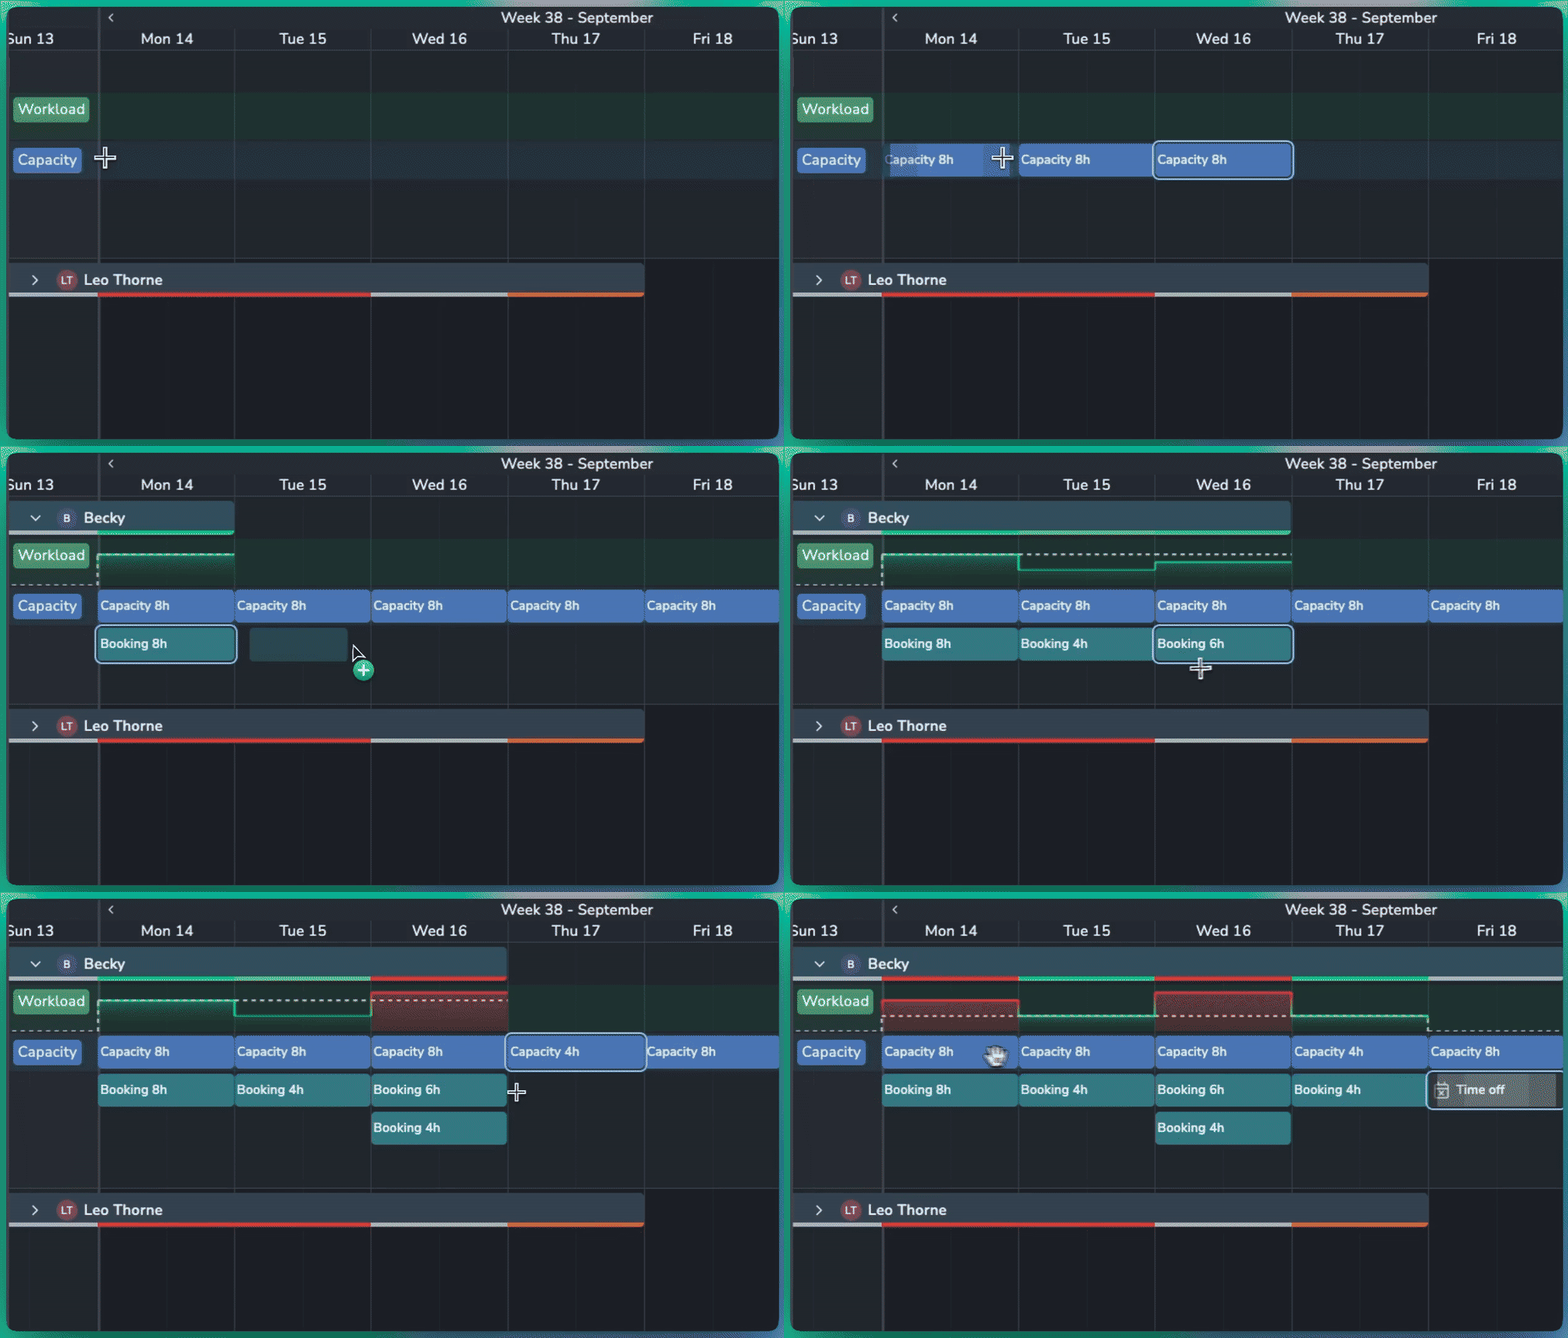
Event types
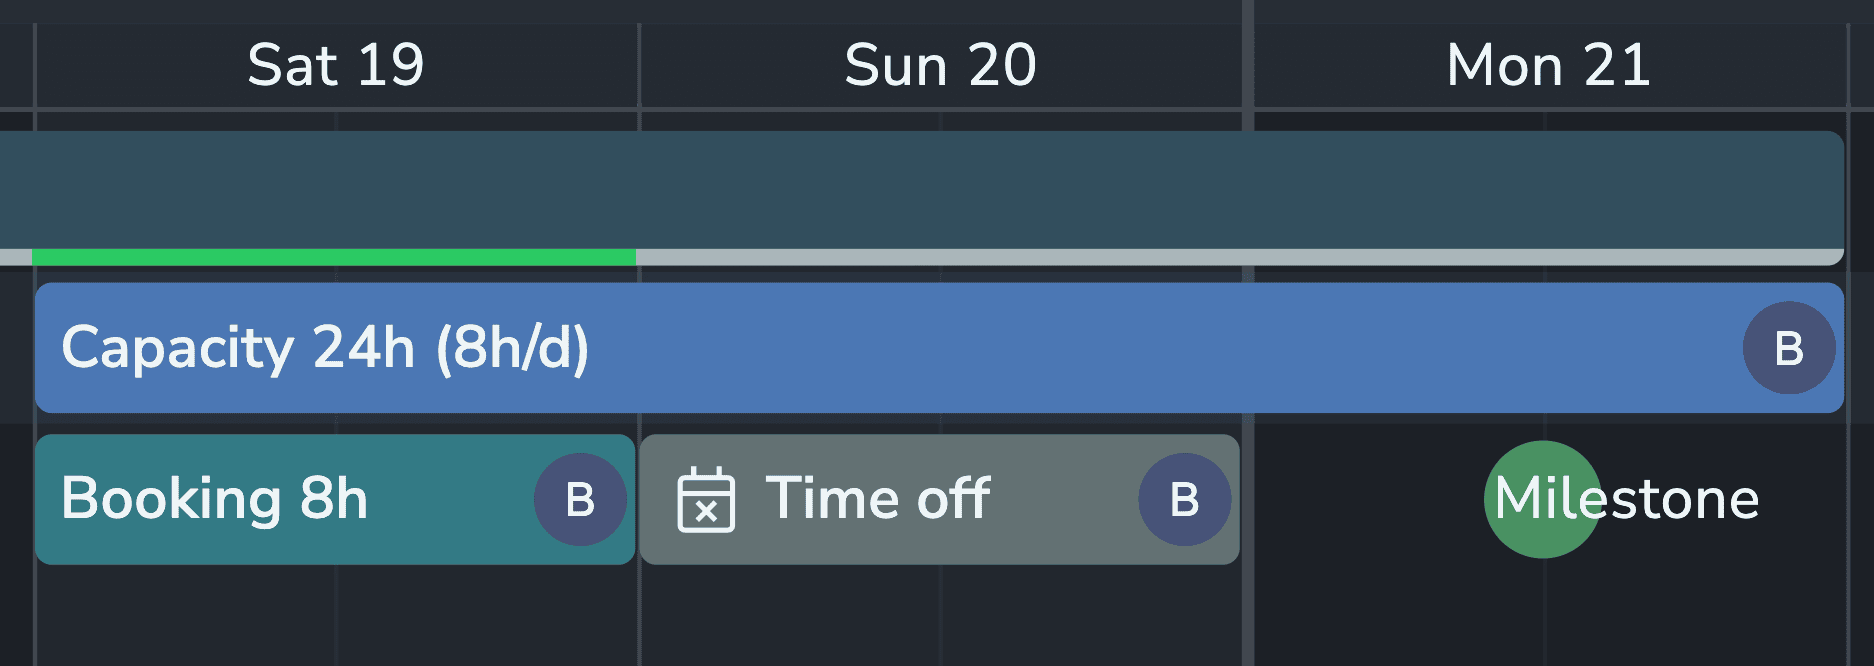
Events on the Plan timeline have one of four types:
Capacity: The hours a resource is available to work, such as a 9 to 5 working day.
Booking: Allocates resources to work and uses up their capacity.
Time Off: Removes all of a resource's capacity for the period, and highlights any clashing bookings.
Milestone: Marks a key date, such as a delivery or client review.
Bookings
A booking allocates one or more resources to a block of time. One booking can hold an artist, their workstation and their software licence together, so they move as one.
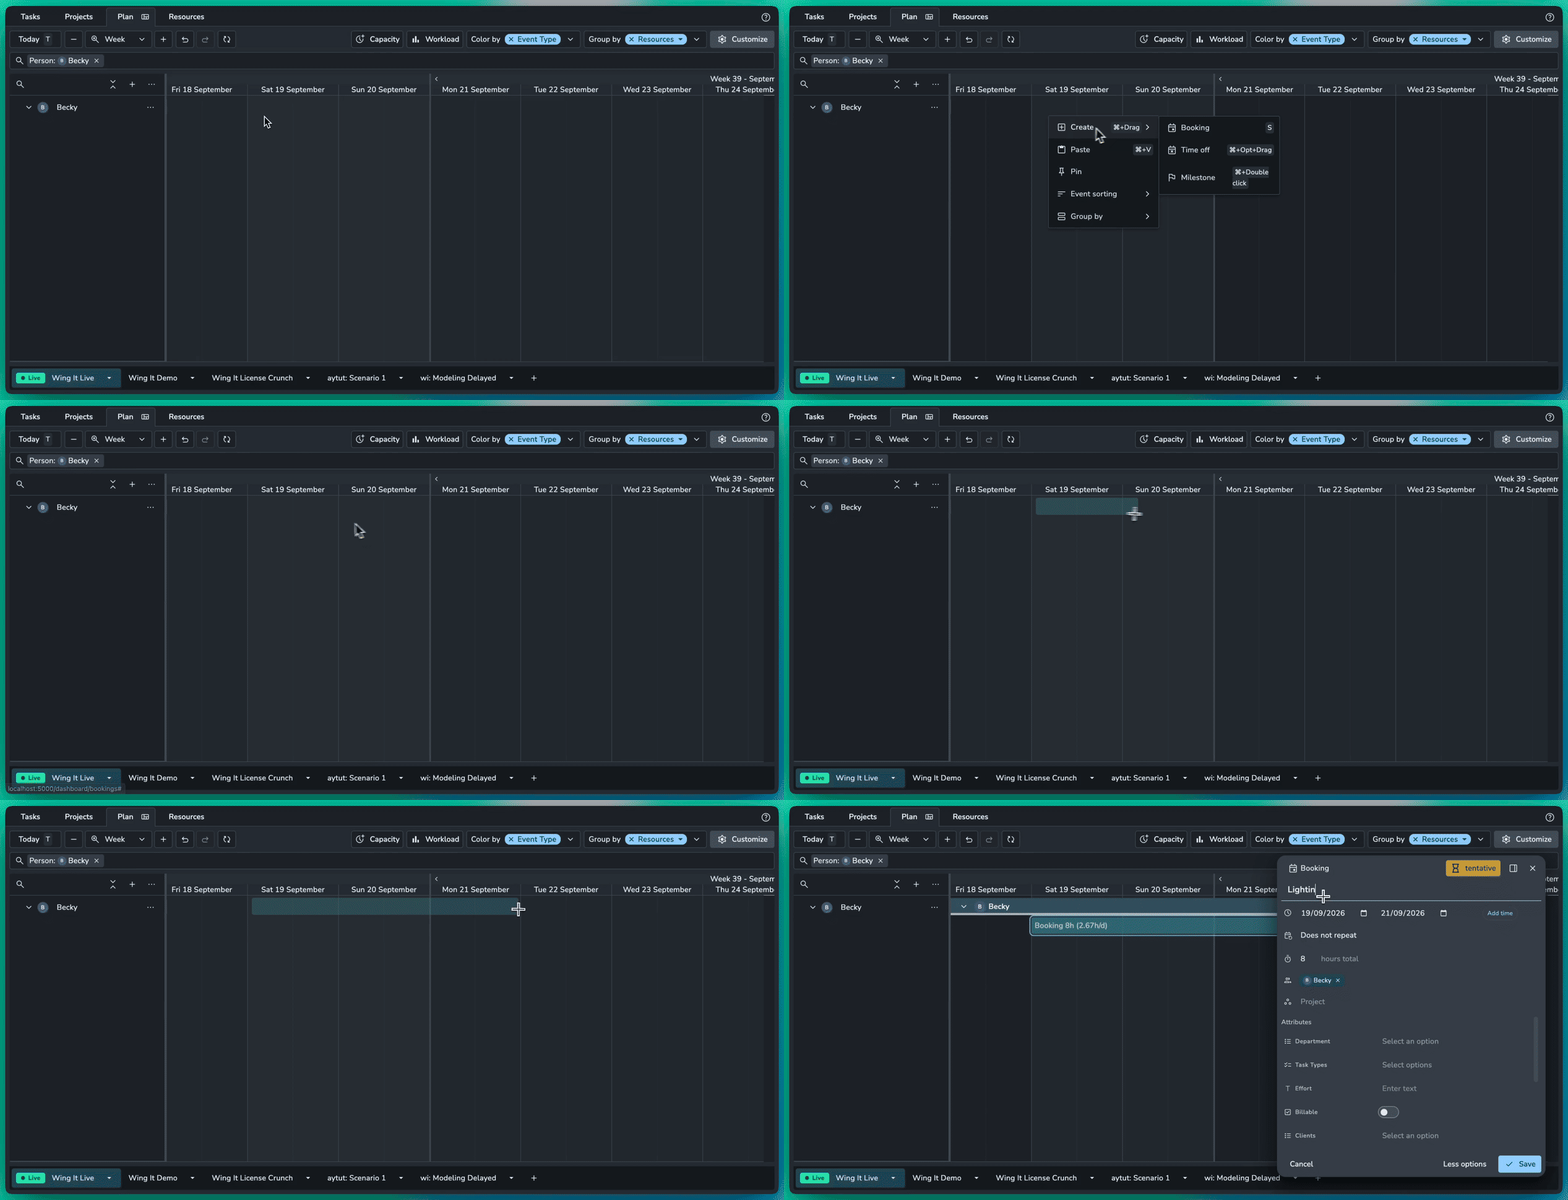
Creating a booking
Hold Ctrl/Cmd and drag on the timeline, or press S to enter creation mode.
Right-click empty space and select Create Event.
Contextual resource picker
When you create a booking inside a grouped or filtered view, the resource picker opens pre-filtered to that context. For example, while grouped by Location: London or Department: Lighting, the picker shows only London-based or Lighting resources.
Hours and partial allocation
Bookings do not have to be full days.
Specific hours: Book an exact time range, such as 9am to 5pm.
Flexible hours: Set how many hours a booking uses, even across several days. An 8-hour booking over two days counts as 4 hours per day.
Time Off and Milestones
Mark an event as Time Off to set the resource's capacity to zero for that period. Any bookings that clash are highlighted. Use Milestone events for key dates such as deliveries.
Booking statuses
Booking statuses are fully customisable, so you can match your studio's own booking stages. New installs start with four:
Confirmed
Tentative
Pencil
Pencil 2
Add, rename or remove statuses to suit your workflow. Mark one status as the confirmed status to tell the Planner which one means a booking is locked in. Its label does not have to be "Confirmed"; for example, you could call it "Done".
Planning projects
Bookings are created at studio level in the Plan tab and can then be assigned to a project. Manage projects and their attributes, such as client, brand and producer, on the Projects page, and group the timeline by any of them.
Creating a project from inside the booking dialog makes a basic project. Add its attributes on the Projects page afterwards so it groups correctly.
Booking details
Each booking shows who created and last updated it, and when.
Capacity and workload
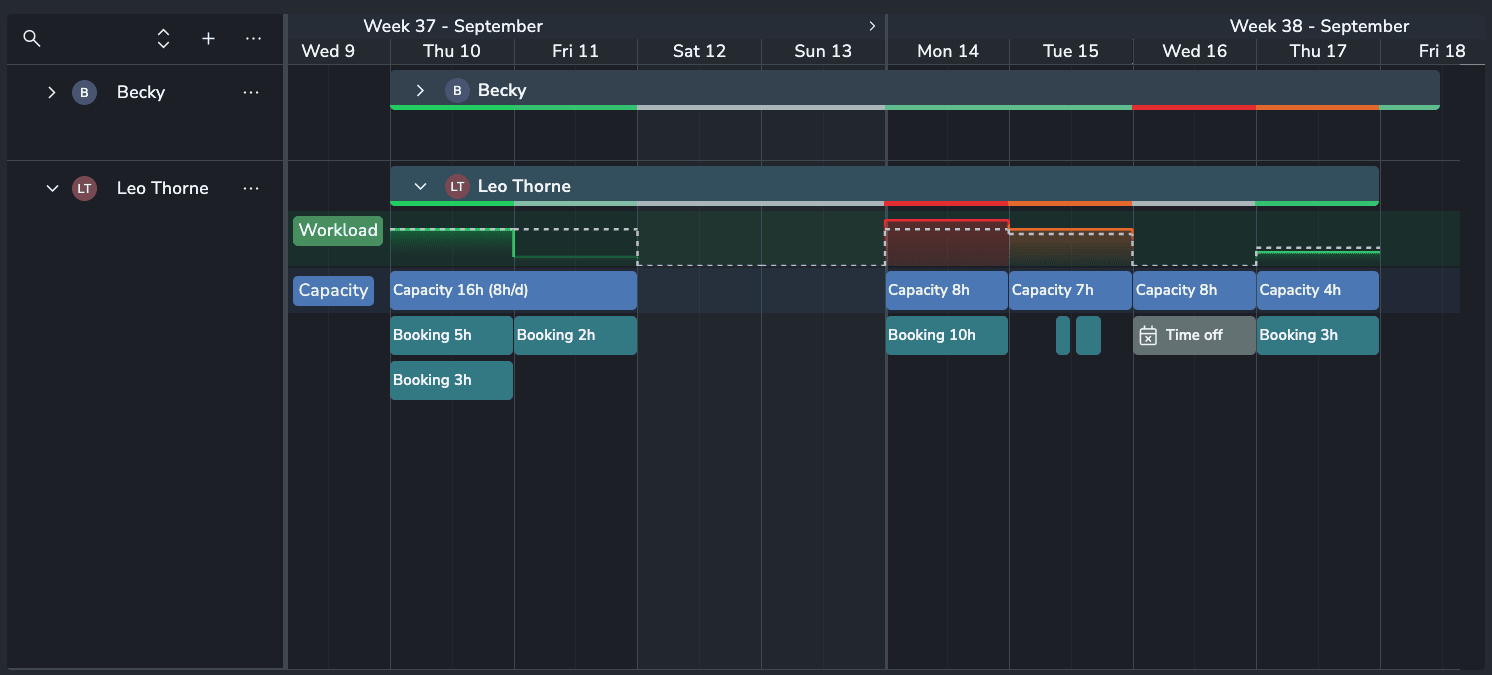
Capacity is the time a resource is available to work. Bookings use up that capacity, and the workload graph shows whether each resource is under, at or over capacity.
Adding capacity
Turn on Capacity in the toolbar. A blue capacity row appears above each resource.
Hold Ctrl/Cmd and drag in the capacity row, or right-click and select Create capacity.
Capacity works like any other event: you can duplicate it, move it, or make it recurring to cover a standard working week (see Recurring events below). A freelancer booked for one afternoon can be given capacity for just that afternoon.
Hours
Capacity and bookings both have an hours field, which is what the workload graph counts.
Hours total: The total hours for the event. A full-day capacity event set to 4 hours represents a half day.
Hours per day: Switch the field to spread hours evenly. A week-long capacity event at 8 hours per day totals 40 hours.
Bookings: A booking spanning a whole day can use only part of it, such as a 2-hour demo. An 8-hour booking across two days counts as 4 hours per day.
Not counted: Clear the hours field on a booking and it is ignored by the workload graph.
Specific times: In Day view, draw capacity and bookings at exact times, such as capacity from 8am to 6pm.
New bookings and capacity events start with a default duration, so an all-day event is created as 8 hours rather than just "all day". Change it to suit, such as a 9-hour day or 18 hours across a two-day event.
Note: Admins can change the defaults in the Planner addon settings (Studio settings > Planner). The global default duration is 8 hours, and you can override it per event type (for example, a different default for Time Off) and per resource type (for example, 12 hours for rooms).
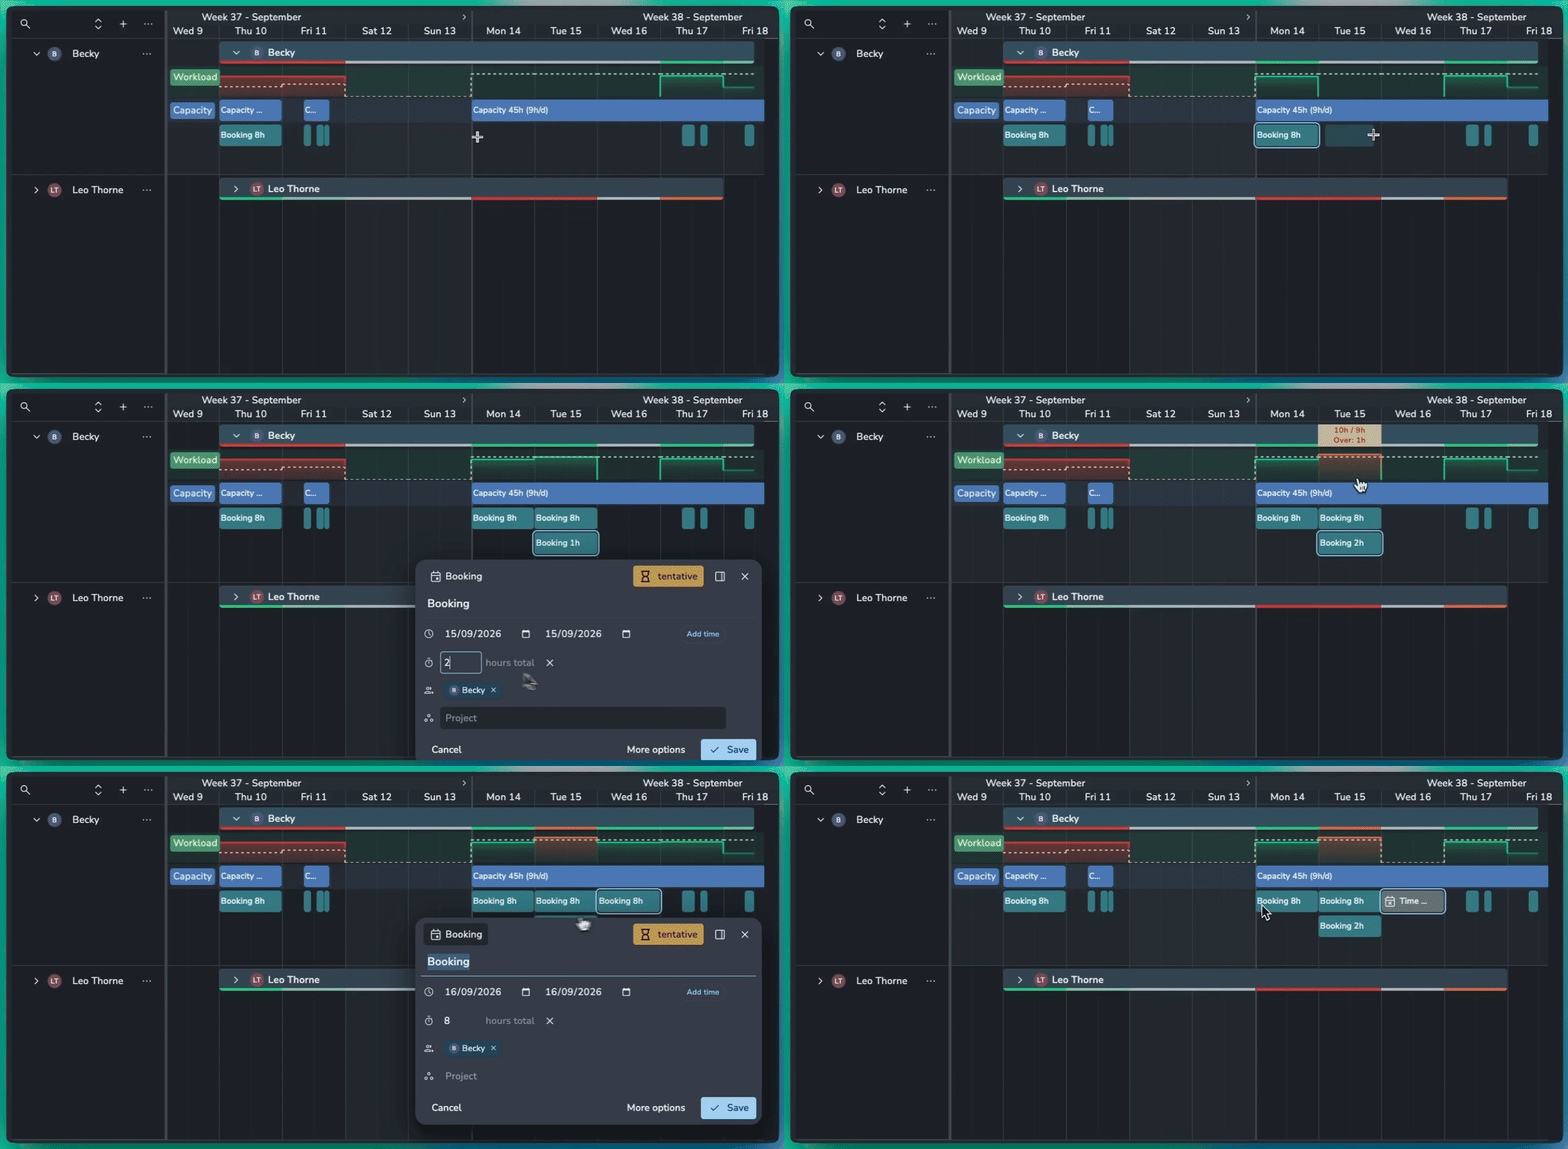
Reading the workload
A coloured indicator above each resource previews its workload. Click a resource's indicator to show its workload graph, or turn on Workload in the toolbar to show it for everyone.
In the graph, the dotted line is the resource's capacity for each day, and the solid line is the hours booked. Hover over a day to see booked hours, capacity and hours left.
Time Off and capacity
A Time Off event sets the resource's capacity to zero for that period, even if capacity events cover it. Any bookings that day show red, so you can see work booked on someone who is away.
Upgrading existing plans
After updating, bookings made before capacity existed show red, because those resources have no capacity yet. To fix this quickly, select the bookings, right-click and select Match capacity. This creates capacity equal to the booked hours for each day. Check the results and reduce any unrealistic days, such as a 13-hour day.
Quick edits
Duplicate: Right-click a booking or capacity event and duplicate it to the next day or the next week.
Move: Right-click and move it to the next day or next week without dragging.
Recurring events
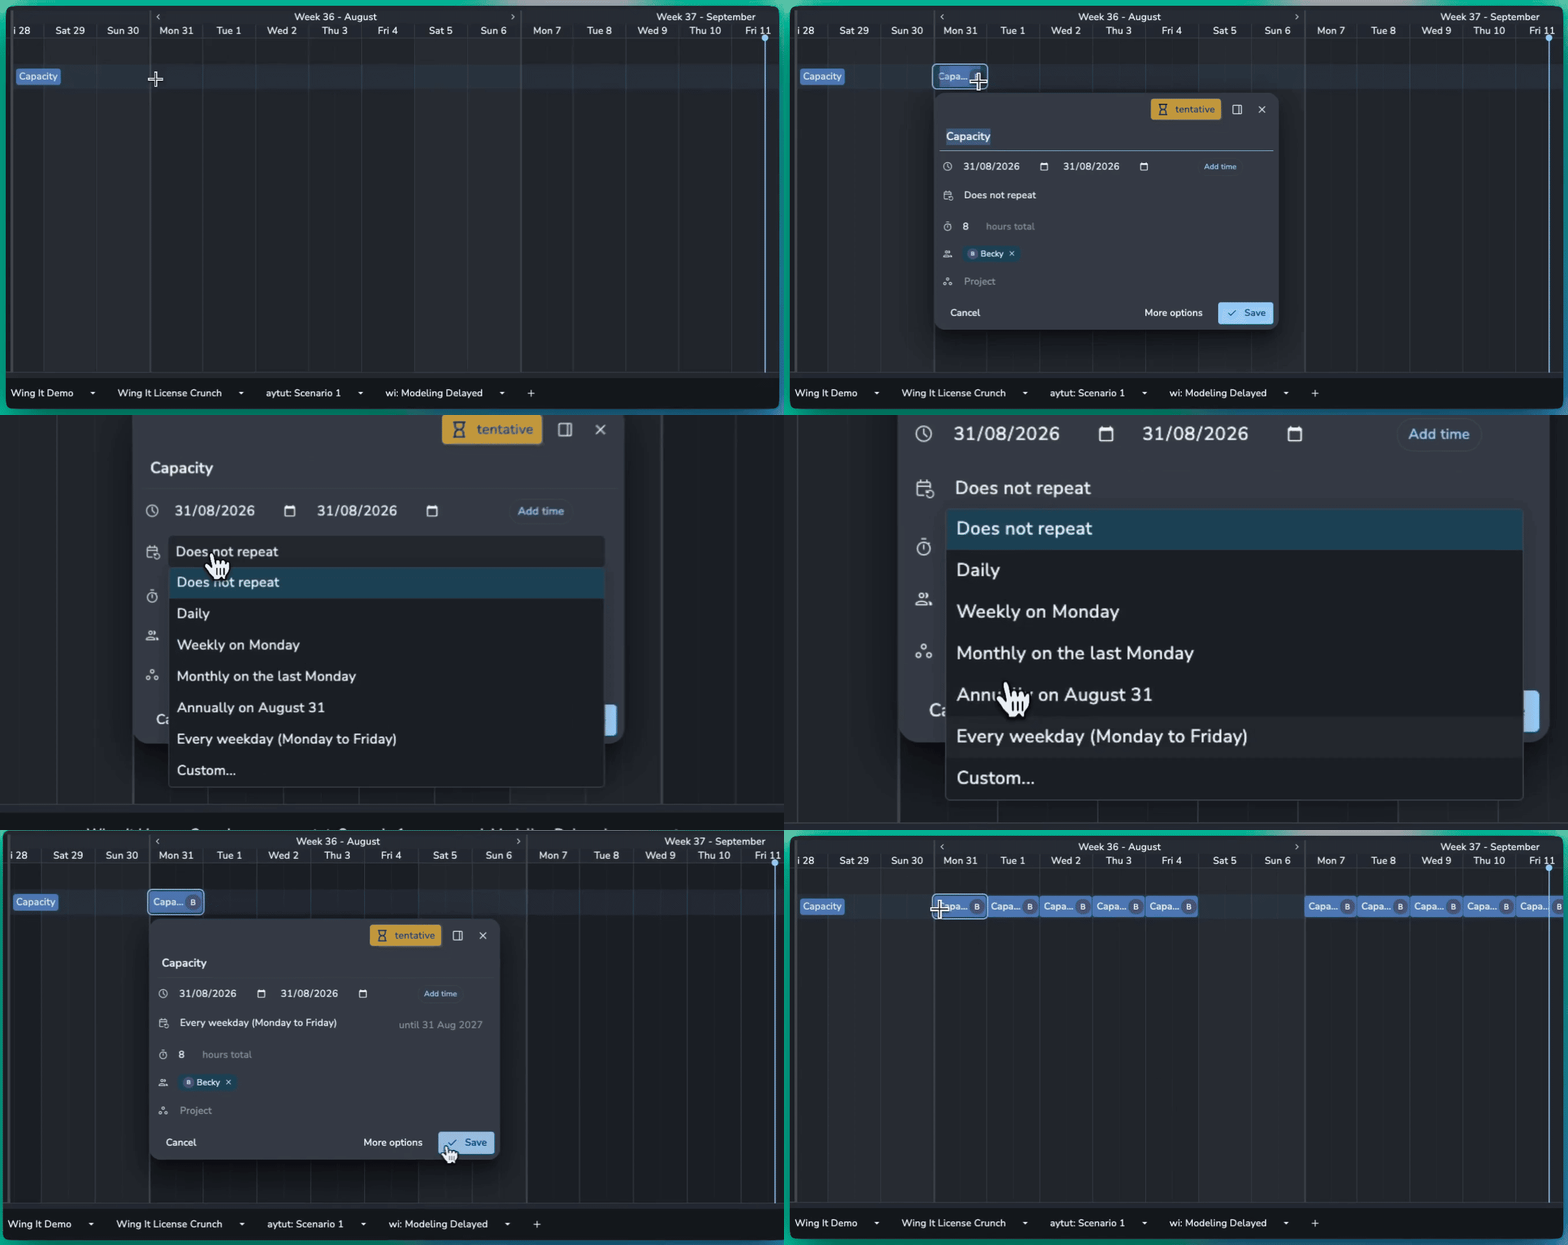
Any booking, capacity entry or other event can repeat. Use recurrence for standing bookings, weekly meetings, or a resource booked Monday to Friday for a set period.
To set a recurrence, open the event and set its repeat. Pick a preset, or choose Custom to pick exact days, an interval, or a monthly rule. For example, create a "9 to 5" capacity event on a Monday and repeat it every weekday to give someone a full working week.
Recurrence also works at hourly level. In Day view, create an 8am to 1pm booking and repeat it every weekday for 20 occurrences to book four weeks of mornings.
A series can end on a date, or stop after a set number of occurrences.
Editing and deleting a series
When you change or delete one occurrence, choose how far it applies:
Only this event: A one-off override; the rest of the series is unchanged.
Following events: This occurrence and all future ones.
All events: The whole series.
For developers
Recurrence follows RFC 5545 (iCalendar). Pass a standard RRULE string, such as FREQ=WEEKLY;INTERVAL=2;BYDAY=WE;COUNT=10, as the rrule parameter when creating events through the AYON REST or Python API. Overrides and exclusions stay linked to their parent series.
Time zones and working hours
Every booking remembers the time zone it was planned in, so a 9am booking for your Mumbai team stays 9am Mumbai time wherever it is viewed.
Time zone switcher: Change the time zone the timeline is displayed in. The setting is saved in your browser and does not change any bookings.
Original time zone: Open a booking to see its time in the zone it was created for.
Moving bookings: Dragging a booking keeps its original time zone.
In Day view, non-working hours are greyed out, in the same way as weekends, so you can see where each working day starts and ends.
Scenarios
Scenarios are separate copies of the plan for testing "what if" timelines without touching production.
Live scenario: There is always one. Changes here update the real
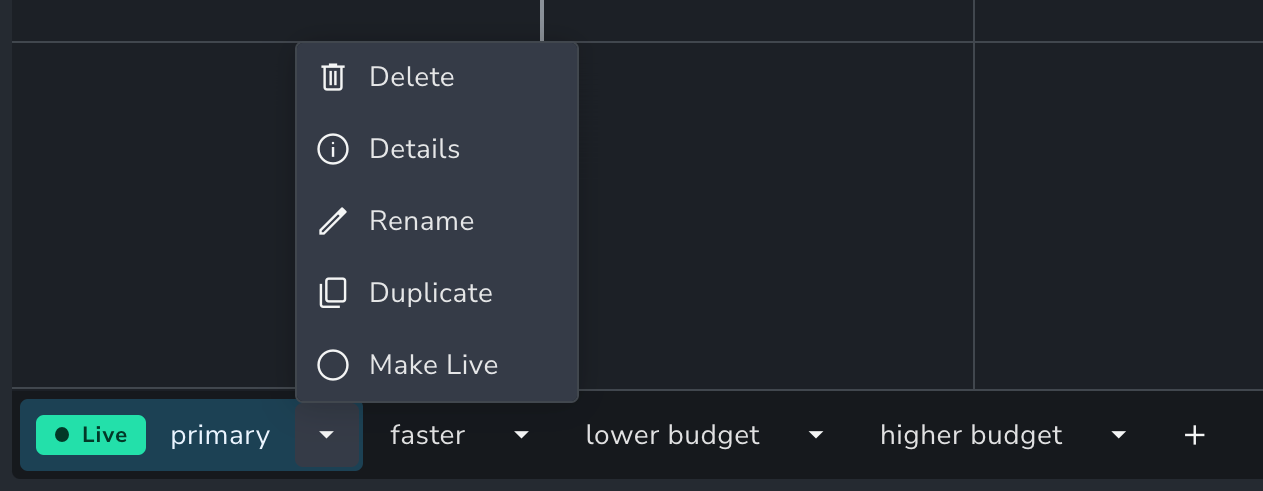
start dateandend dateof production tasks.Staging scenarios: Try a delay or a bigger team safely. When a plan is final, right-click the scenario and select Make Live.
Right-click a scenario tab to Rename, Duplicate, Sync, view Details, Make Live or Delete it.
Making a scenario live asks for confirmation. Deleting one requires typing a confirmation, so scenarios are hard to remove by accident. Only users with permission to manage scenarios see these controls.
Permissions
A new Planner has no permissions applied, so everyone can see and edit every event. Admins control who can see and edit events in the Planner addon settings. To limit access to individual attributes, such as a day rate, see Attribute access in Planner: Resources tab.
Event access
Open the app menu (the nine dots, top right), select Studio settings, then the Planner addon. There are two settings:
Each rule pairs who it applies to (Everyone, individual users, or access groups) with an access level:
Click Submit, then save the settings for the change to take effect.
Per-project access with access groups
Access groups are AYON's app-wide way of giving users access to projects. Users have no project access until they are given an access group on a project. In Project event access, choose an access group instead of a user, and anyone with that group on a project gets that access level for the project's events.
In Studio settings > Permissions, create access groups such as Planner edit and Planner view.
In Project settings > Project access, select a user and a project, add the access group, and save.
In Studio settings > Planner > Project event access, give Planner edit the Editor level and Planner view the Viewer level, then save.
For example, a user with Planner edit on one project and Planner view on another can edit the first project's events, only view the second's, and sees any other project's events as redacted.
Working with the timeline
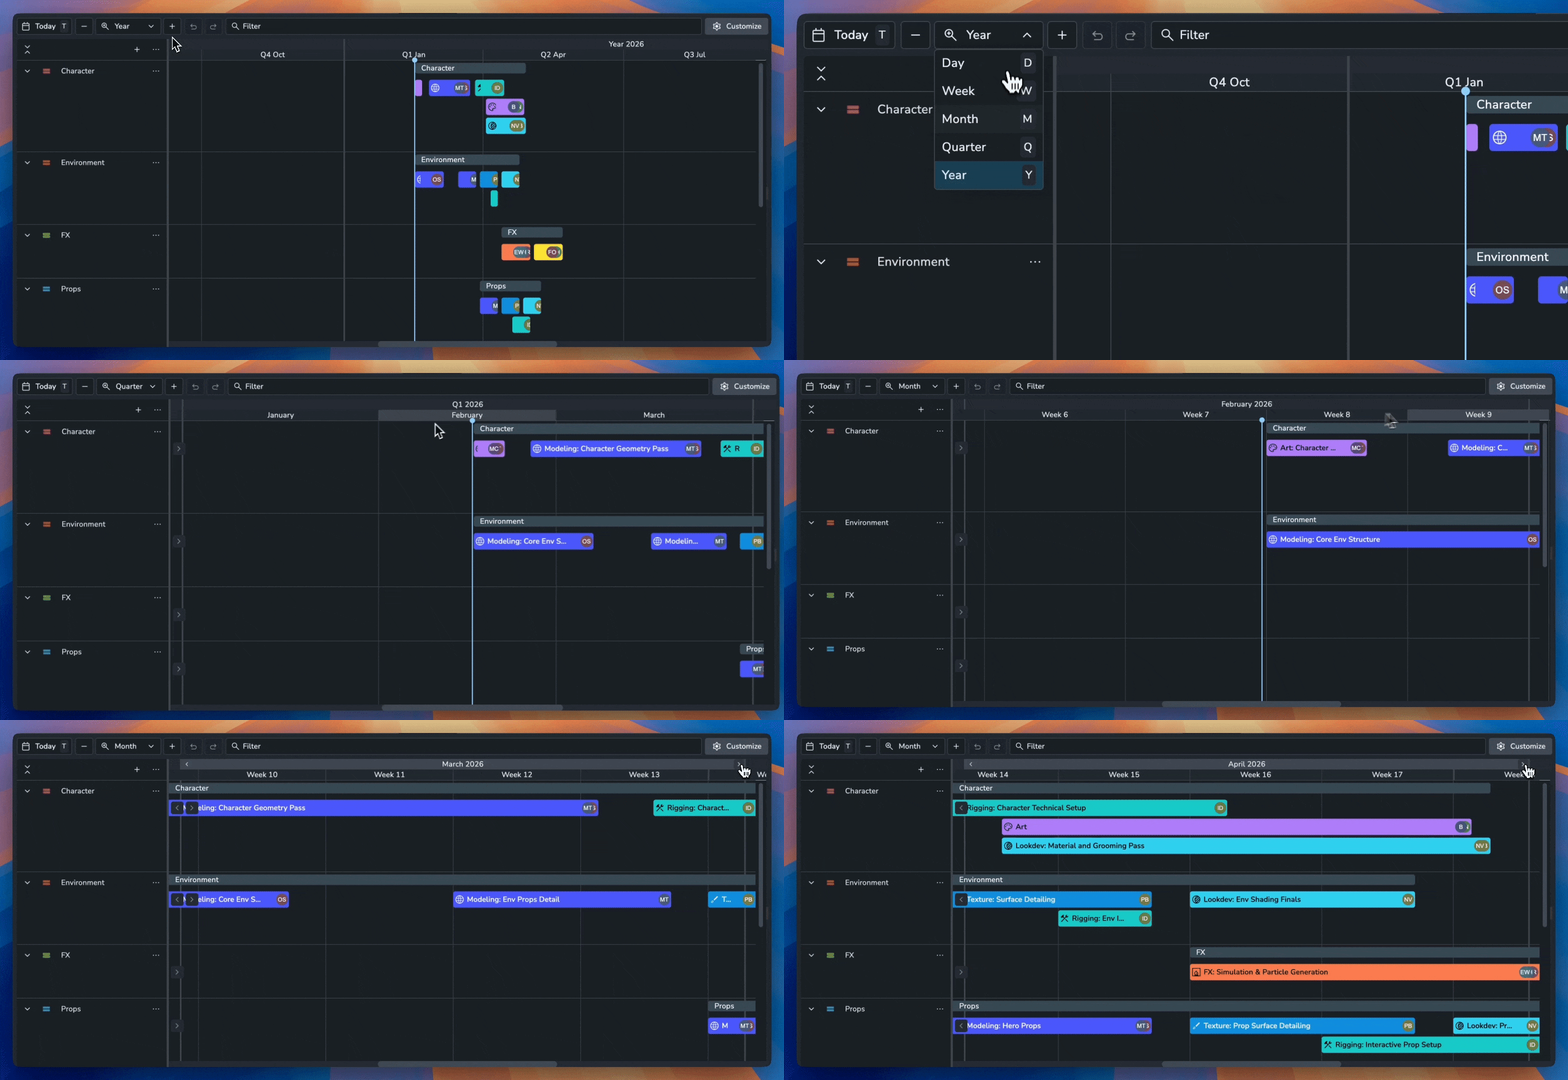
These controls work in both the Plan and Schedule tabs.
Grouping and filtering
There are no fixed layouts. Group the timeline by any resource, booking or project attribute, such as Location then Department, and filter it to the resources you need.
Navigation
Editing
Copied events use a spreadsheet format, so you can paste them into Excel or Google Sheets, or paste compatible rows back in.
Display settings
Color by: resource, project, status and other attributes.
Event sorting: Auto (compact stacking) or one row per event, sorted by start date, duration or label.
Granularity: Events snap to days; zoom to Day view for hourly precision.
Views
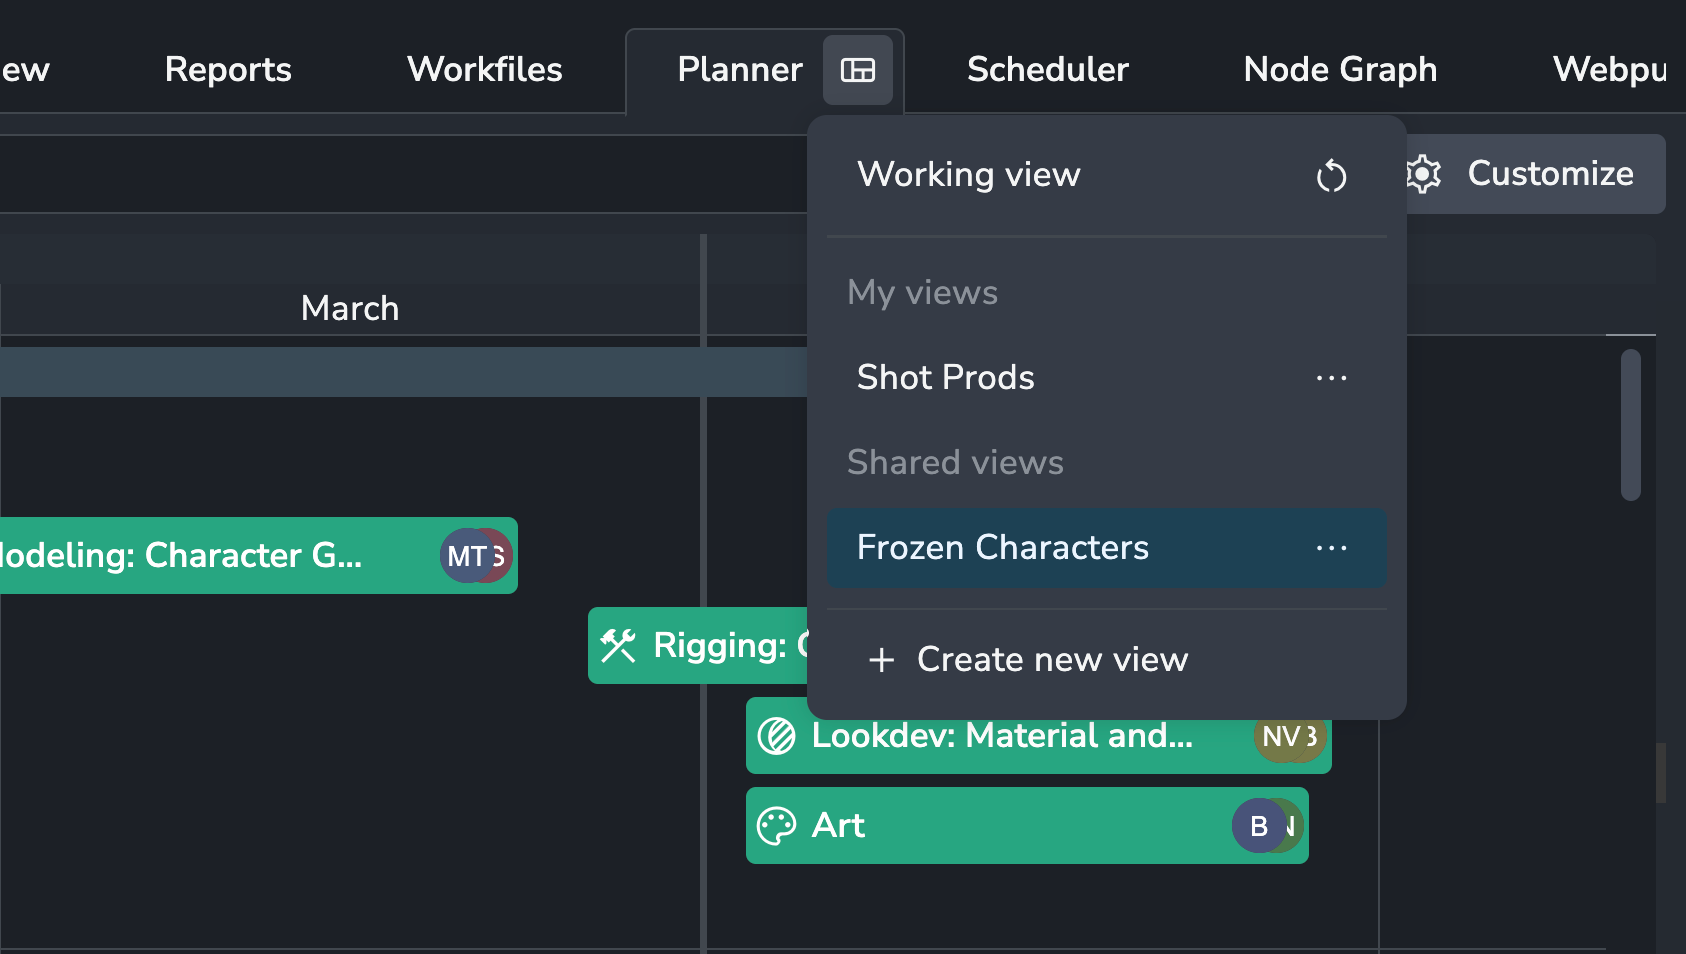
Save filters, grouping, sorting and zoom as a View and share it with the team. Planner views can be assigned to specific users.
Export
Right-click and select Export events to download a CSV (spreadsheet) or ICS (calendar) file, or copy to the clipboard. Choose which scenarios and groups to include before exporting.