Getting Started with AYON on Ynput Cloud: A Complete Studio Walkthrough
This guide provides an end-to-end walkthrough of how to start your first AYON workspace using Ynput Cloud. From deploying your first AYON Workspace to conducting asset reviews and running a full artist pipeline.
Last updated About 1 hour ago
This walkthrough is designed for launch your own dedicated AYON workspace using Ynput Cloud. However, if you are looking to quickly explore the system and get hands-on experience with the interface, we recommend starting with the AYON Playground guide. It is the quickest way to get up and running in the AYON Workspace.
What This Walkthrough Covers
Deploying an AYON Server: Setting up an instance on Ynput Cloud in minutes with a 14-day free trial.
Server Exploration & Customization: Navigating the AYON Server UI, updating welcome screen, and setting up studio preferences.
User & Permission Management: Onboarding team members, creating access groups, and assigning studio roles.
Project Setup & Planning: Creating projects, defining asset hierarchies, building schedules, and assigning tasks.
Standalone Production Tracking: Uploading versions, inspecting individual products, and running interactive review sessions directly on the web server.
Pipeline & Bundle Configuration: Installing addons, configuring application paths, enabling color management, and defining project anatomy.
The Artist Workflow: Downloading the AYON Launcher, launching DCC applications, saving workfiles, creating publish instances, and publishing assets.
Delivery & Handoff: Managing client deliveries and vendor product transfers.
Further Steps: Go beyond this guide and explore more ways to keep exploring and growing your studio.
Step 1: Prepare the AYON Server
Get the AYON Server
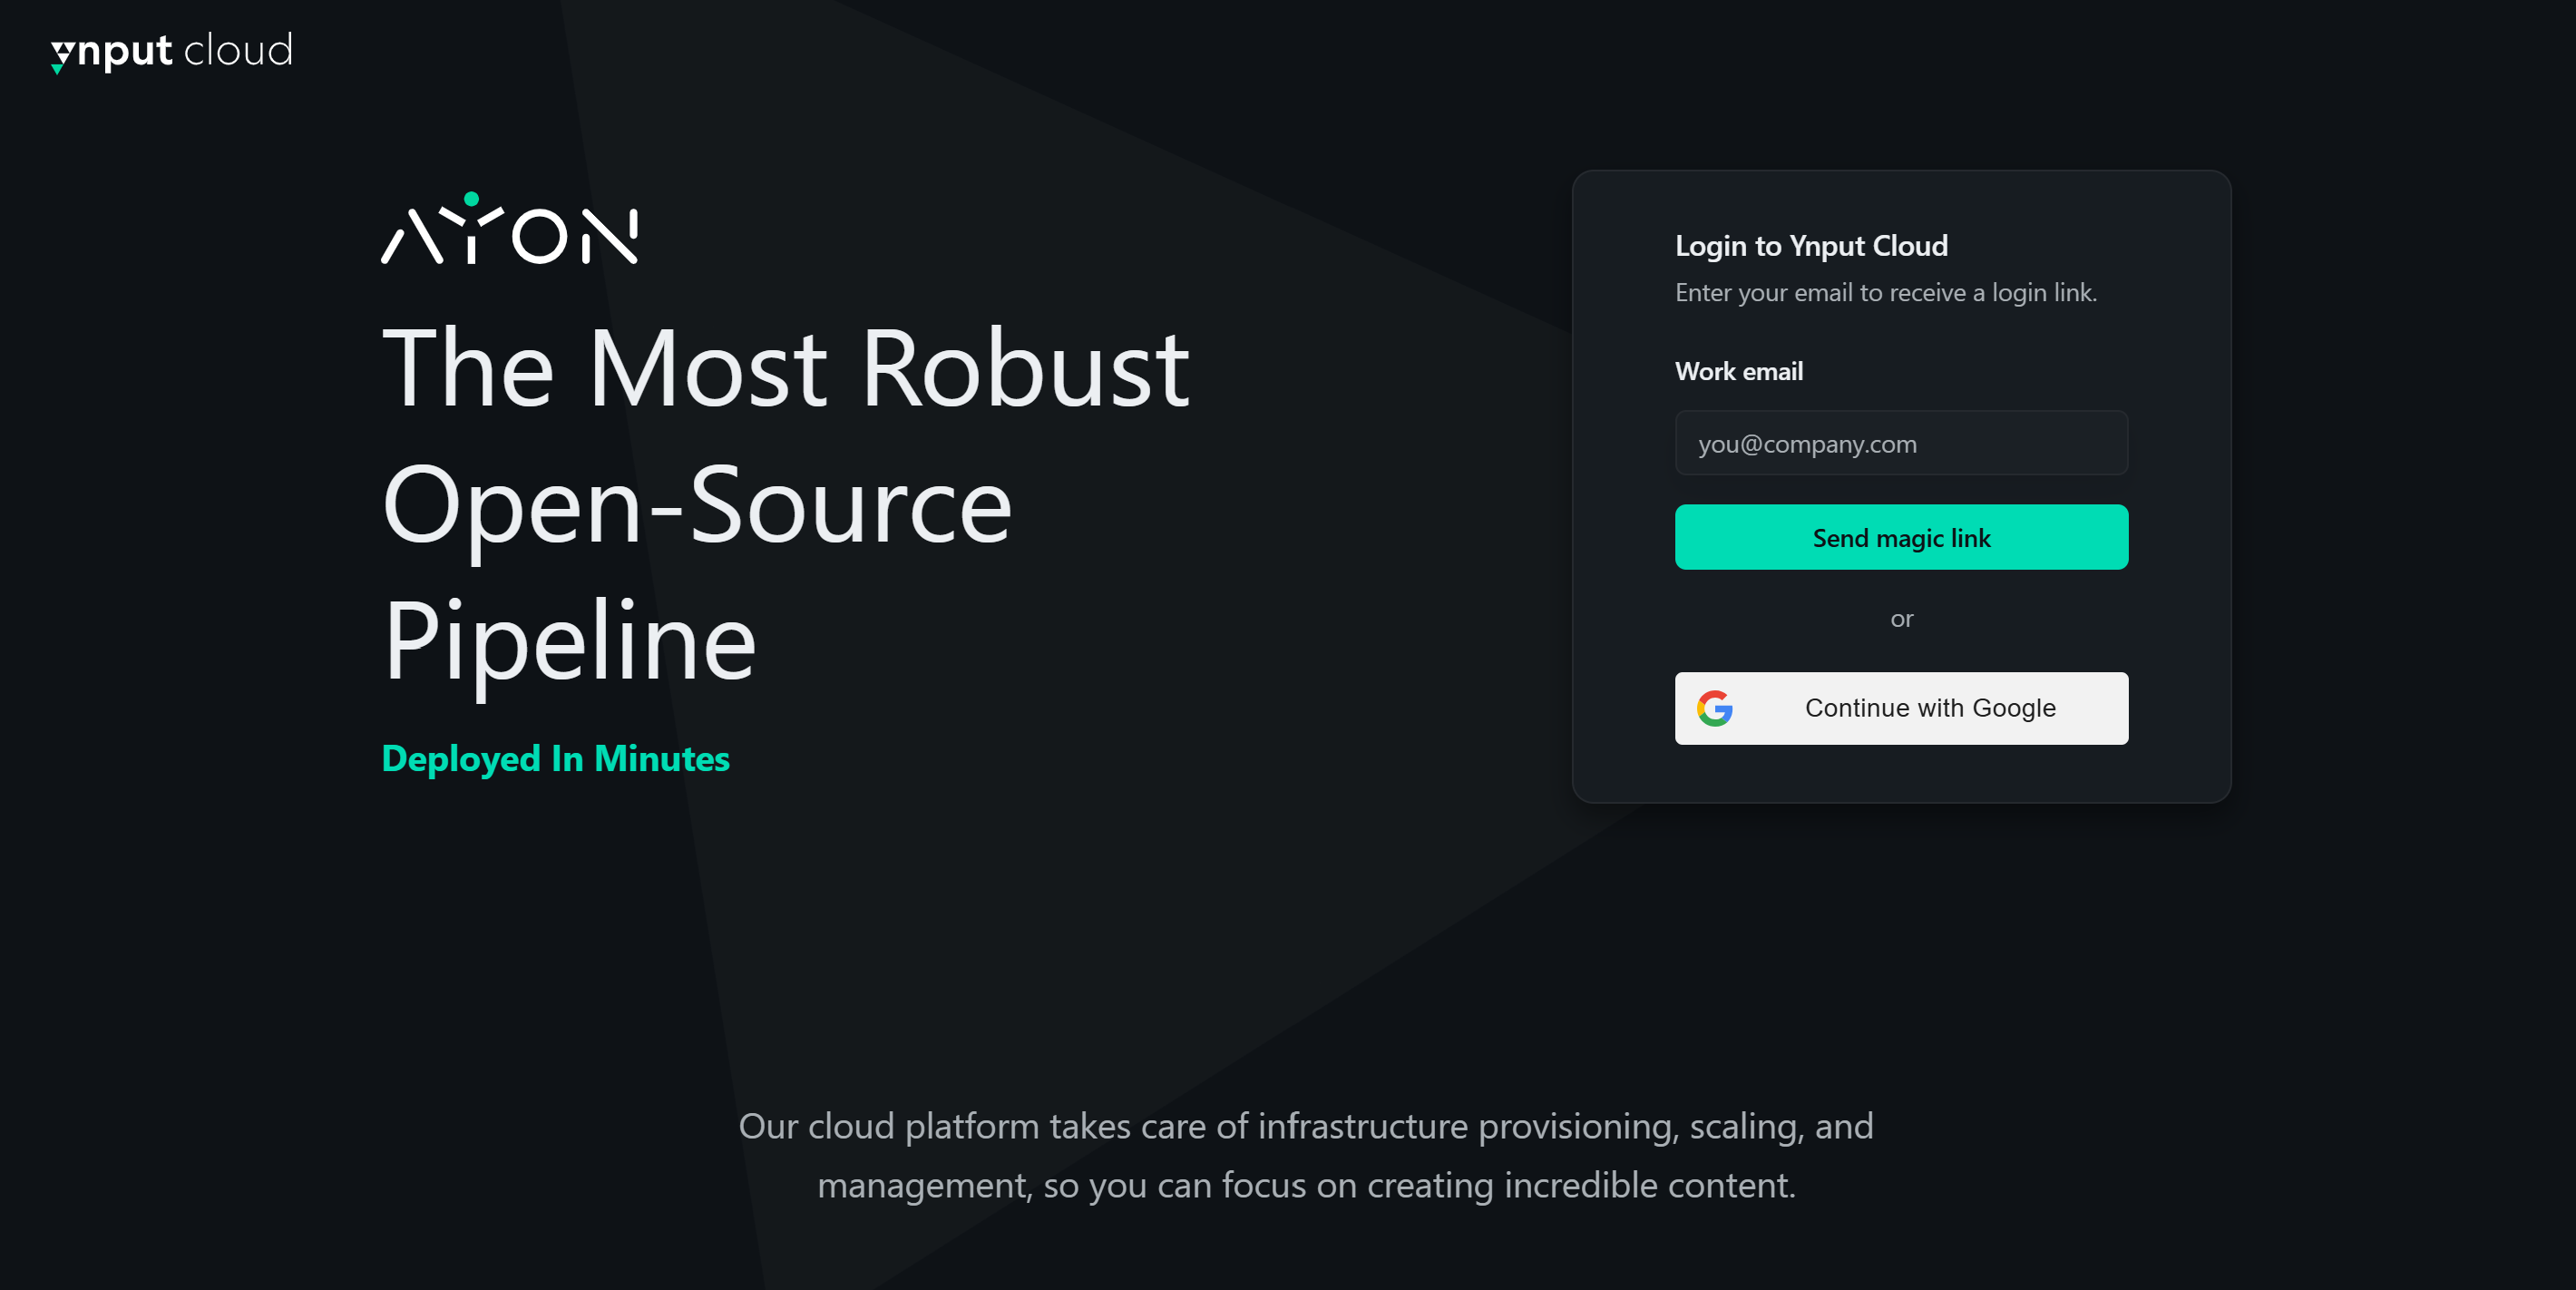
To get started, head over to Ynput Cloud and sign up using your email or Google account.
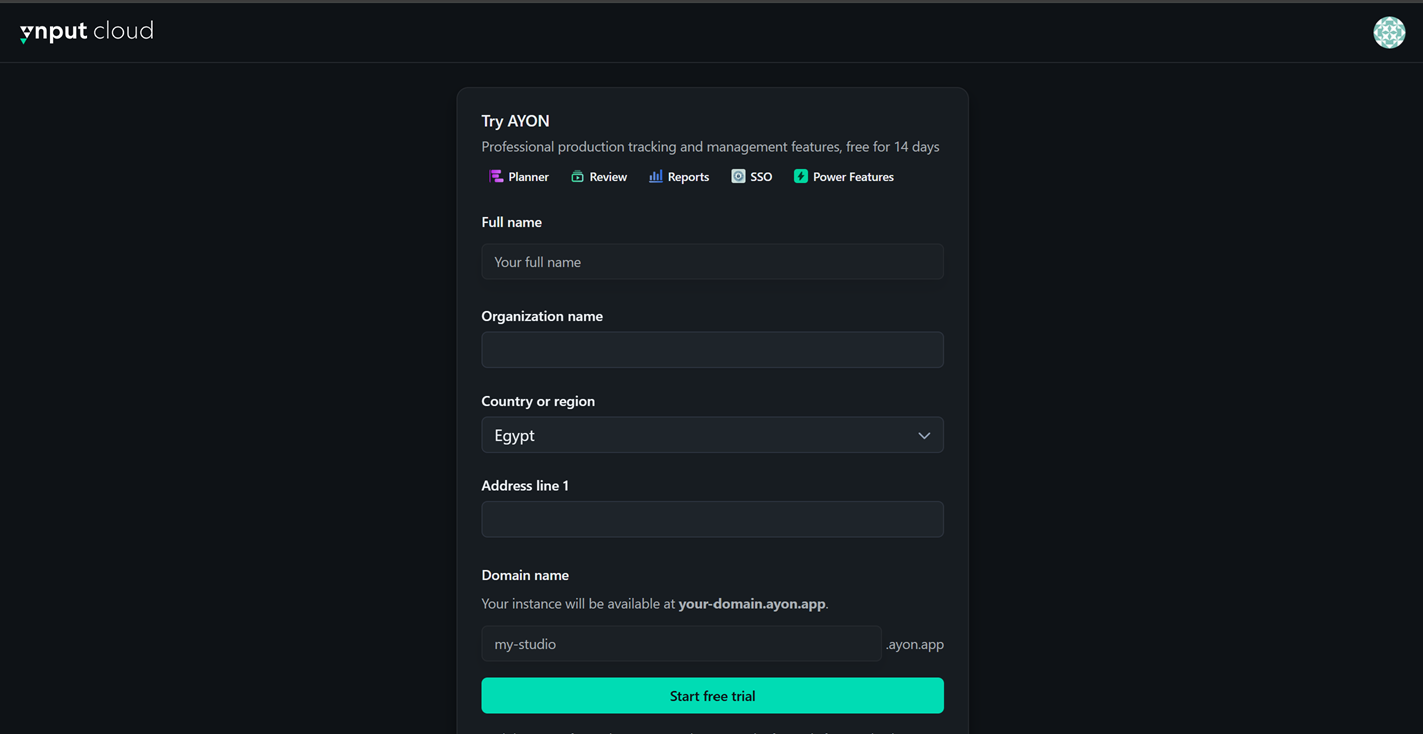
If this is your first time logging in, you will be guided through setting up a 14-day free trial for your AYON Server:
Fill in your name, organization, country, and address.
Choose your Domain Name. This determines your unique server URL (e.g.,
my_domain.ayon.app).
Managing Your Server: Once created, you can manage your instance and subscription directly within Ynput Cloud. For a detailed guide, see Get Started with AYON on Ynput Cloud.
Prefer an on-premise installation? You can also self-host AYON Server locally. See AYON Server Local Deployment for instructions.
AYON Server First Look
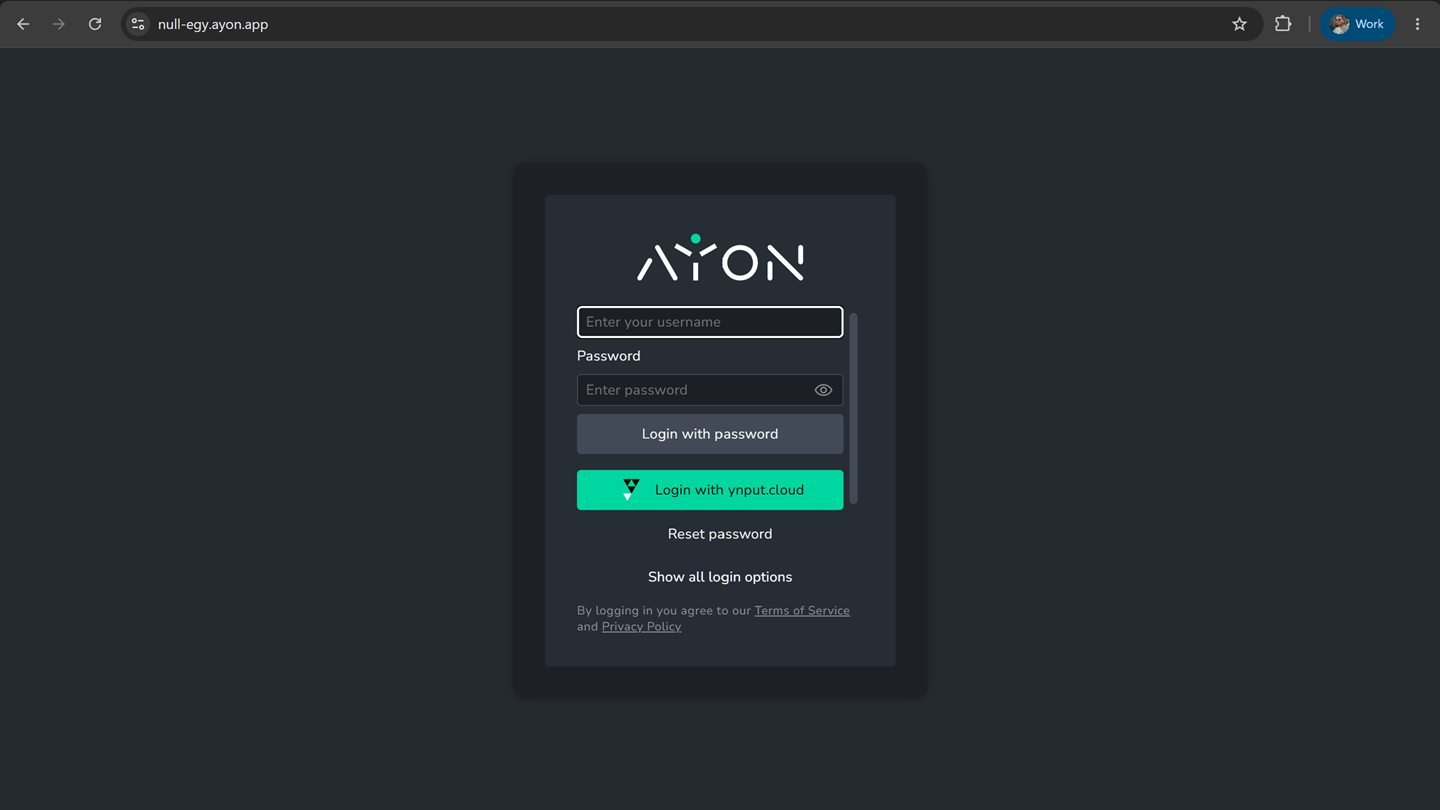
Once your server instance is ready, navigate to your server URL and log in using the “Login with ynput.cloud” option.
Bootstrap AYON Server
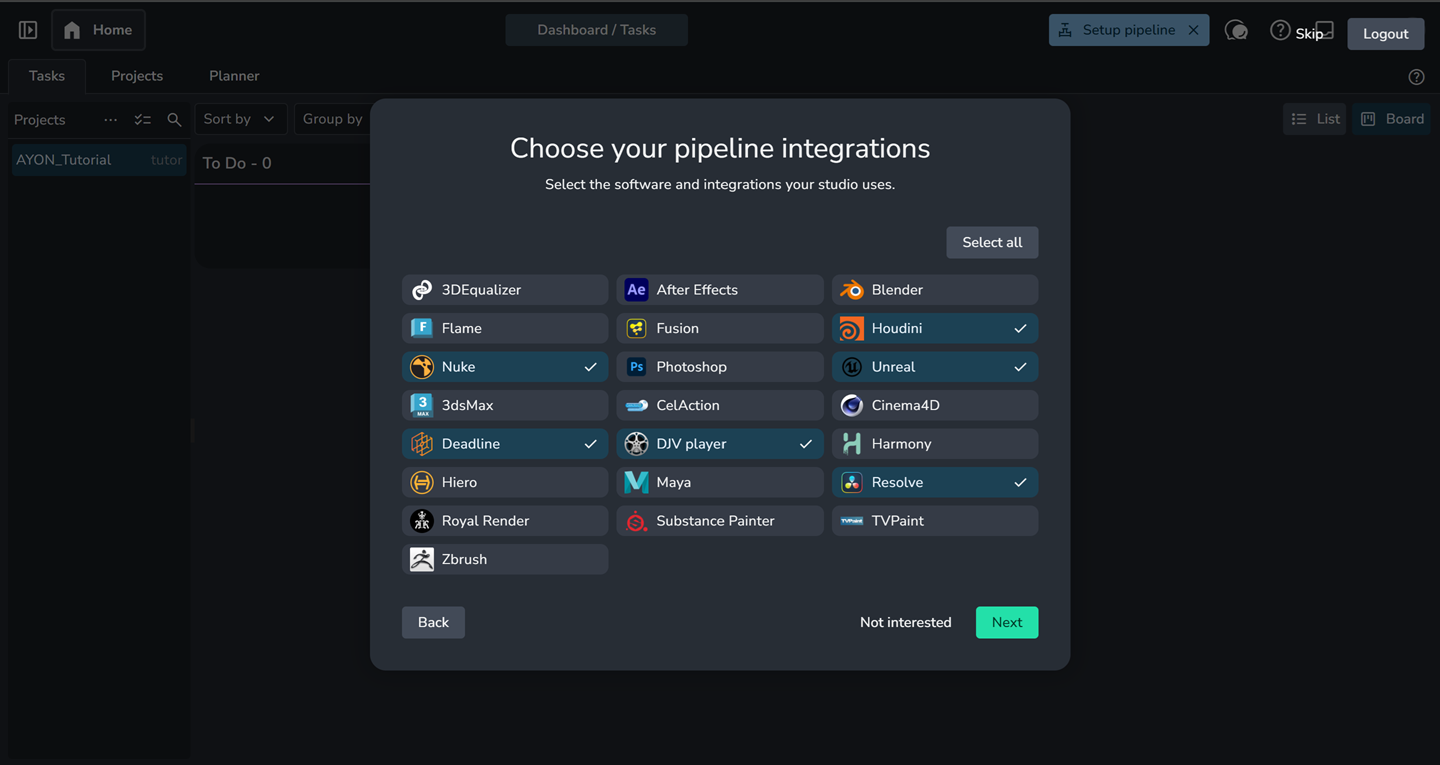
The first time you log in to your AYON Server, a brief questionnaire will ask about your current studio setup and production pipeline. AYON uses your responses to bootstrap the server and replicate your existing workflow, creating a familiar environment for a smooth, seamless transition so your team can pick up right where they left off.
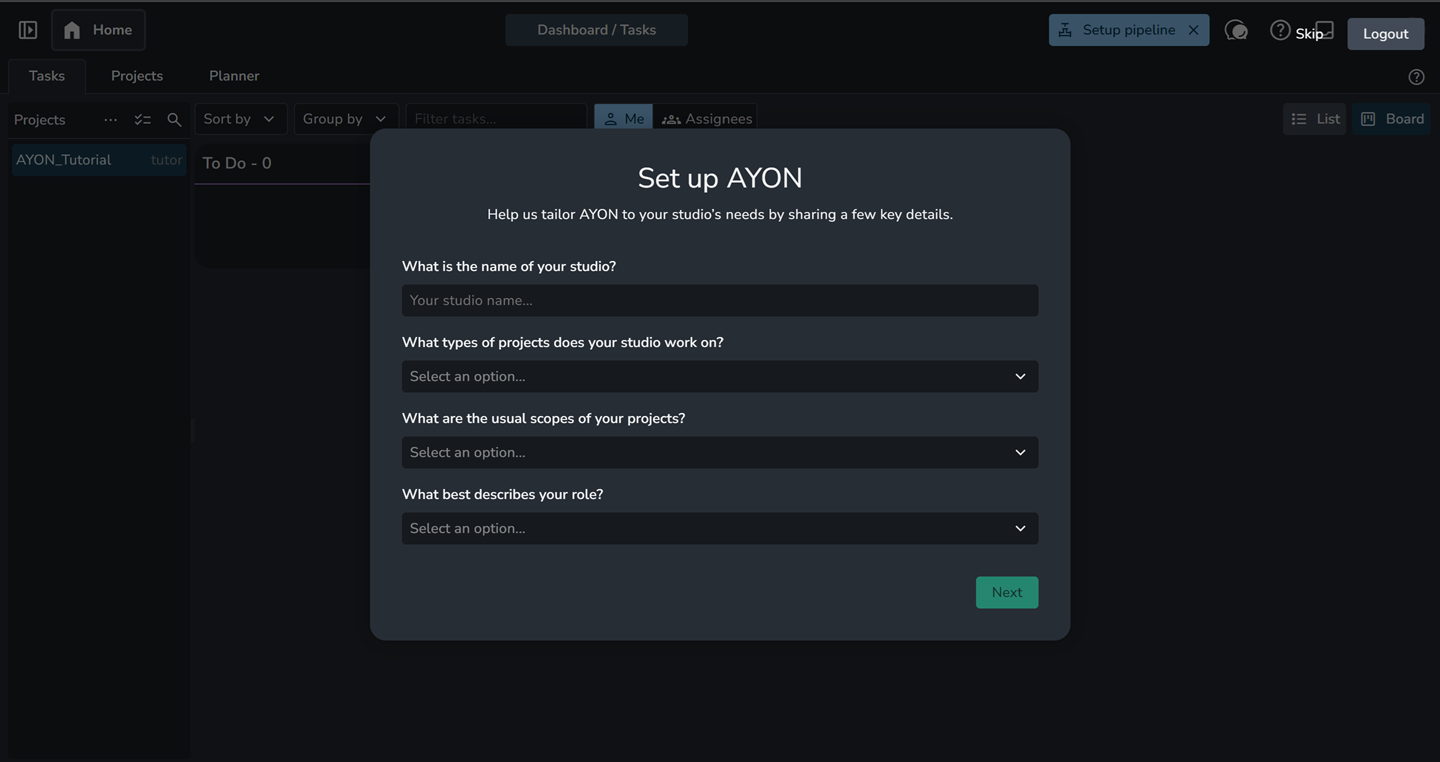
Quick Navigation
Let’s take a quick tour of the AYON Server Web UI exploring the daily work spaces:
Project & Production Dashboard (
H+H): The default landing page upon logging in. It provides a studio-wide overview of active projects, overall progress stats, and assigned tasks.Project Production Management (
1or Sidebar Menu): Accesses your active project workspace. This area provides detailed views of the project hierarchy, published products, task progress, asset planning, and review sessions.Studio-Wide Settings (
S+Sor App Menu): Located under the AYON menu in the top-right corner. Use this section to manage global server configurations, addon versions, studio users, access roles, global permissions, and pipeline defaults.Project Settings (
P+Por App Menu): Handles project-specific configurations, including pipeline settings, user permission overrides, project roots, per-user path overrides, and project anatomy definitions.
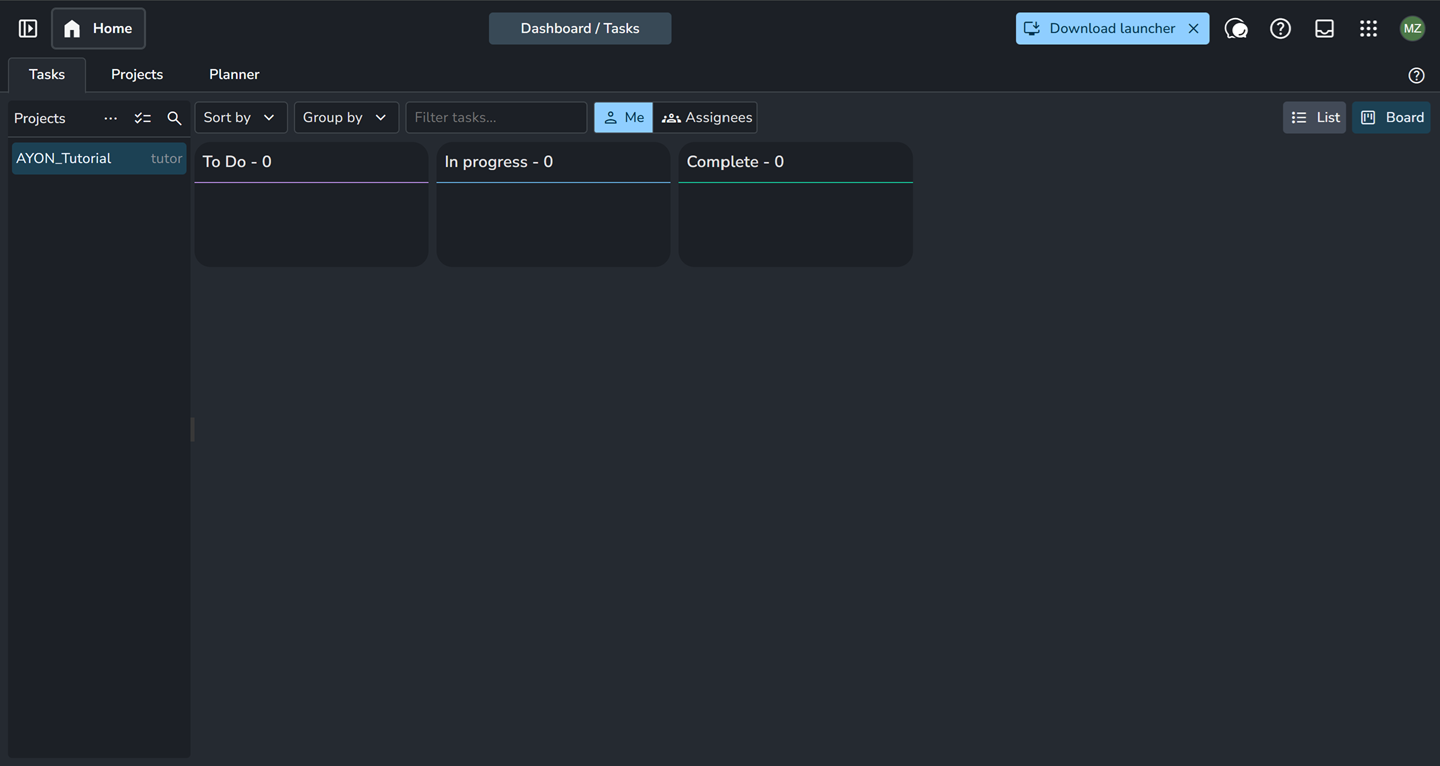
Project & Production Dashboard (H + H)
Project Production Management (1 or Sidebar Menu)
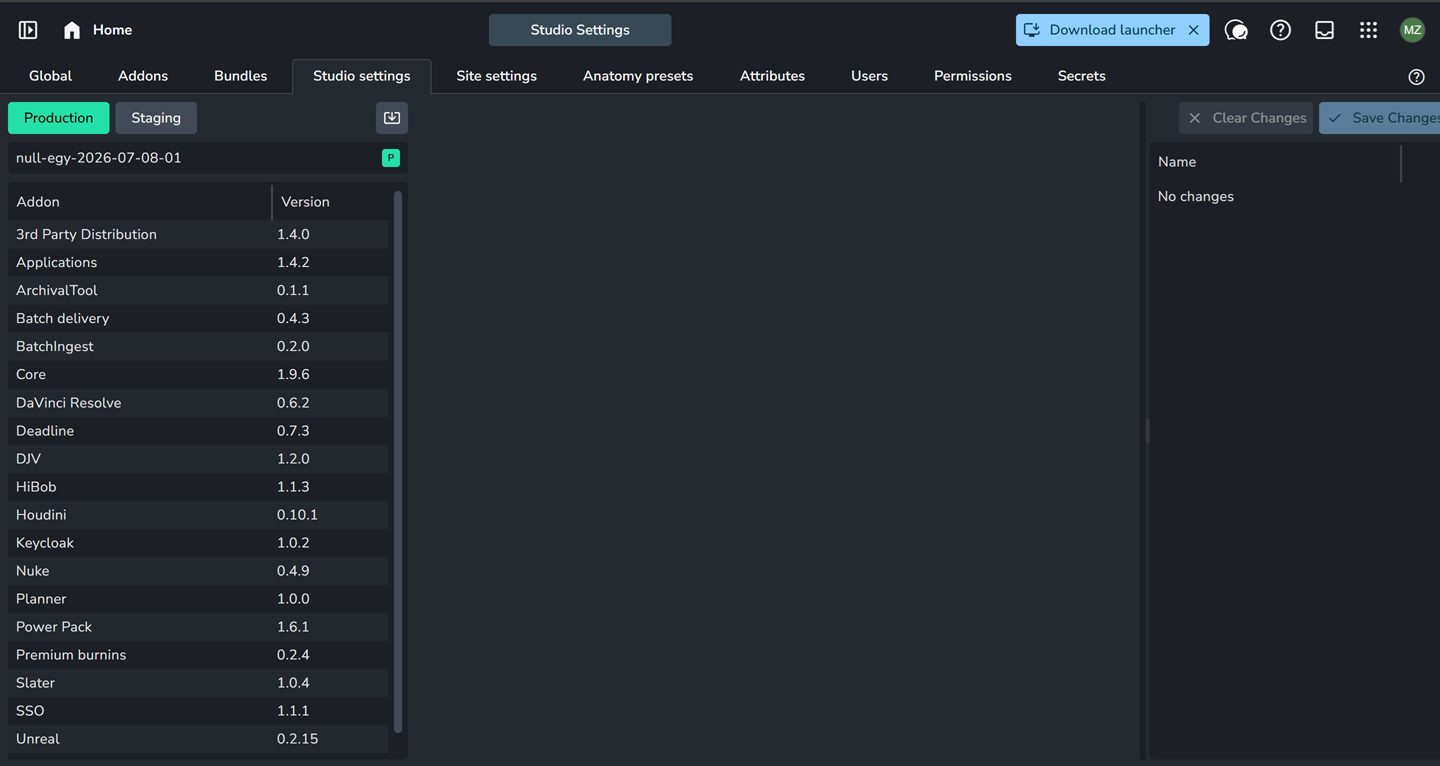
Studio-Wide Settings (S + S or from App Menu)
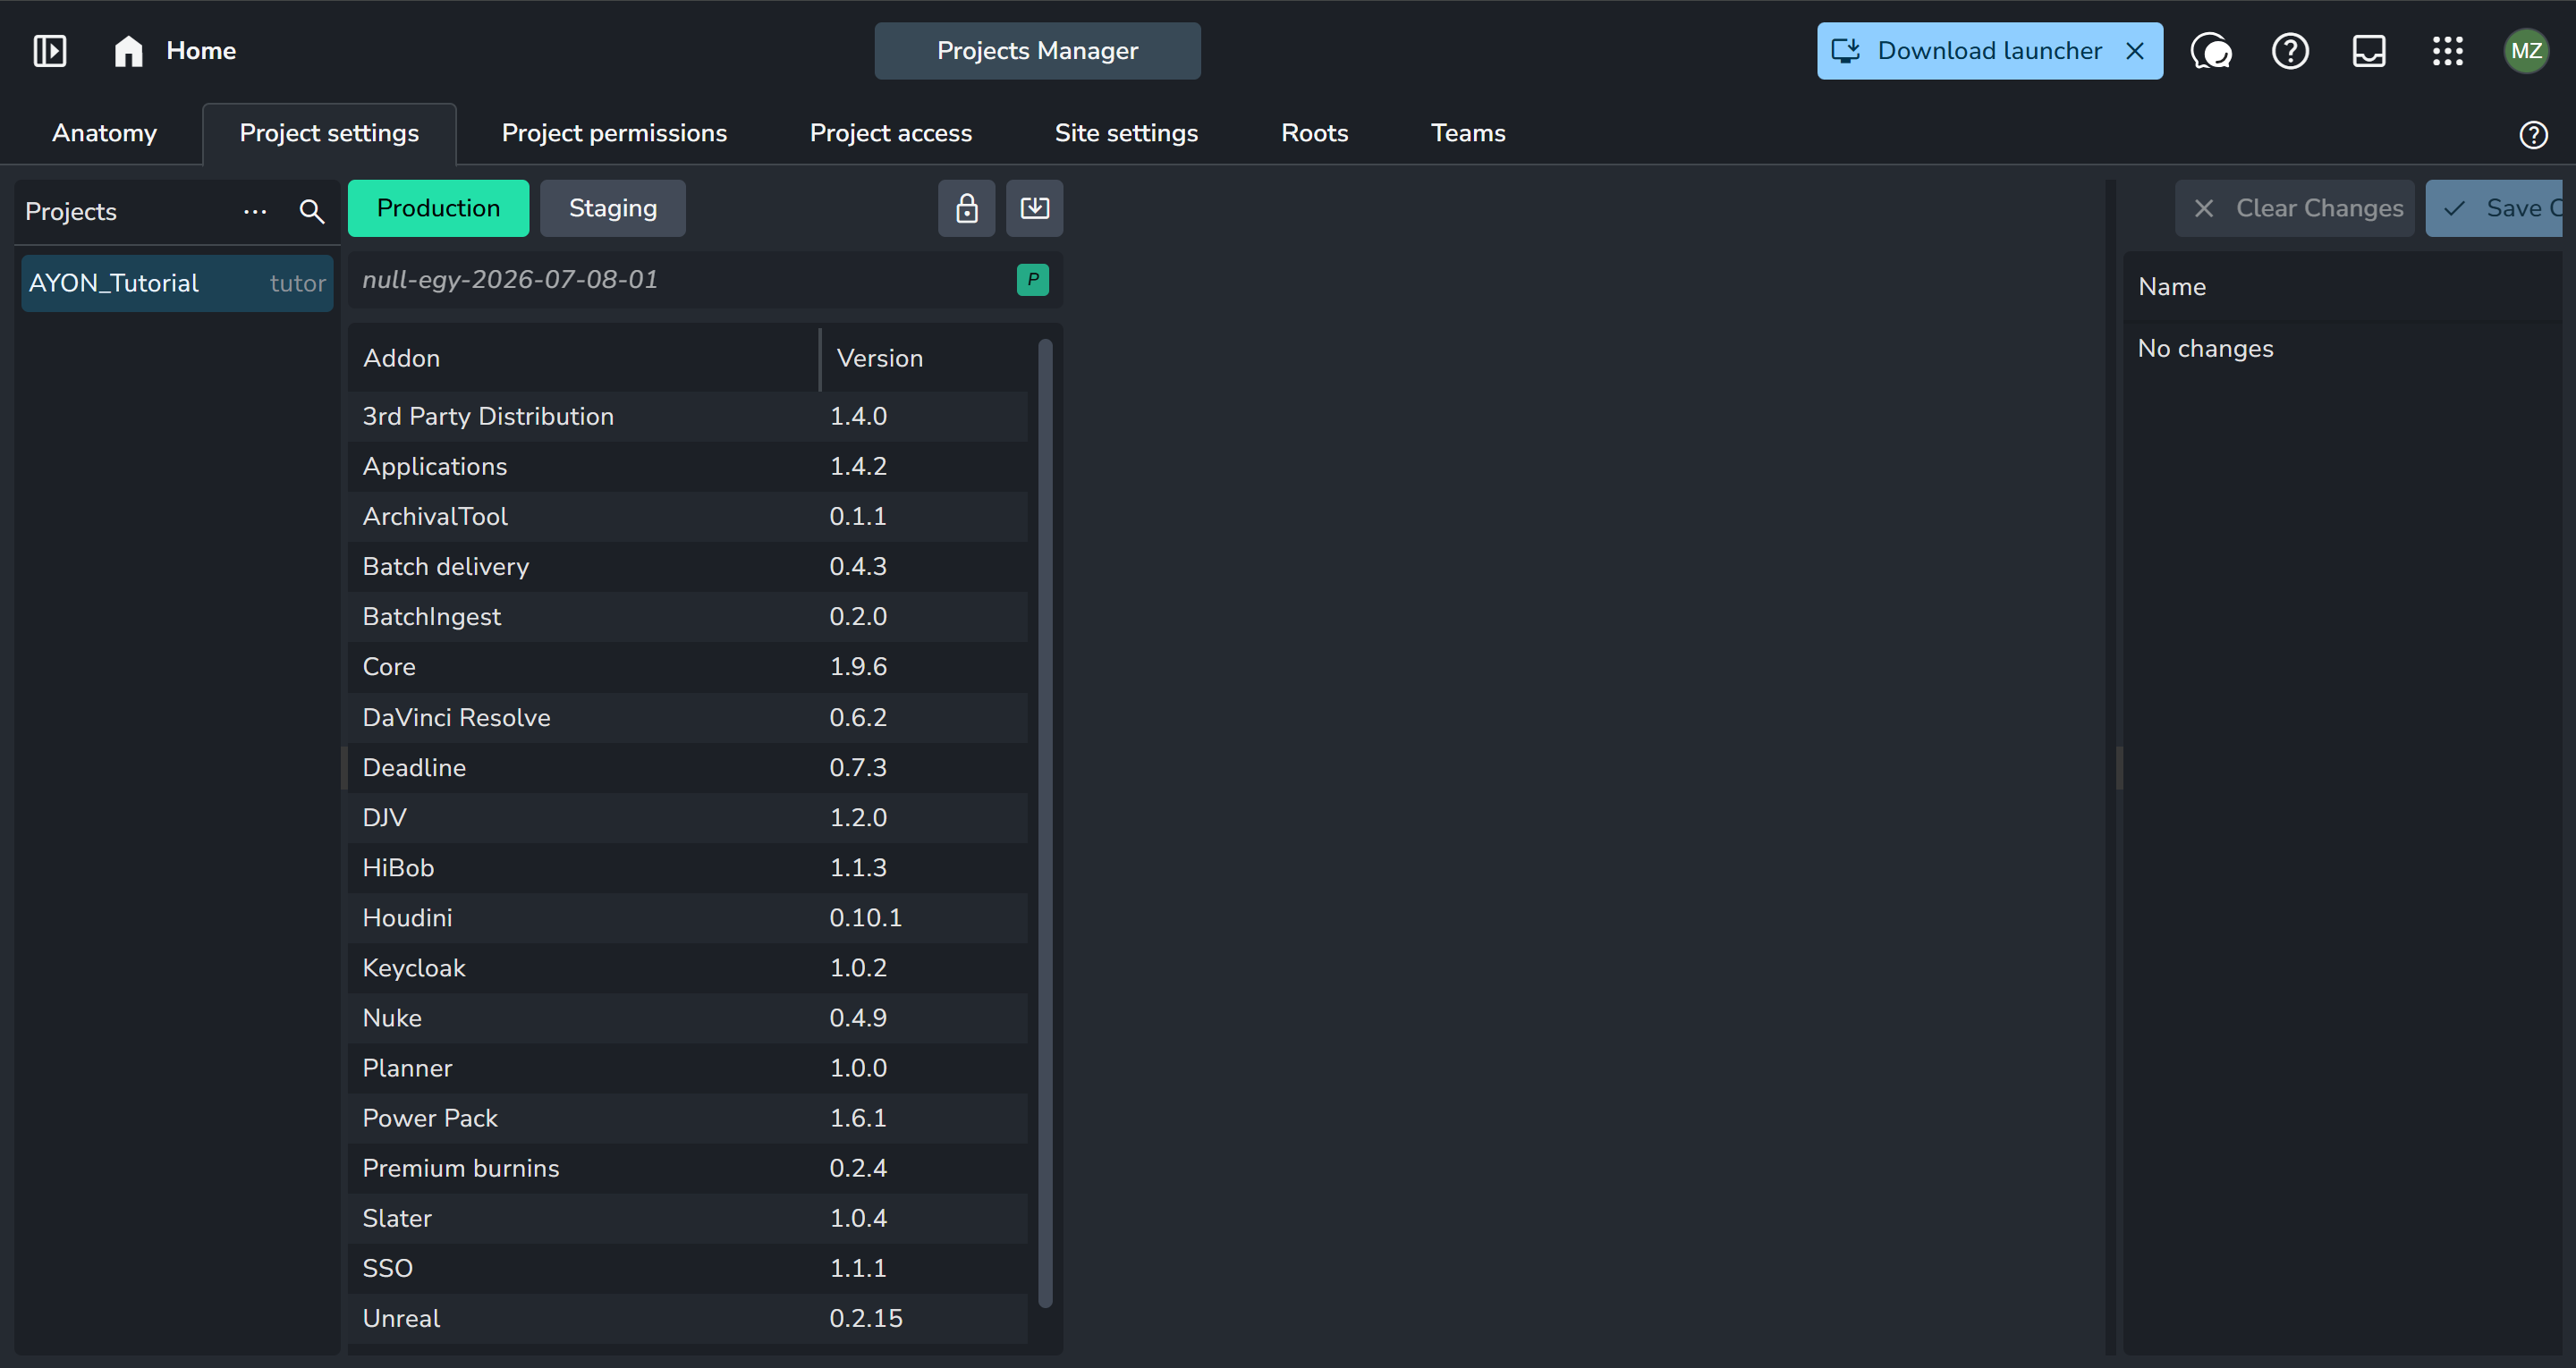
Project Settings (P + P or from App Menu)
For a detailed interface shortcuts, please refer toAYON Web App Keyboard Shortcuts.
Tab Visibility:
The visibility of these tabs and navigation options depends on the user's role. Administrators see every space, while artists see a simplified interface with fewer tabs, strictly tailored to their daily production tasks.
Change the AYON Welcome Screen
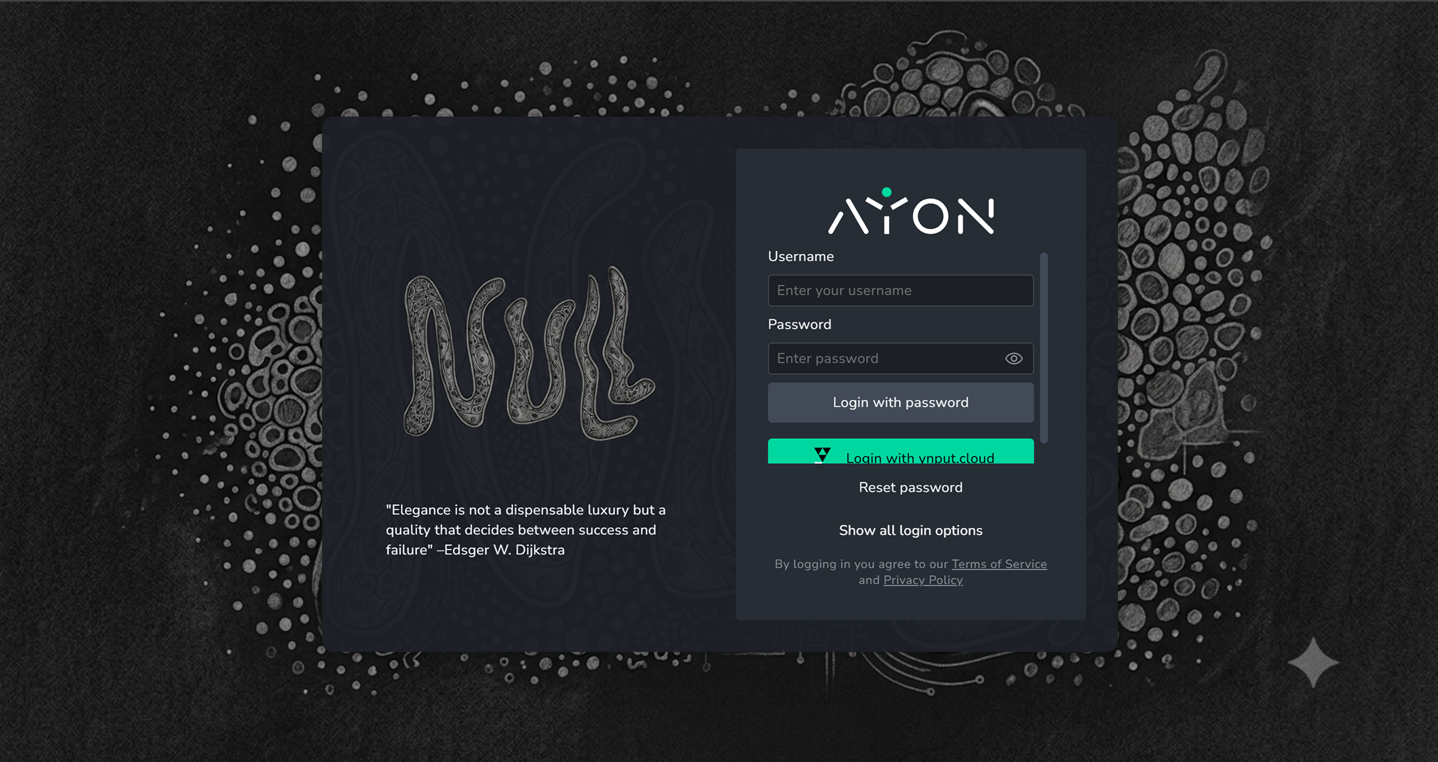
Let’s warm up getting familiar with AYON Server administration by customizing your server's welcome screen and login message.
Step-by-Step Instructions
Open Studio Settings by pressing
S+Son your keyboard (or select Studio Settings from the AYON menu in the top-right corner).Go to the Global tab.
Locate and update the following configuration options:
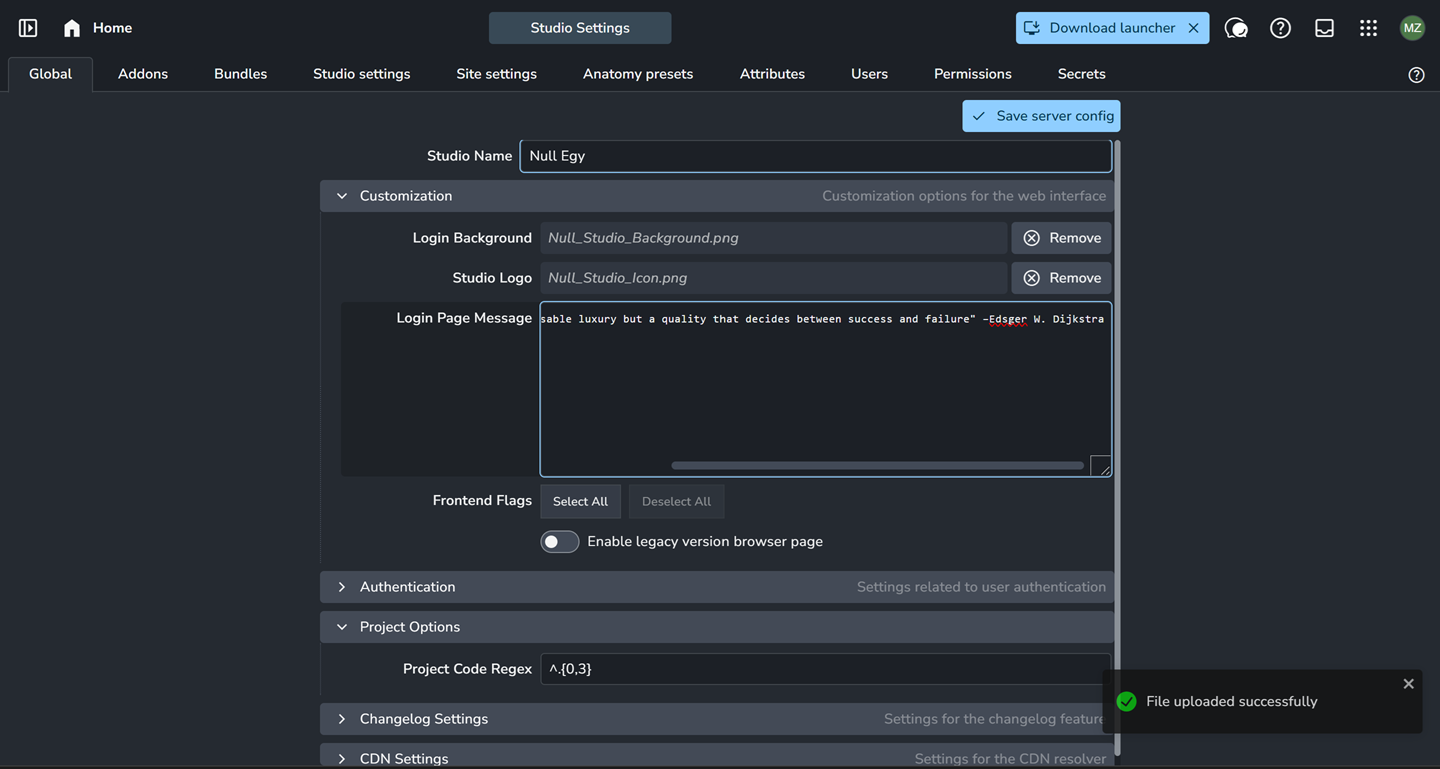
Studio Name: Enter your official studio or team name.
Configuration > Login Background: Upload or select a custom image for your server's login page.
Configuration > Studio Logo: Upload your studio's logo to brand the top navigation bar and login screen.
Configuration > Login Page Message: Write a custom greeting or notice displayed to artists when they sign in.
Click Save at the bottom of the page to apply your changes studio-wide.
Quick Verification:
Log out of your session or open a private browsing window to view your newly customized login page and welcome screen!
Onboarding Users and Permissions
To onboard users in AYON, you will create user accounts, assign their access levels (user roles) and project permissions, and send them invitations so they can set their passwords and log into their accounts.
💡 Why this workflow? Setting up roles and permissions before sending invitations ensures team members have the exact access and visibility they need from the moment they first log in.
User Creation
To manage users, navigate to the Users tab inside Studio Settings:
Quick Shortcut: Press
U+Uon your keyboard to jump directly to the Users tab.Menu Navigation: Press
S+S(or select Studio Settings from the AYON menu in the top-right corner), then select the Users tab.
You can create users in two ways:
Individual Creation: Click the Add New User button in the top-left corner to create accounts one by one.
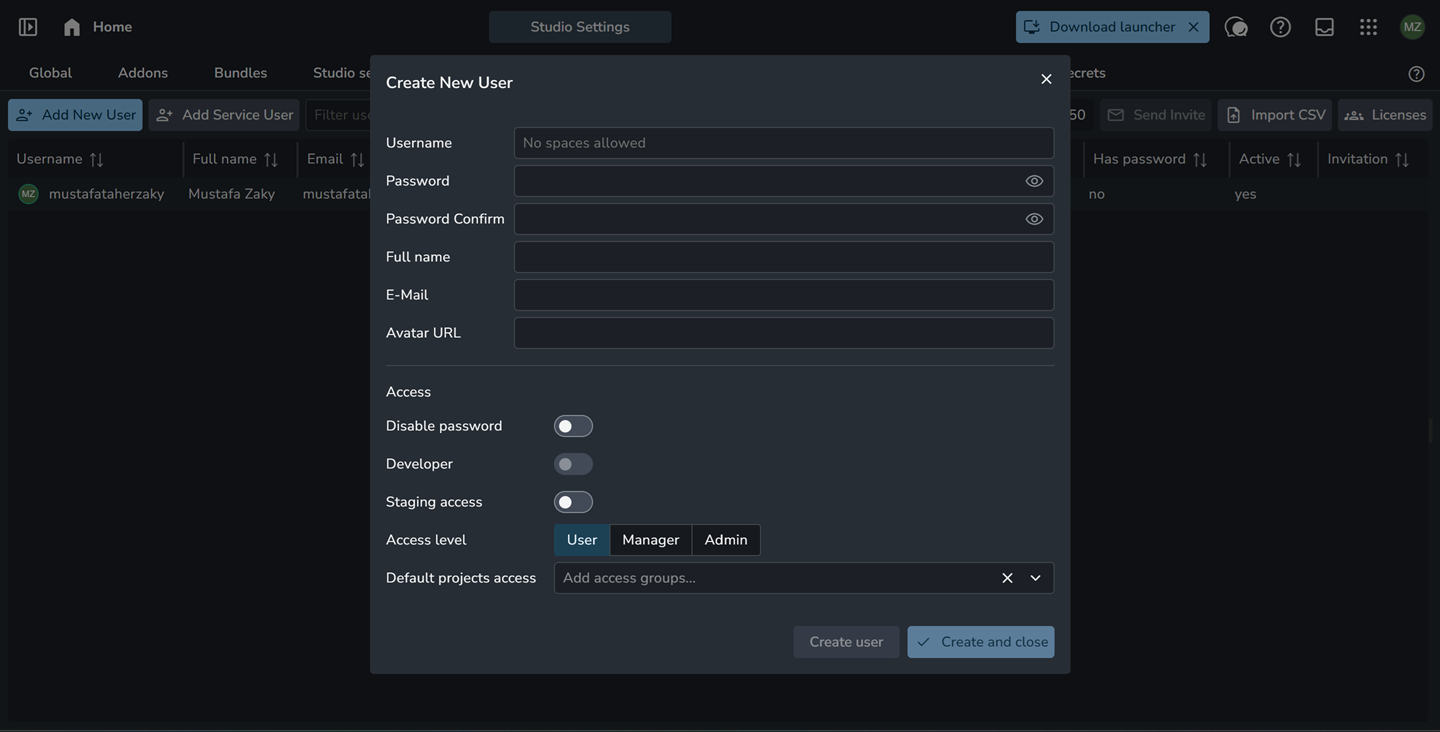
Batch Import: Click the Import CSV button to onboard multiple users at once. Your CSV file should include the following column headers:
user name ,full name ,email ,avatar urlYou can take example from the attached csv example below.
demo_users_example.csv
1.2 KB• Spreadsheet
For further information about user management, please refer to User Management.
User Invitation
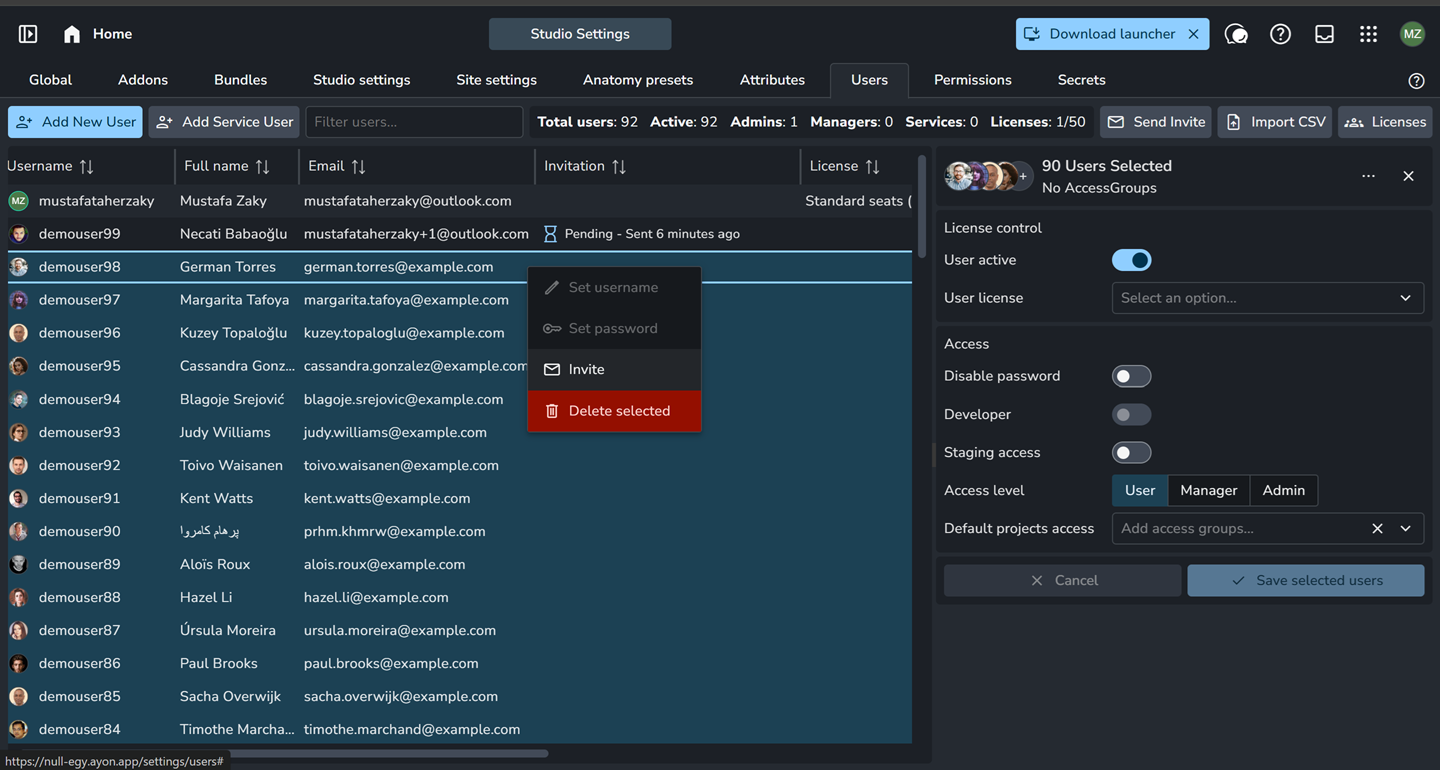
Once user accounts are created and permissions are configured, select one or multiple users (using Shift + click) and click the Invite button in the right-hand user details panel or in the right-click context menu.
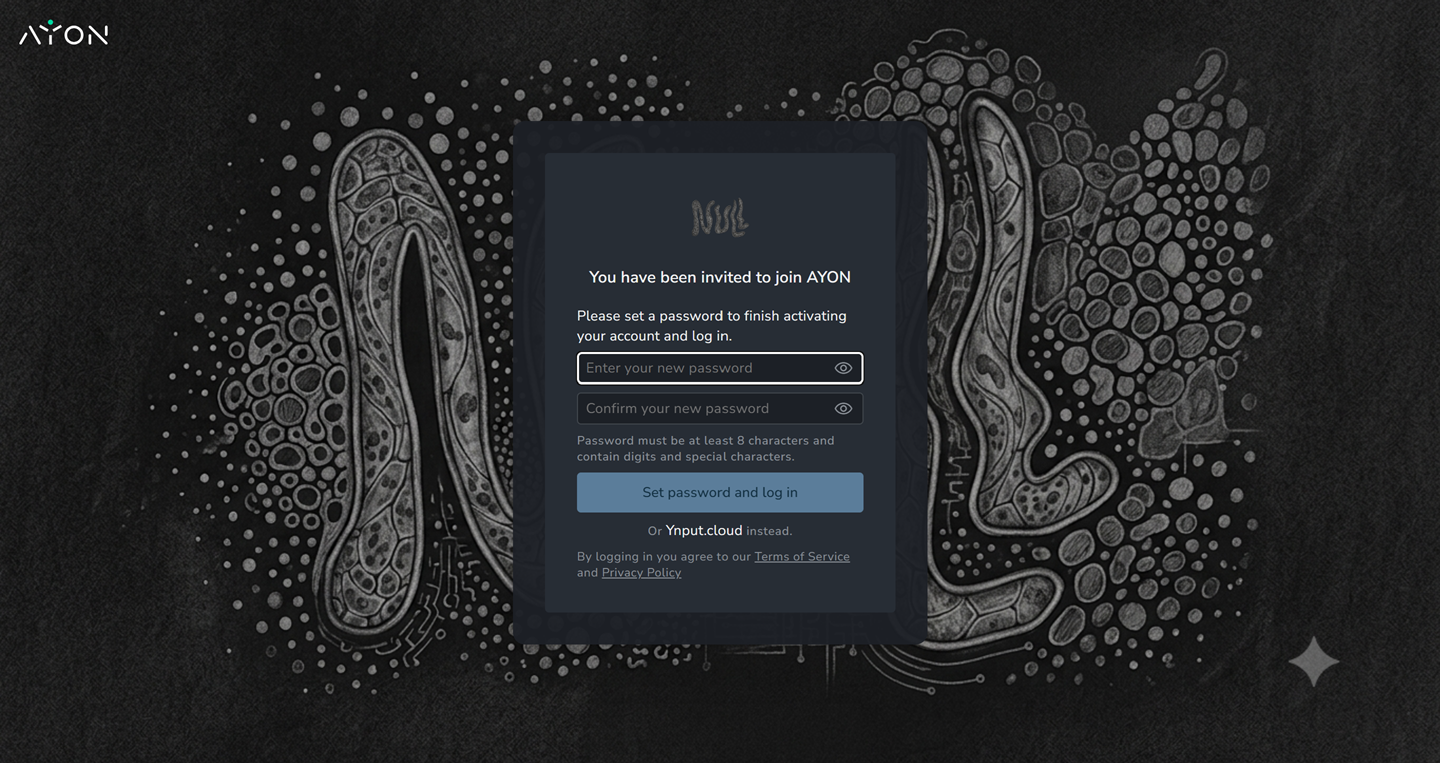
Invited users will receive an email with a secure link to set their password and log in.
Password Reset Alternative:
As an alternative to sending invites, you can also manually set or reset a user's password directly from their detail panel on the right.
Access Levels & Access Groups
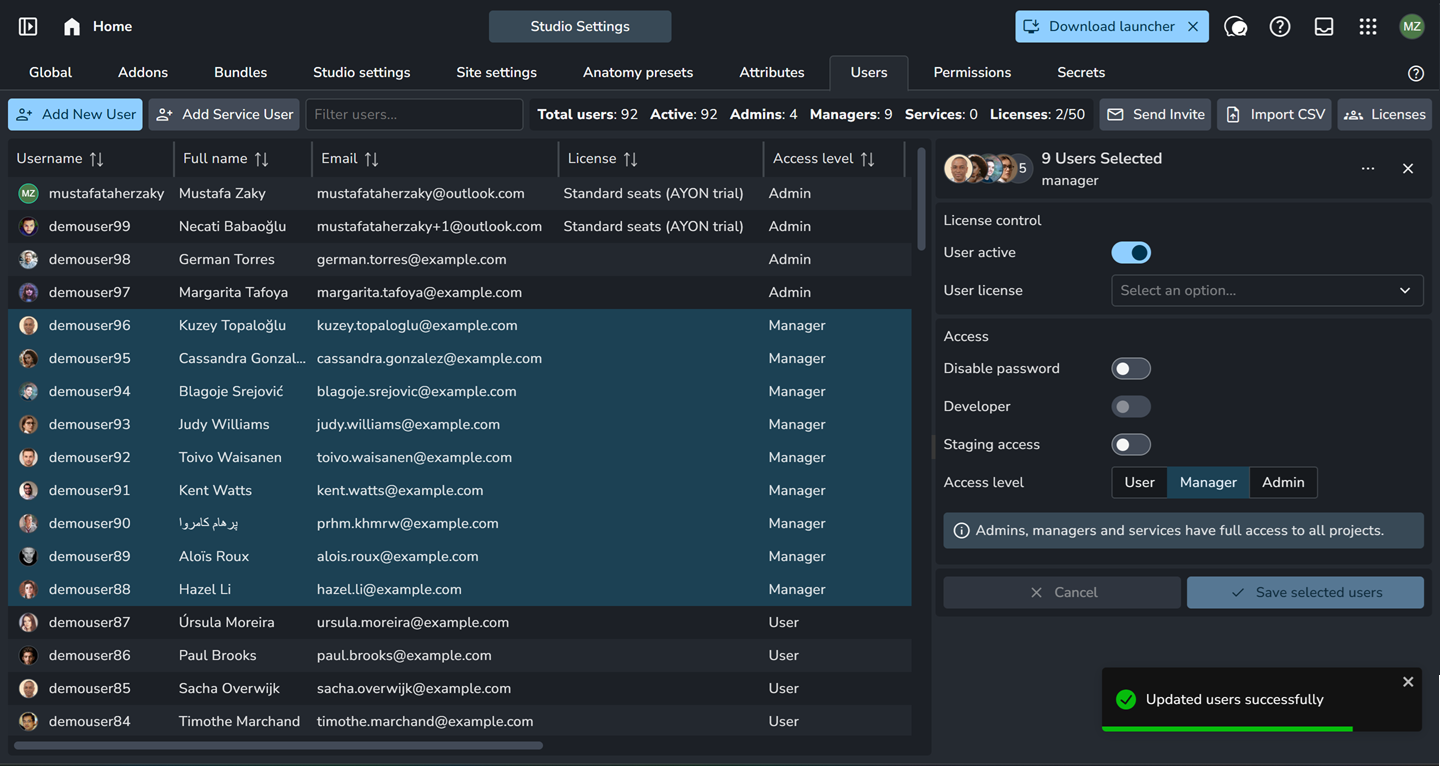
Selecting one or multiple users in the Users tab opens their details panel on the right, where you can configure their account settings:
Set Access Level: Choose one of three available roles: Admin, Manager, or User (Standard).
Admins and Managers automatically receive broad access across the server.
Standard Users rely on Access Groups to determine precisely which projects, folders, tasks, and settings they can view or edit.
Assign Default Access Group: For standard users, set a Default Access Group directly within their user panel. This defines their baseline permissions assigned to new projects upon creation, without affecting existing projects.
You can leave this field empty so the user won't be granted automatic access to any newly created projects.
For further information about permissions and access groups, please refer to User Permissions and Project Access Groups.
Manage & Overriding User Access Groups Permissions
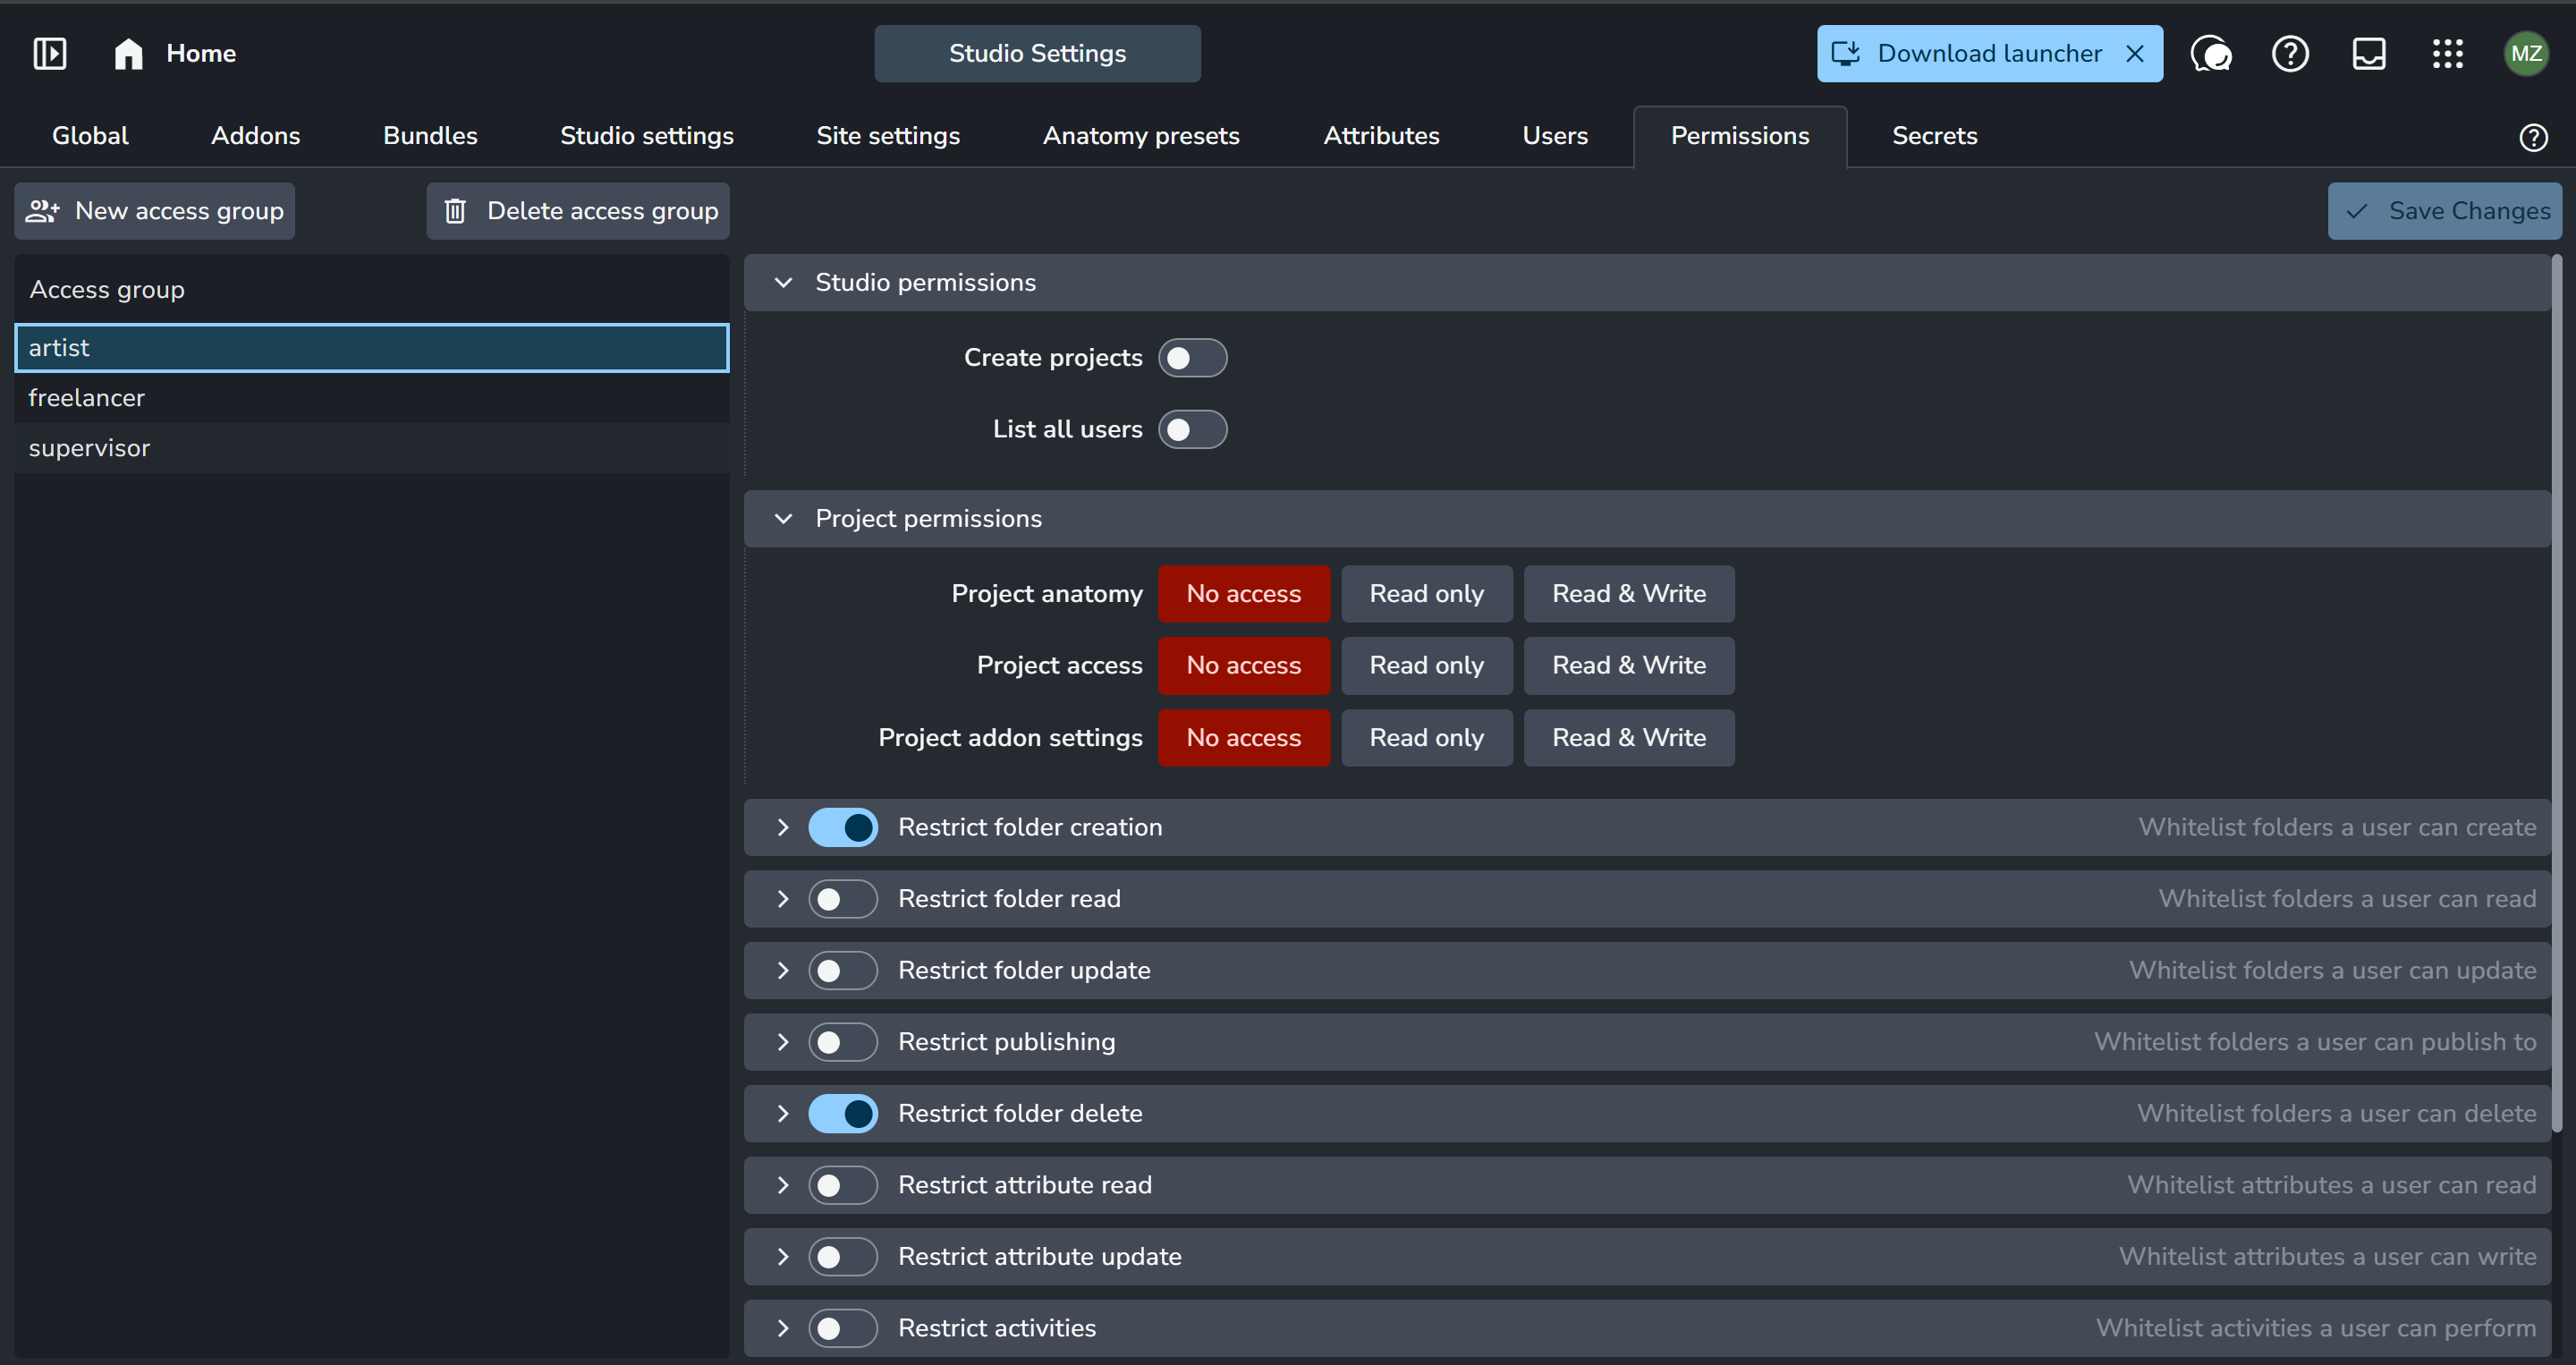
Go to Studio Settings (S + S) → Permissions tab to manage global baseline permissions for each access group.
You can override the permissions per project by going to Project Settings (P + P) → Project Permissions tab, then selecting your desired project from the left side panel to customize rules for each access group per show.
Step 2: Start Production
Now that your AYON Server is initialized and your team accounts are created, you can start productions.
Create Project
Navigate to the Projects tab from the top navigation (or press H + H to go Home, then select Projects).
Click Create New Project in the top action bar.
In the setup pop-up, enter your Project Name and Project Code (keep all other settings at default for now). Click Create.
Select your newly created project from the list to open its details panel on the right.
Set the Thumbnail, Description, and core project attributes (e.g.,
fps, start/end dates, resolution).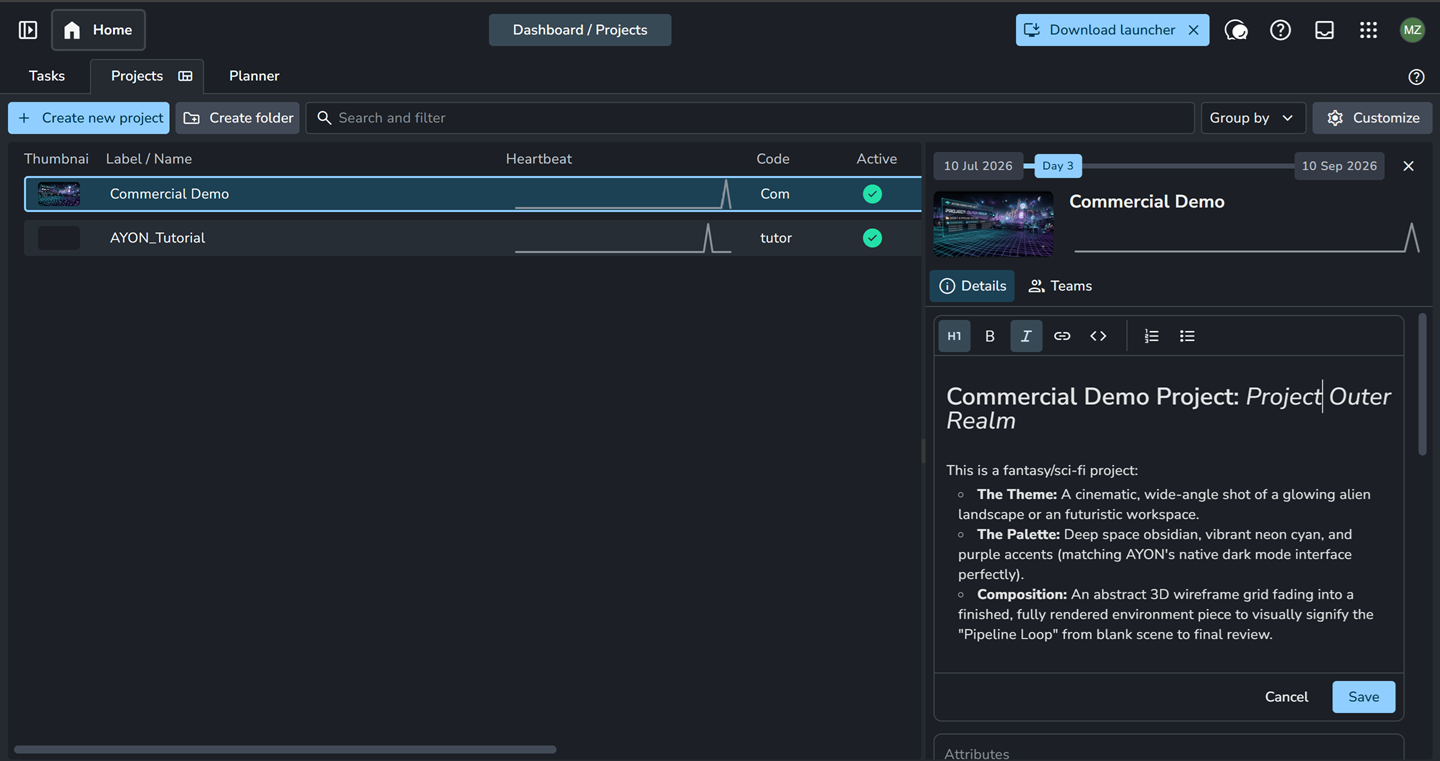
Create Project Hierarchy
To build out shots, assets, sequences, or tasks, open your project by double-clicking it in the Projects list (or selecting it from the left sidebar menu).
You can build your hierarchy in two ways:
Manual Creation: Click the + Create button to add individual folders, tasks, sequences, or shots step-by-step.
Batch CSV Import: Click Import CSV to populate your project structure at scale. Your CSV file should use the following column structure:
Path, Entity Type, Folder Type, Task TypeYou can take example from the attached csv example below.
demo_project_example.csv
4.4 KB• Spreadsheet
Manage Project Access
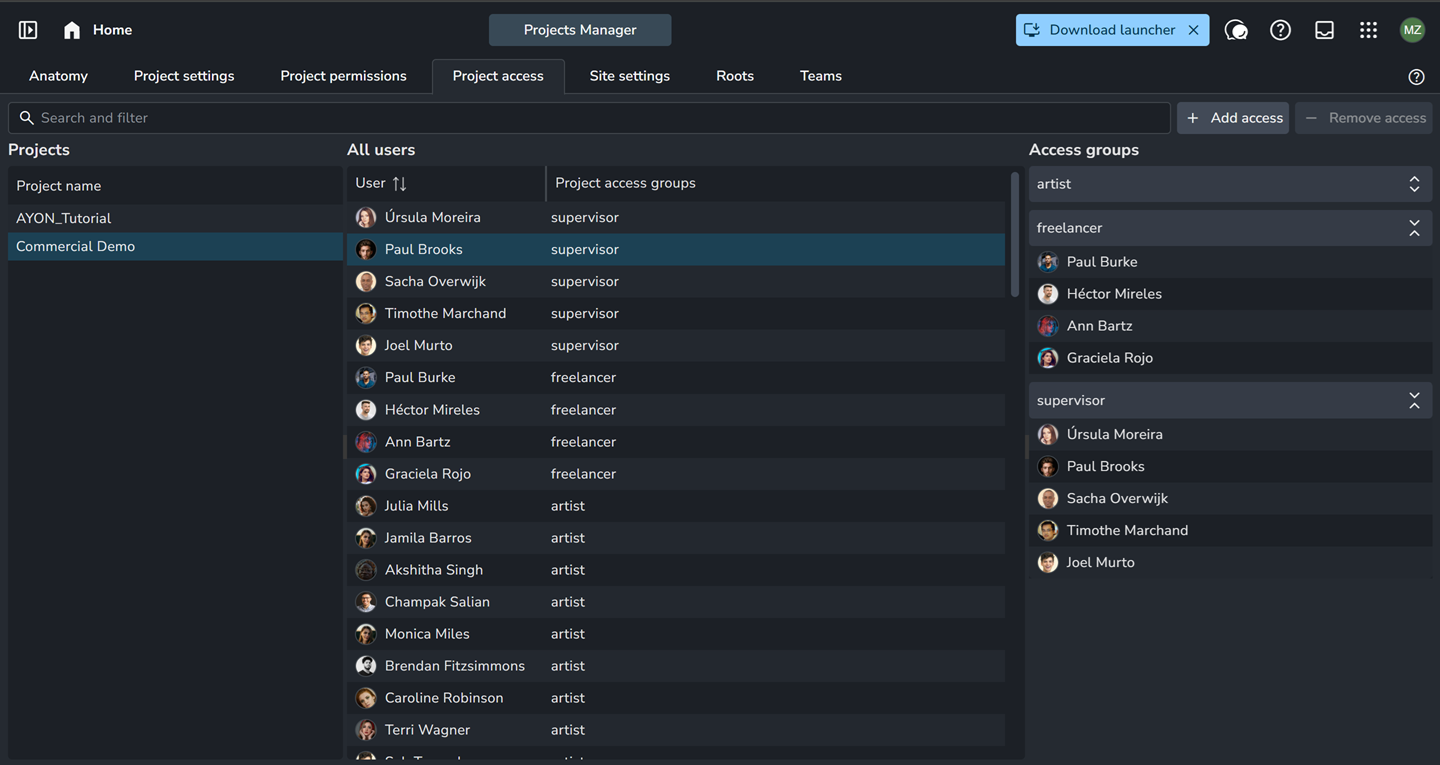
Navigate to Project Settings (P + P) → Project Access tab and select your project from the left side panel.
Assign each user to an Access Group to control exactly what they can view, edit, or publish on this show.
No Access Default:
If a standard user is not explicitly assigned an access group for a project, they will have no access to that show.
Project Planning in AYON
AYON provides a dedicated Planner Addon to manage production timelines using an intuitive, calendar-based interface.
Planning your show in AYON operates on two levels:
High-Level Planning (Planner Tab): Block out broad production phases (e.g., Modeling, Lookdev, Layout, Compositing) directly on a calendar.
The Planner tab is completely separate from your project structure. it does not link directly to individual tasks, assets, or shots.
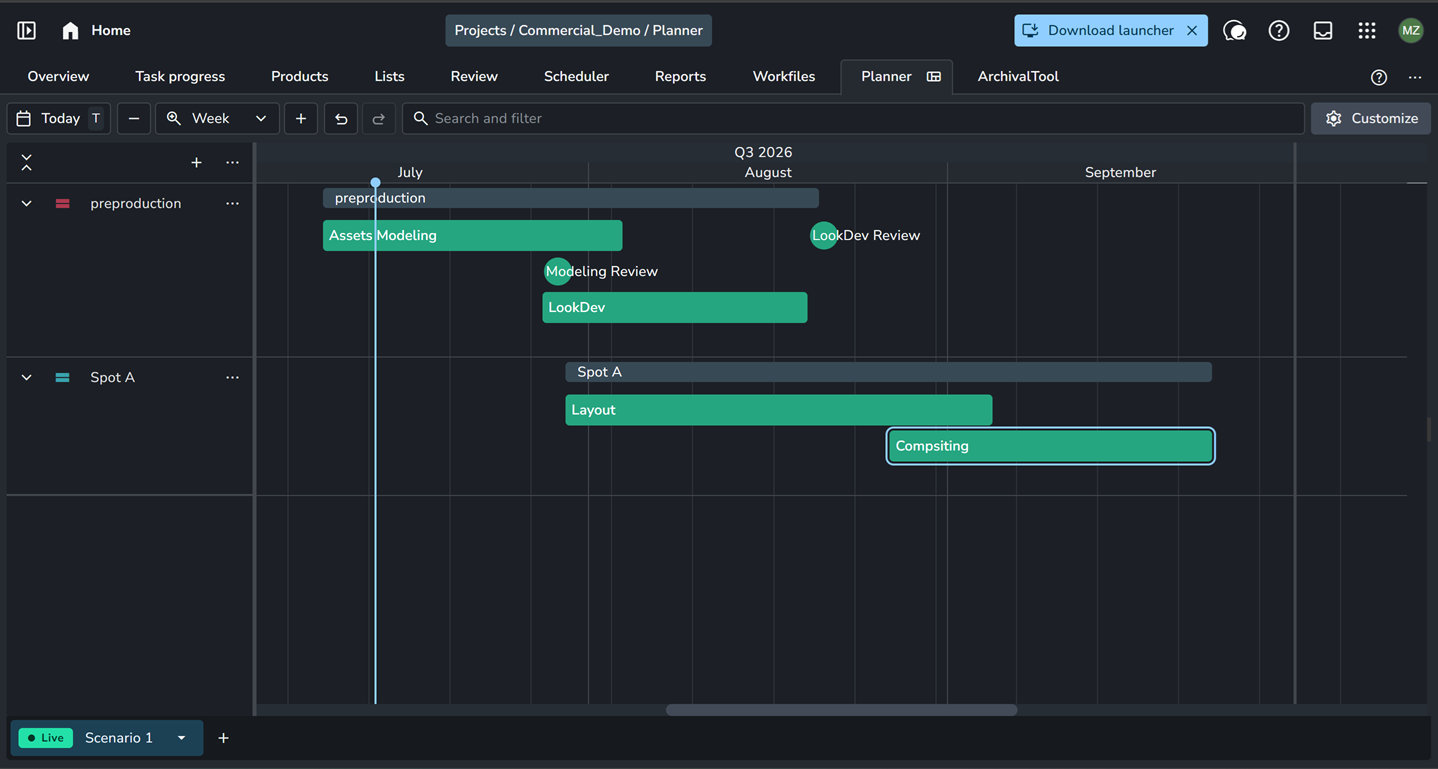
Planner atb where you block out broad production phases (e.g., Modeling, Lookdev, Layout, Compositing) directly on a calendar. Project-Level Scheduling (Scheduler Tab): This is where your high-level timeline connects to your actual show hierarchy. Assign specific project tasks to scheduled timeframes and map them against your overall calendar milestones.
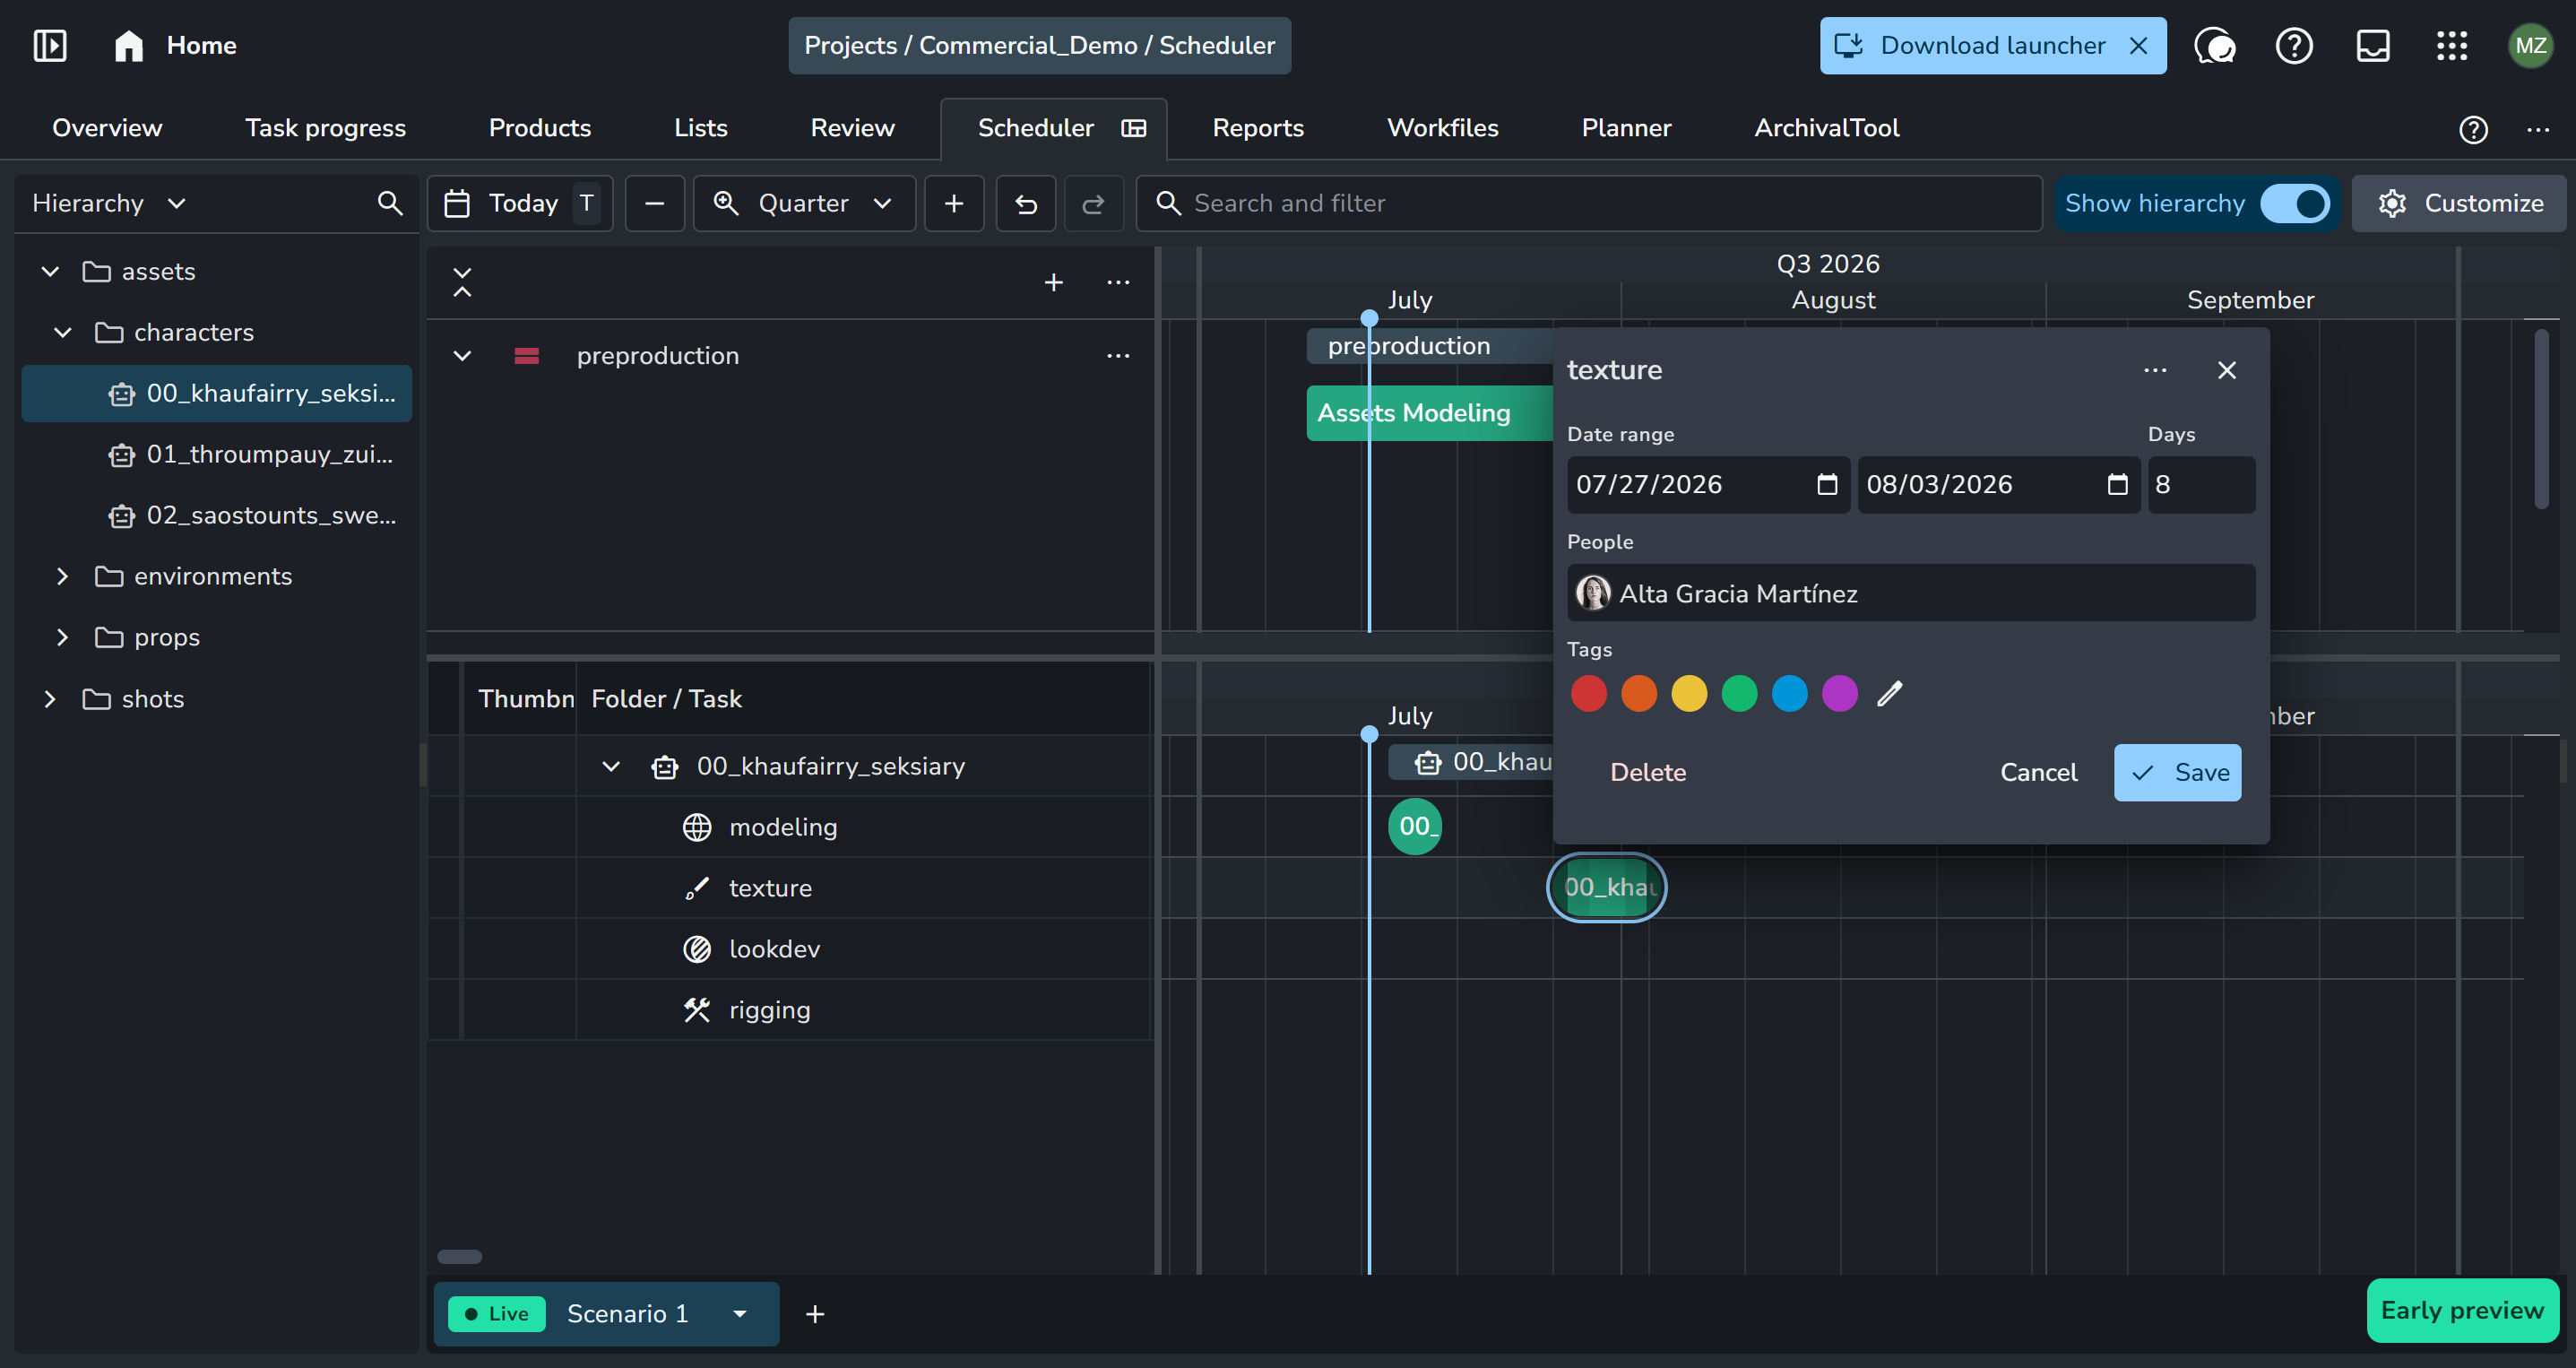
The Scheduler tab where your high-level timeline connects to your actual show hierarchy.
Project Planning & Overview Tab:
All schedule modifications are synchronized in real time across the Planner, Scheduler, and Overview tabs. While the Overview tab uses a spreadsheet-style table that lacks the visual timeline of the Planner, you can still use it to quickly edit task dates directly in a CSV-like fashion for smaller projects.
Project Planning Demo:
To explore a real-world production setup, ask the Ynput team about porting the Wing It demo project to your AYON Server.
Production Tracking Directly Without Pipeline
AYON can be used purely as a production tracking and review platform, completely independent of AYON Pipeline. In this workflow, artists create their work in any DCC and upload reviewables directly to the AYON Server for tracking and supervisor approval. Ideal for studios with custom pipelines or non-integrated software.
Task Status
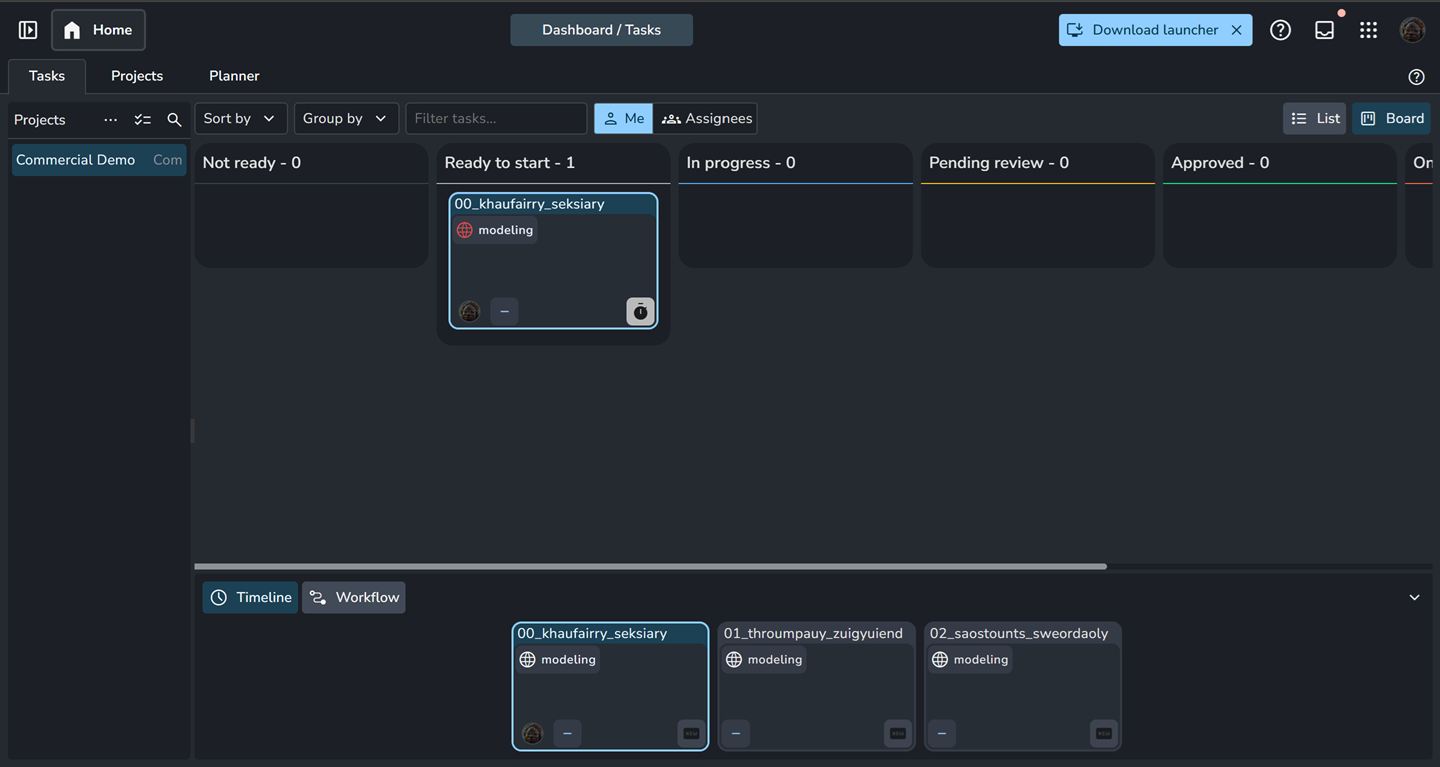
Once tasks are assigned, artists can track their active work directly from the web UI:
Log in to the AYON Server and head to the Home view (
H+H).Select your task.
Drag and drop the task into the status column to reflect your current progress (e.g., moving it from Ready to start to In progress).
For more information, see Tasks (Home) Page.
Uploading Reviewables to AYON Directly
When you are ready to get feedback on your work, you can upload reviewable directly to AYON
Click on the task to open its details panel on the right.
Drag and drop your media file (e.g.,
.mp4,.mov,.png, see Default File Support) into the details panel.Change the task status to Pending Review.
For more information, see Create Versions Without a Pipeline.
Reviewing Submissions
Supervisors and production managers can review submitted work in two ways:
Individual Review: Open any task directly from the Home or Project view to inspect uploaded media, scrub timelines, and post frame-accurate notes or status approvals.
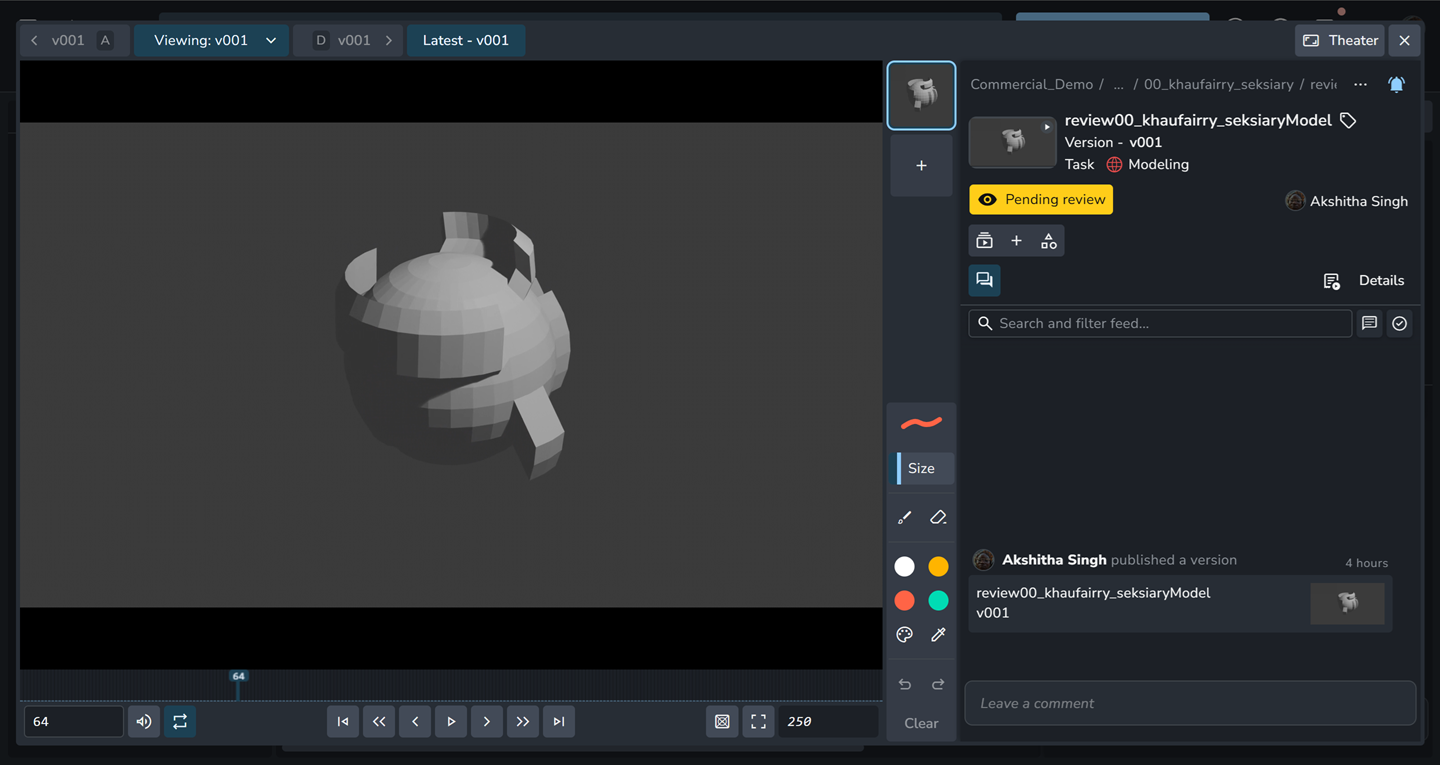
Review Sessions: Admins can assemble a Review Session to line up and play back multiple published products and tasks sequentially for review meetings or client dailies.
For more information, see Review Sessions.
Step 3: Introducing AYON Bundles
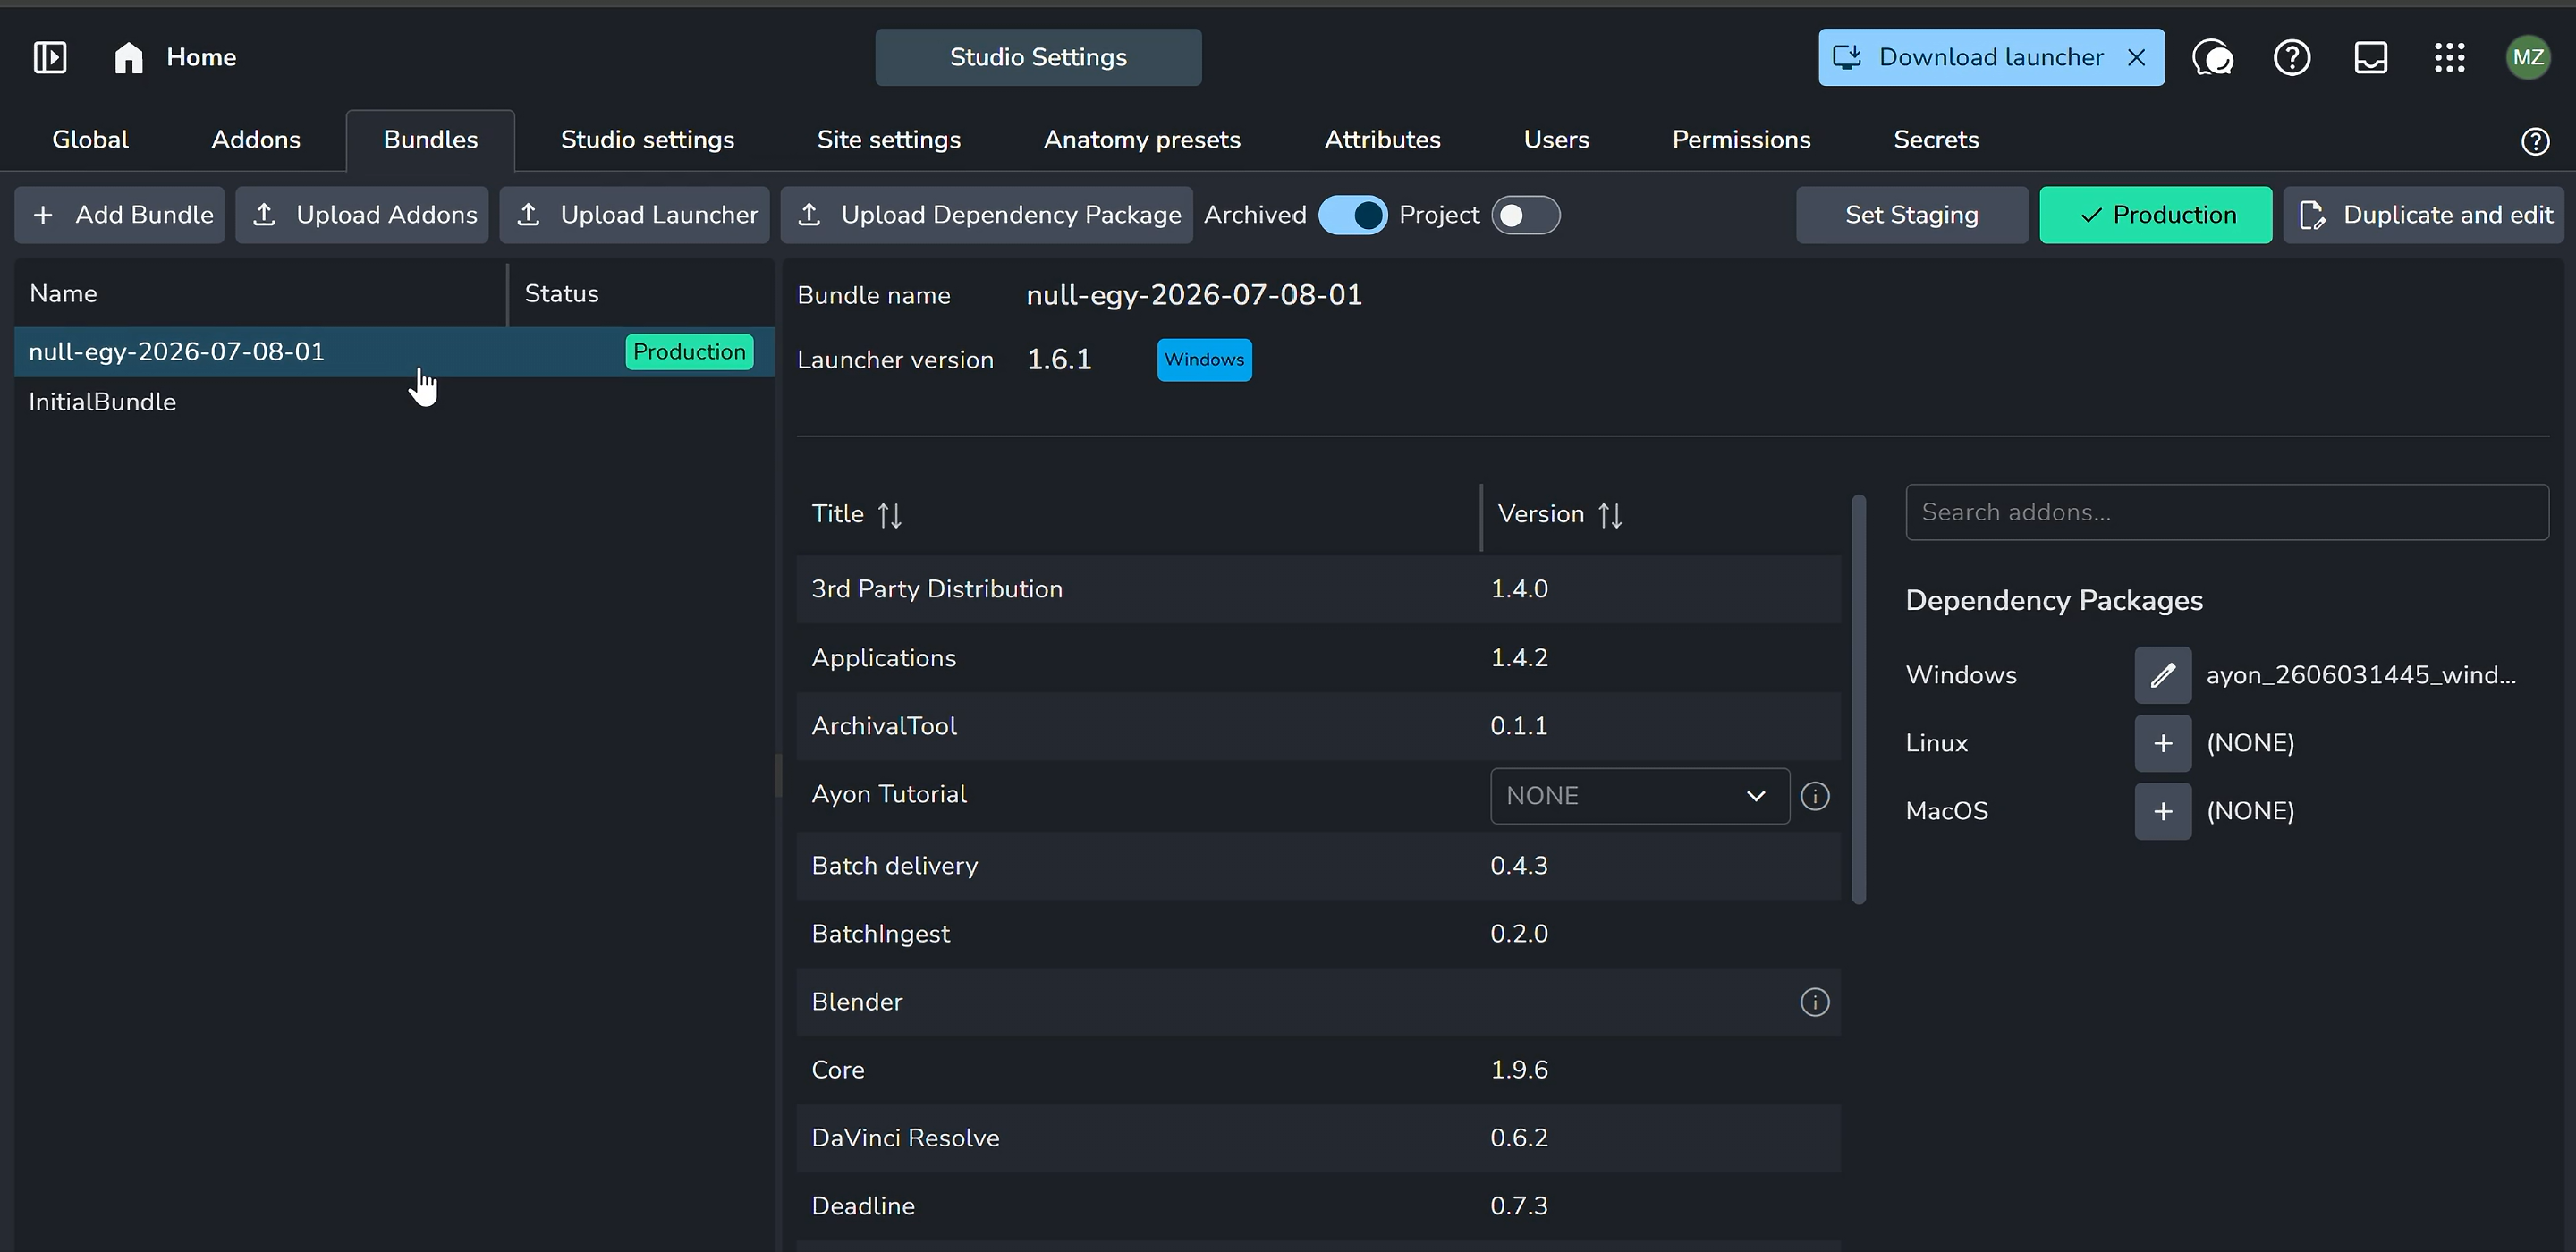
AYON is a modular application and the way to extend its features is via bundles.
A bundle is a collection of different AYON components that extends your AYON server. It contains addons that expand production features (like the planner addon) as well as pipeline addons (like the core addon) and other desktop components like the AYON launcher and dependency packages.
You can see your bundles in the Bundles tab below Studio Settings (or use the shortcut B + B). The bundle marked Production is the active one for your server.
It’s crucial to keep an eye on bundles so you can update your addons whenever new releases are available.
For more info, check Bundles & Addons.
In the next section, we will update our bundle and configure the pipeline.
Step 4: AYON Pipeline
Think of the AYON Pipeline as the bridge connecting your workstation to the rest of the studio. From an artist's point of view, it takes care of all the tedious file management behind the scenes so you can focus on creating.
At its core, AYON handles the essentials automatically:
Sets Up Your Workspace: Automatically loads the right plugins, environment variables, and studio tools every time you open an application.
Keeps Files Organized: Creates uniform folder structures and manages where your workfiles are saved without guessing the naming conventions.
Handles Sharing: Makes it effortless to publish your finished work to the AYON Server and load assets created by other team members directly into your scene.
Add Missing Addons to Production
Since we’ll be using Blender for this guide, let me make sure our server has the Blender integration addon installed alongside OCIO for color management.
Here is how to grab them and update your production environment:
Install Addons:
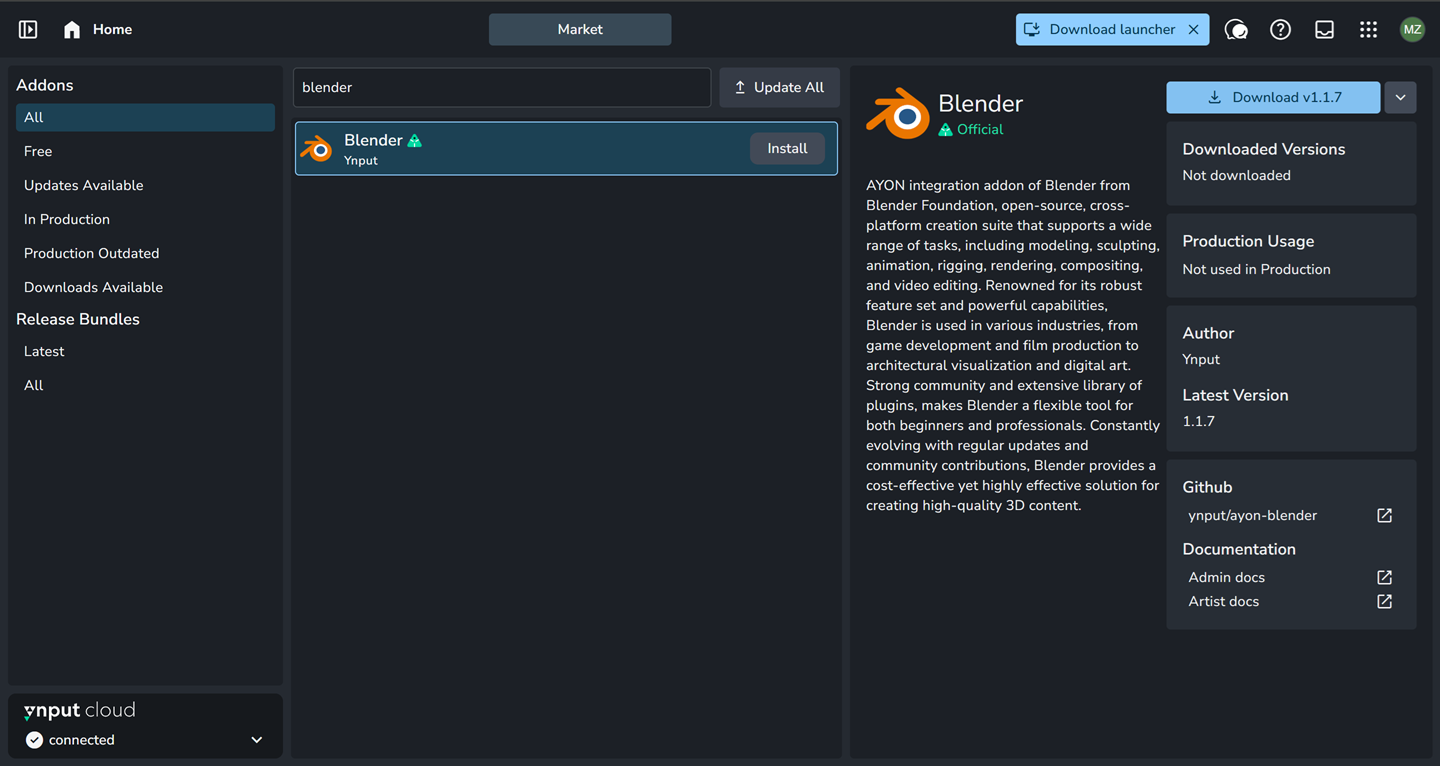
Find the Addons: Head over to the Addon Market (press
M+M) and search for Blender and OCIO.Install: Click Install next to each addon.
Edit Production Bundle: Jump to the Bundles tab (
B+B), select your active production bundle, and click Duplicate and Edit.Update Addon Versions: Pick the versions for your newly added Blender and OCIO addons, then click Save.
Save: Click Create new bundle.
Set as Active: Select your new bundle, right-click it, and click Set Production.
Pipeline Configuration
When setting up your studio pipeline for the first time, check these key settings:
Project Roots (Project Anatomy): Defines where your project files, workfiles, and publishes will live on disk. At a minimum, you must configure the
workroot path.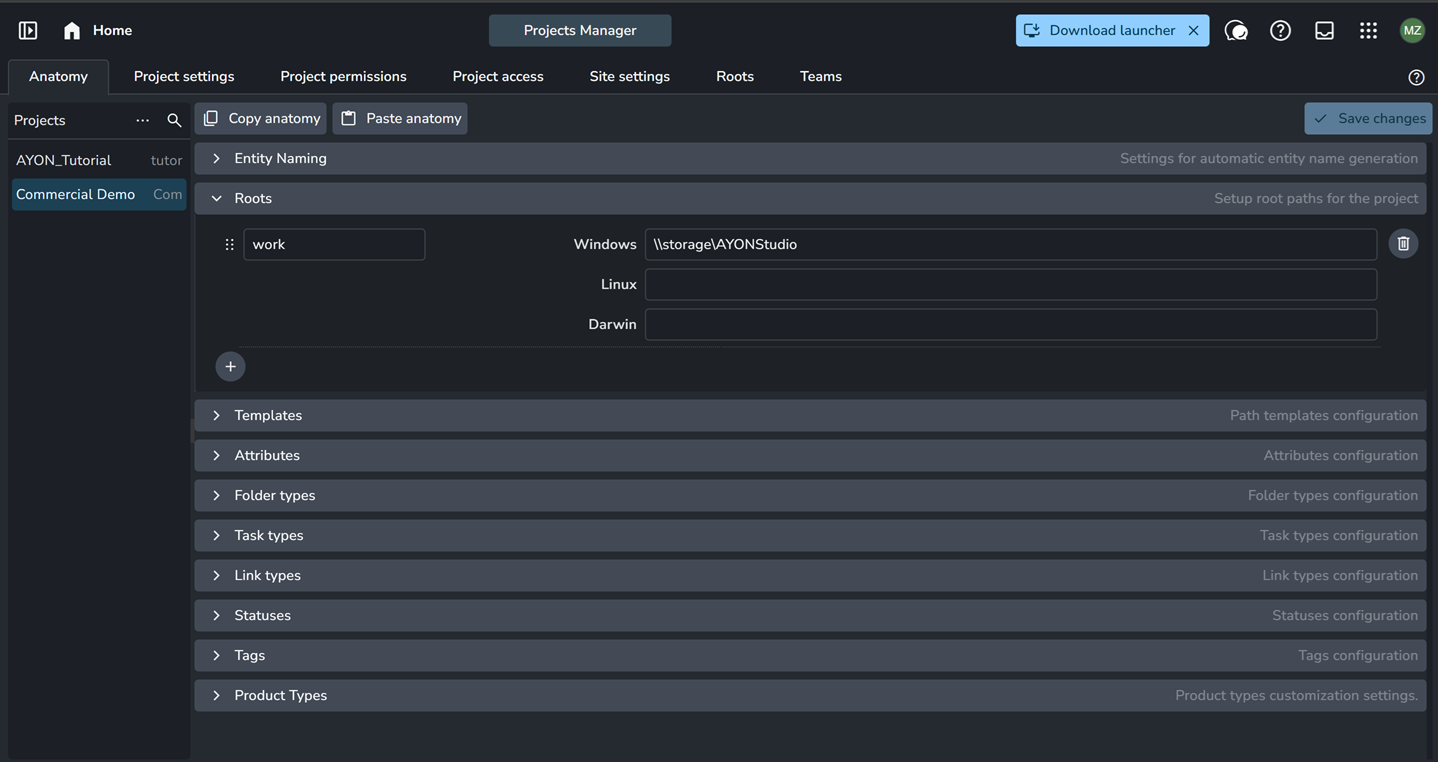
AYON is highly flexible and offers complete control over file locations and naming conventions for advanced setups.
Application Paths: Under Studio Settings → Applications, set the local executable paths for each software version (e.g., Blender, Nuke, Maya). You can specify multiple paths per application version across different OS platforms.
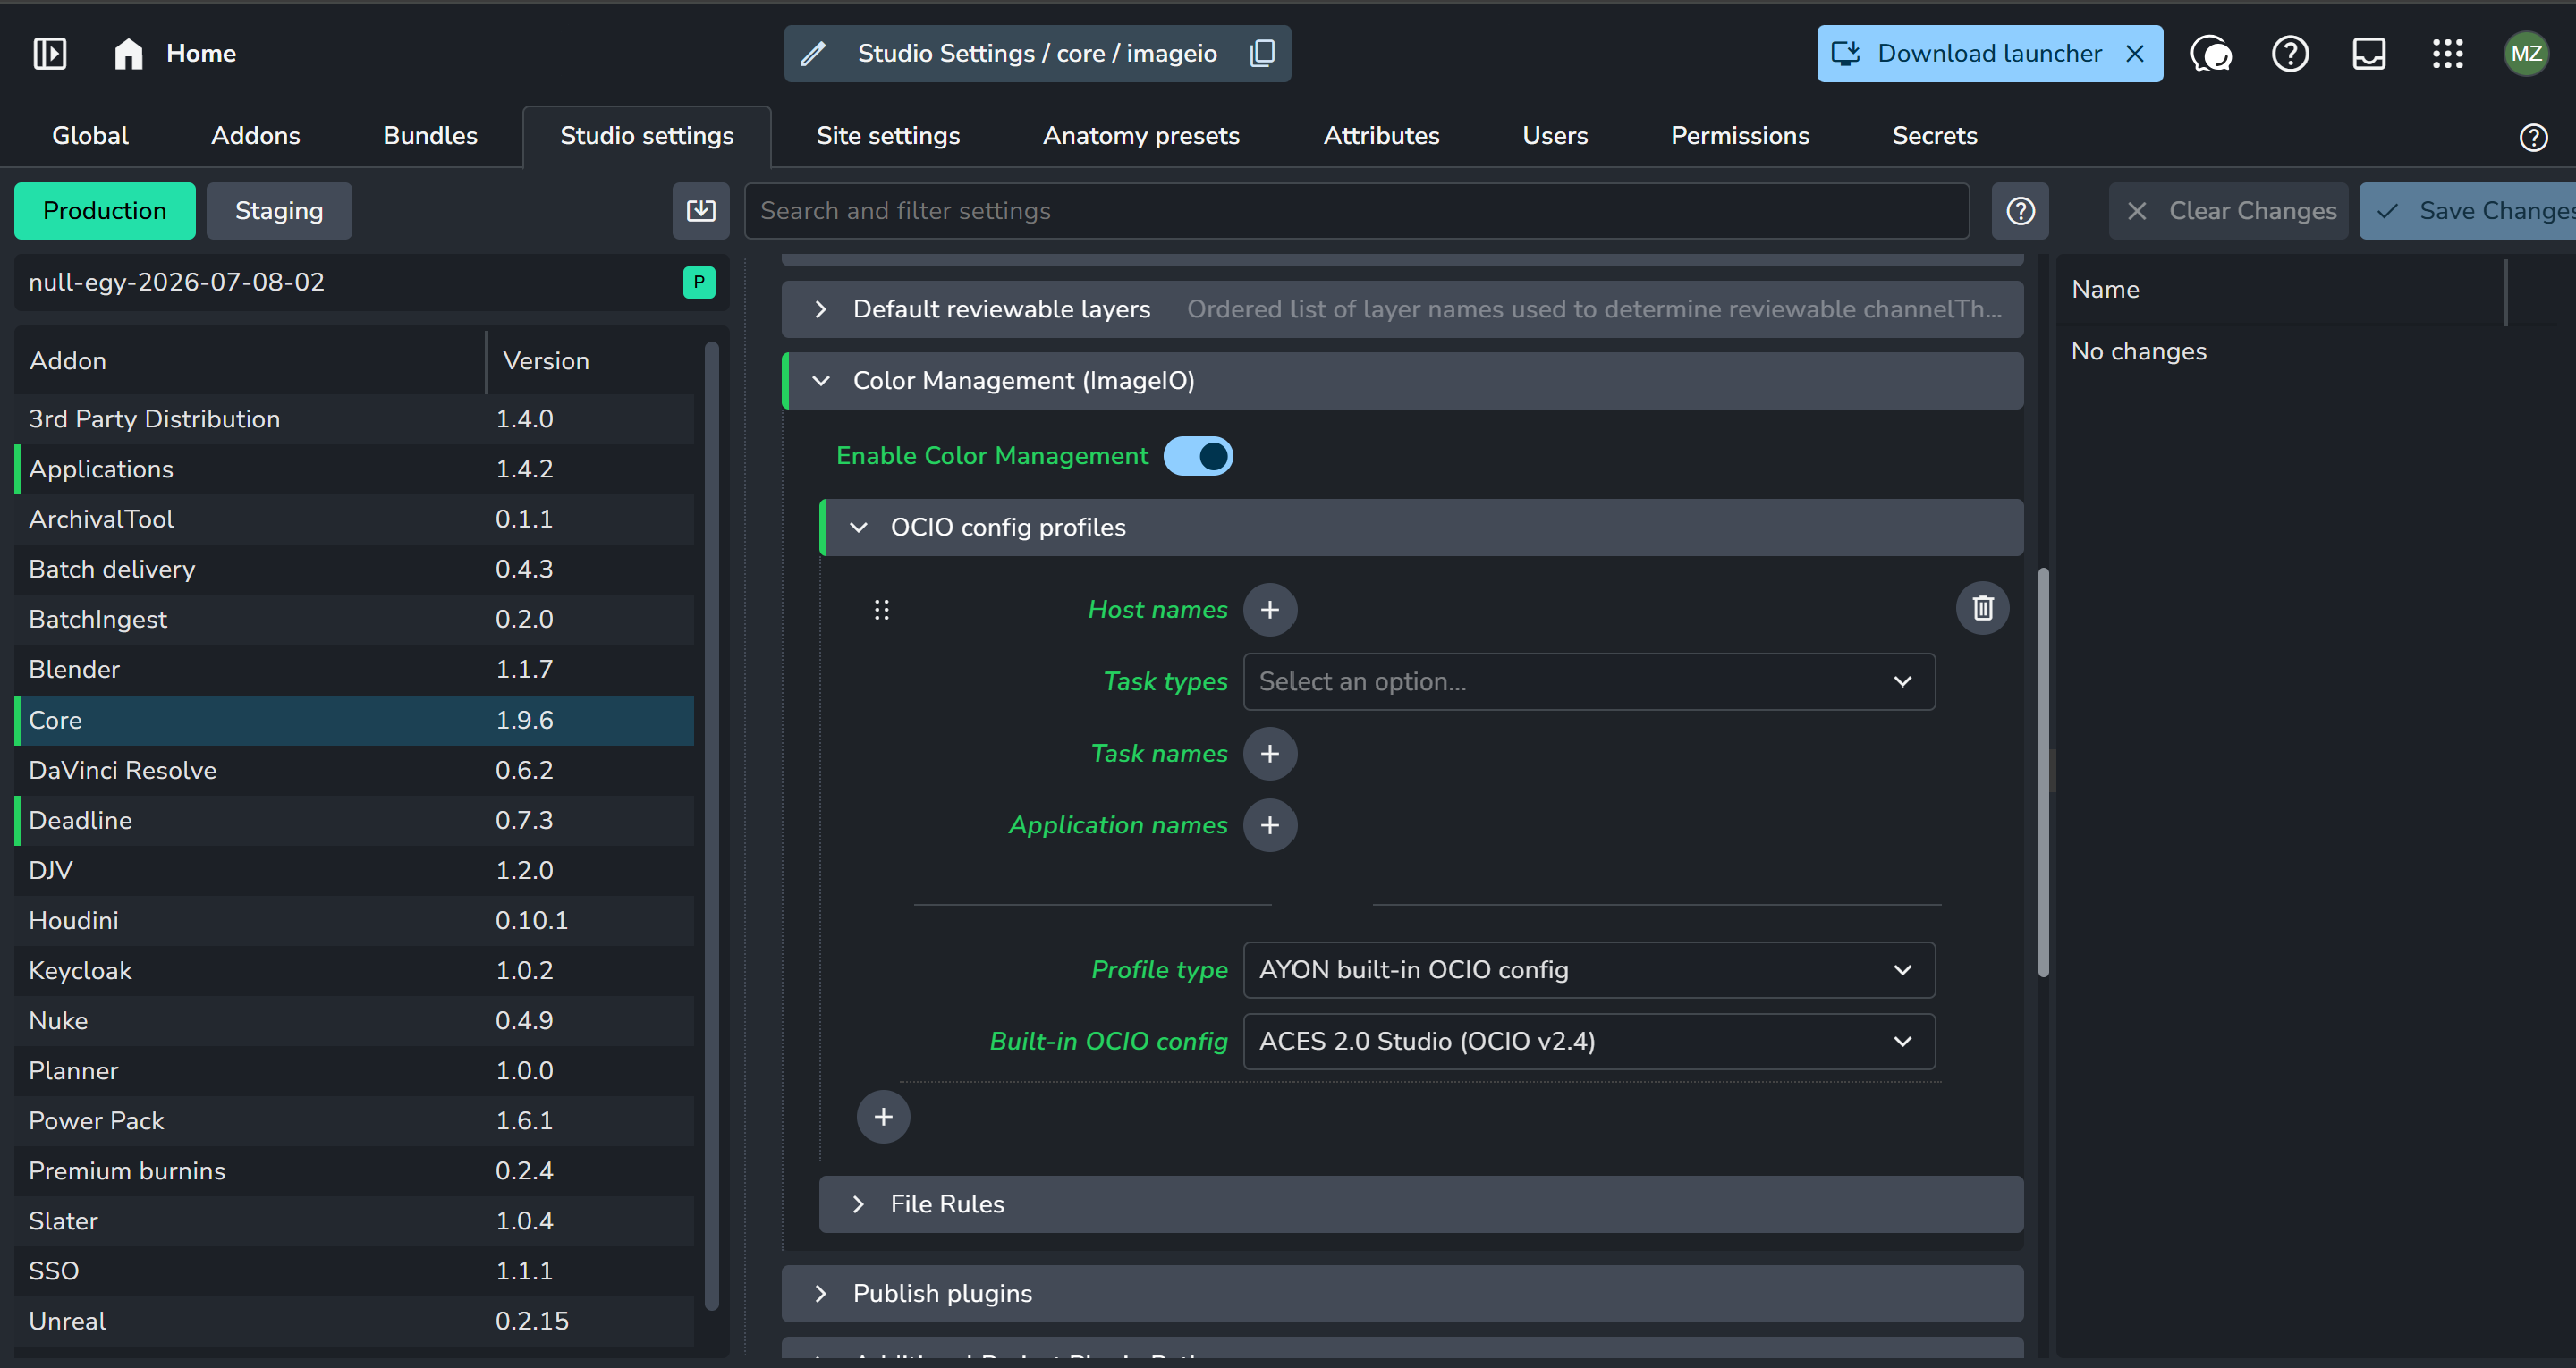
Color Management: Enable global color management (OCIO) under the Core Addon settings.
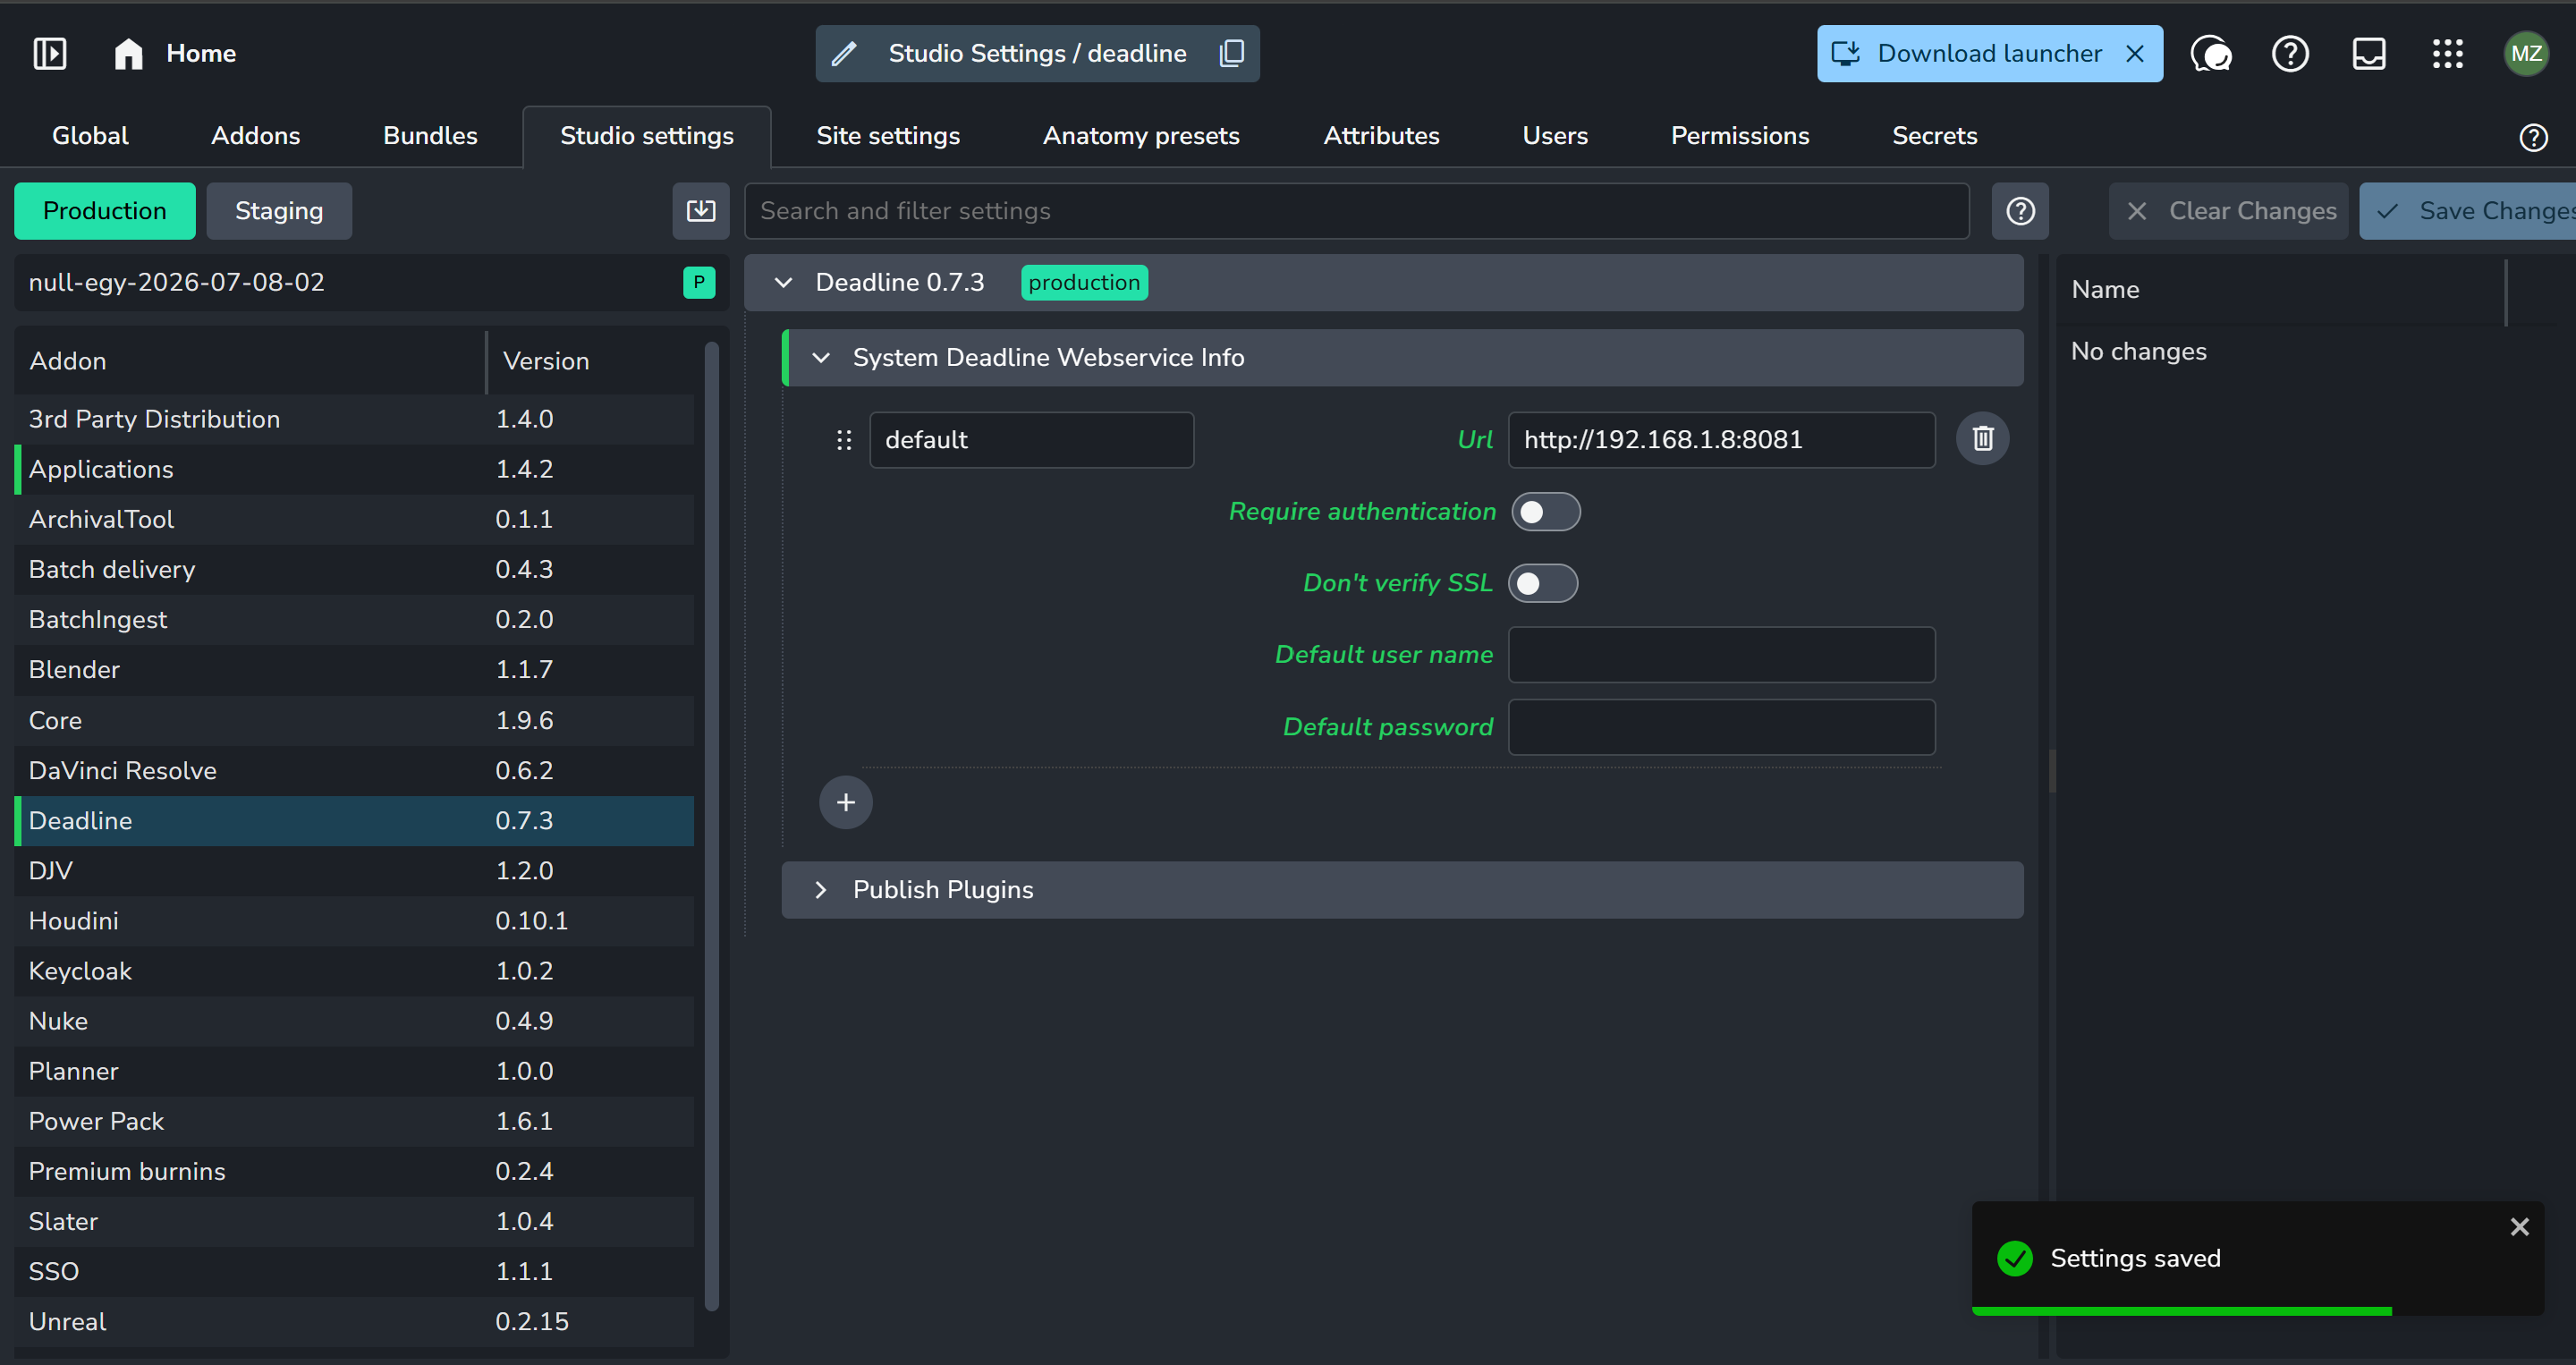
Deadline Settings: Thinkbox Deadline is widely supported across the AYON pipeline. For further info about setting up Deadline, see Configure Deadline Addon.
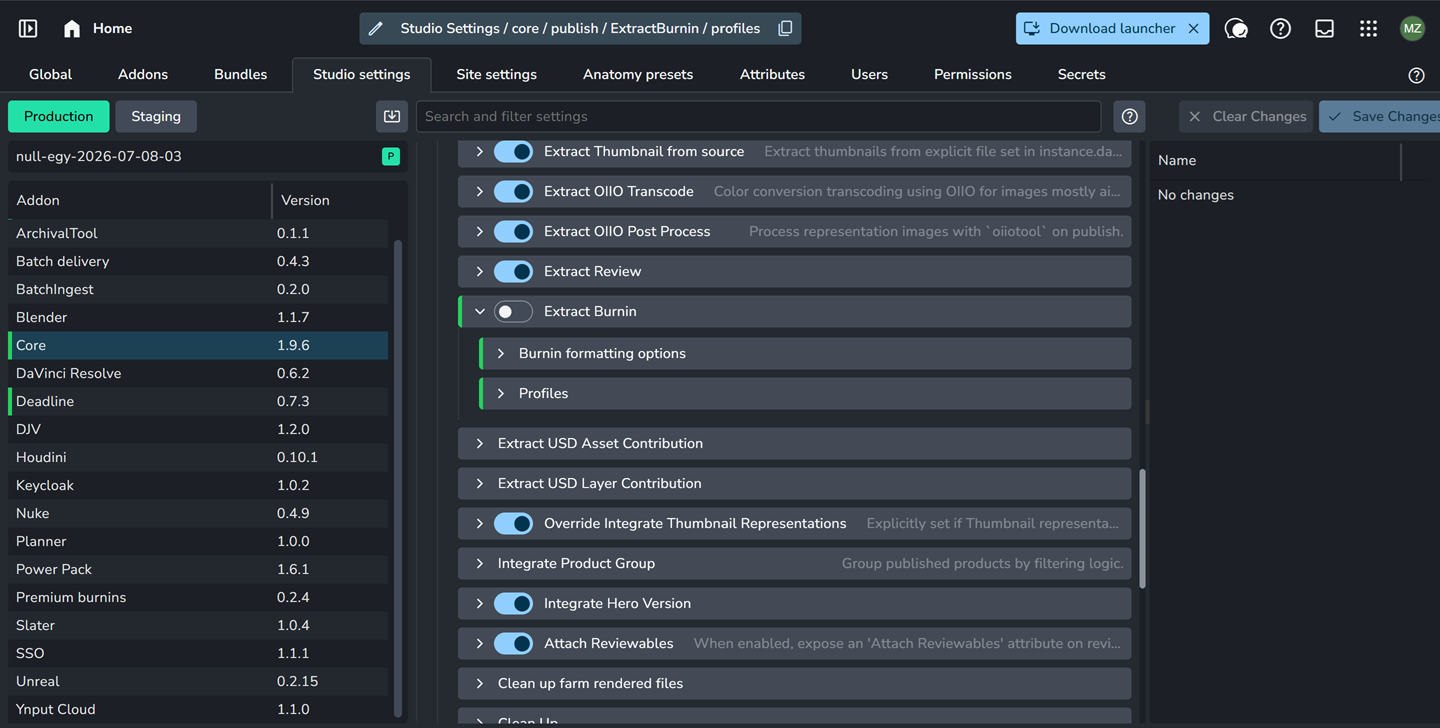
Burnins Settings: Since we are using a trial, we will be leveraging the Premium Burnins addon. Because of this, make sure to disable the default burnin plugin inside the Core Addon settings to avoid duplicate processing.
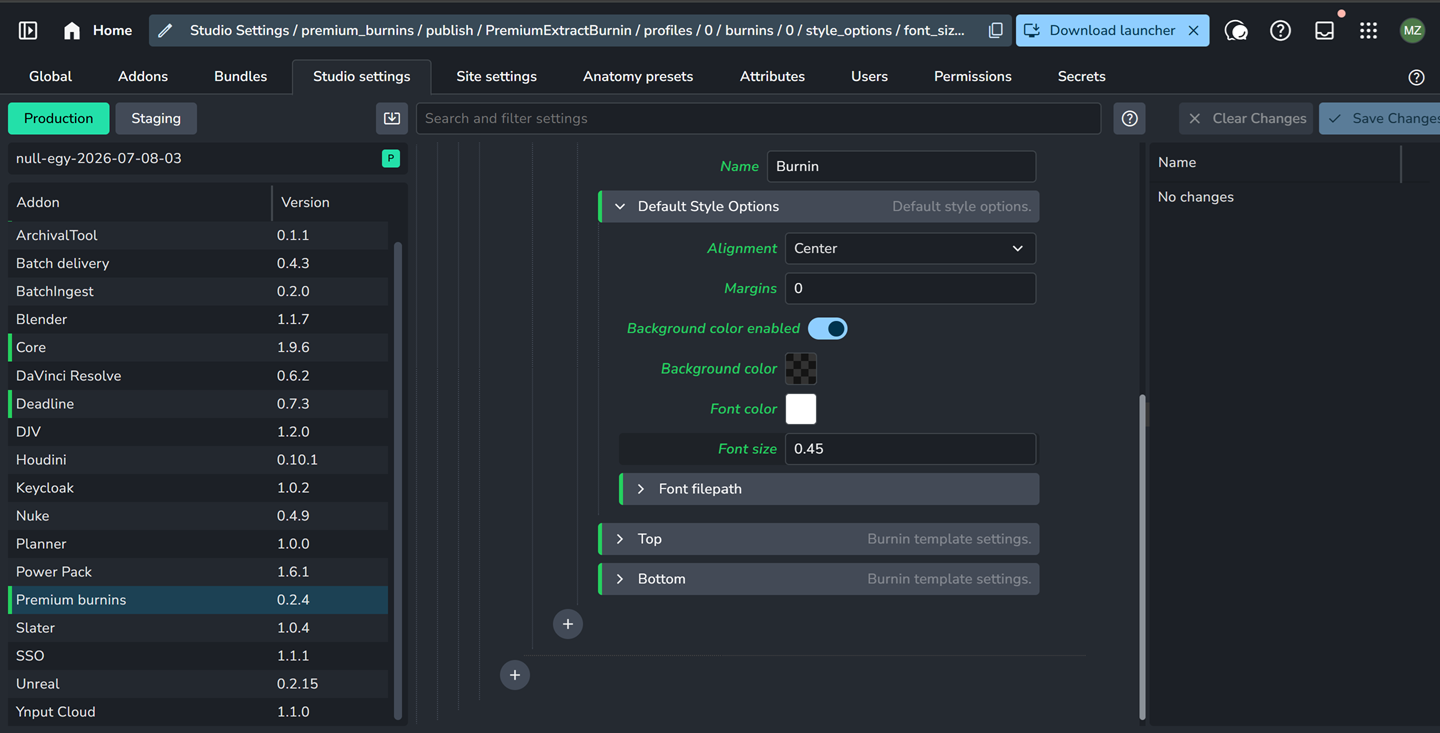
If you ever want to customize your burnin fonts, you can easily change them right inside the Premium Burnins addon settings!
Pipeline Artist Lifecycle
Artists can log in to the AYON Server Web UI to download the AYON Launcher via the . For more info, see Installing AYON Launcher on User Machine.
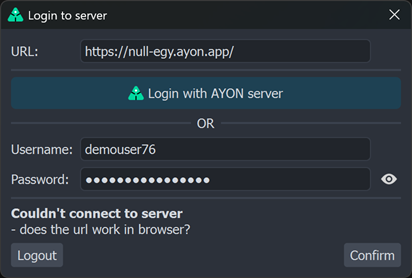
Once installed, launch it, log in, and follow these steps:
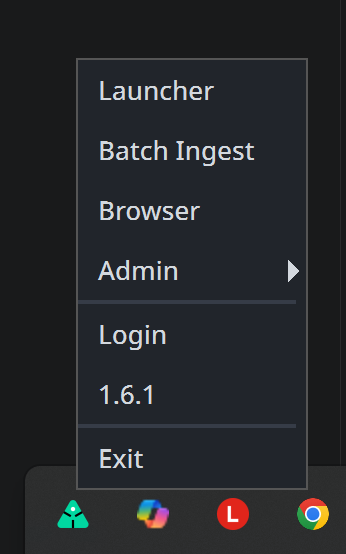
Double-click the AYON tray icon or Click Launcher in the tray menu to open the Launcher.
Select your target Project, Folder/Asset, Task and Click Blender.
Explore the main AYON tools inside Blender:
Workfiles: Go to
AYON Menu→Workfilesto save or manage your working file.Creator: Open
AYON Menu→Creatorto create amodelproduct. You will notice AYON creates an organizational collection in Blender. Click Publish to publish your work.AYON creates internal markers/collections inside host applications to track published data. It will never modify your scene content without informing you.
Publisher: Open
AYON Menu→Publisheror click on the publish tab in the publisher and click Publish.Server Check: Open the AYON Server Web UI to verify your newly published version.
Loader: Open
AYON Menu→Loaderto browse products and load specific representations into your scene.
Tracking Production
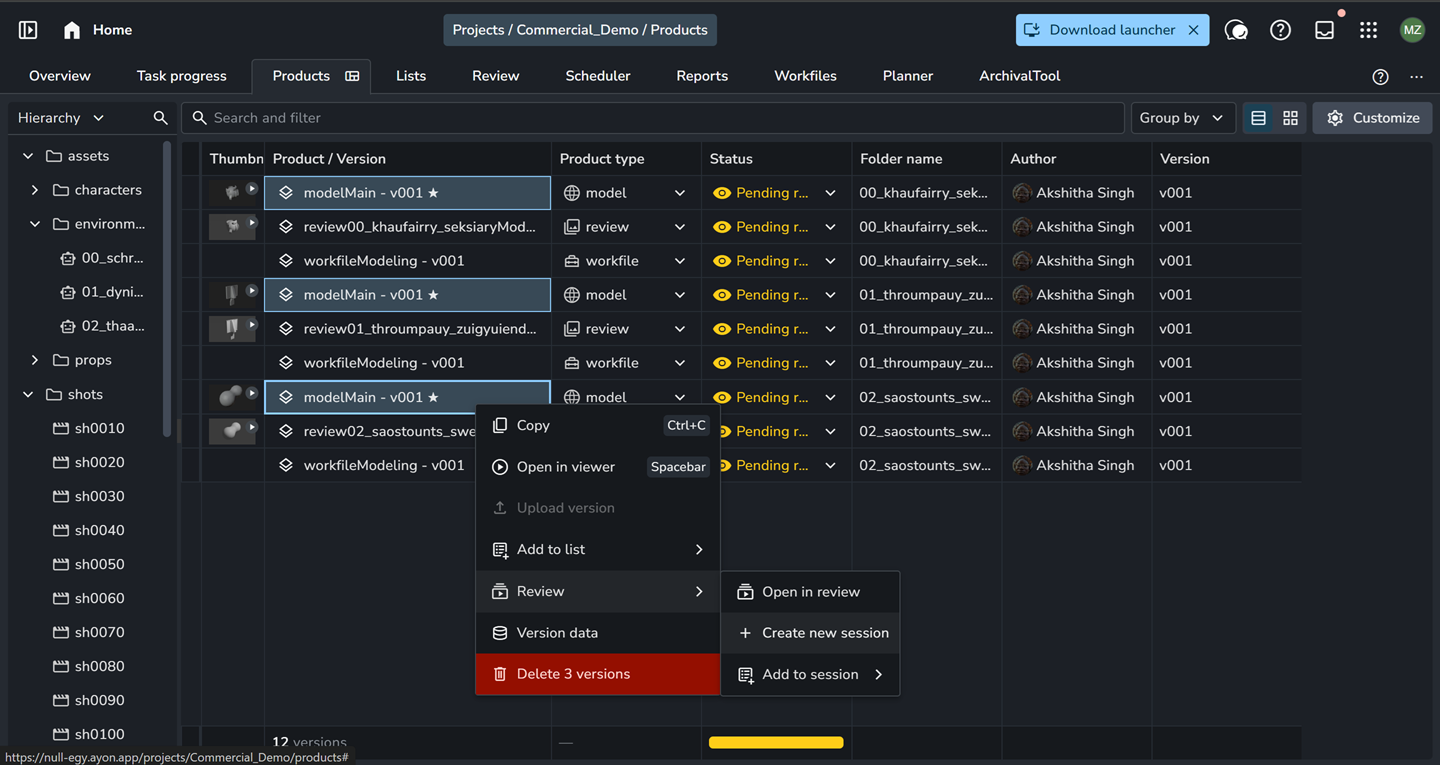
When inspecting published products on the AYON Server, you can track production progress in detail, including statuses for assets, shots, tasks, and specific product versions. You can also review uploaded media directly using the review workflows discussed earlier.
Delivery
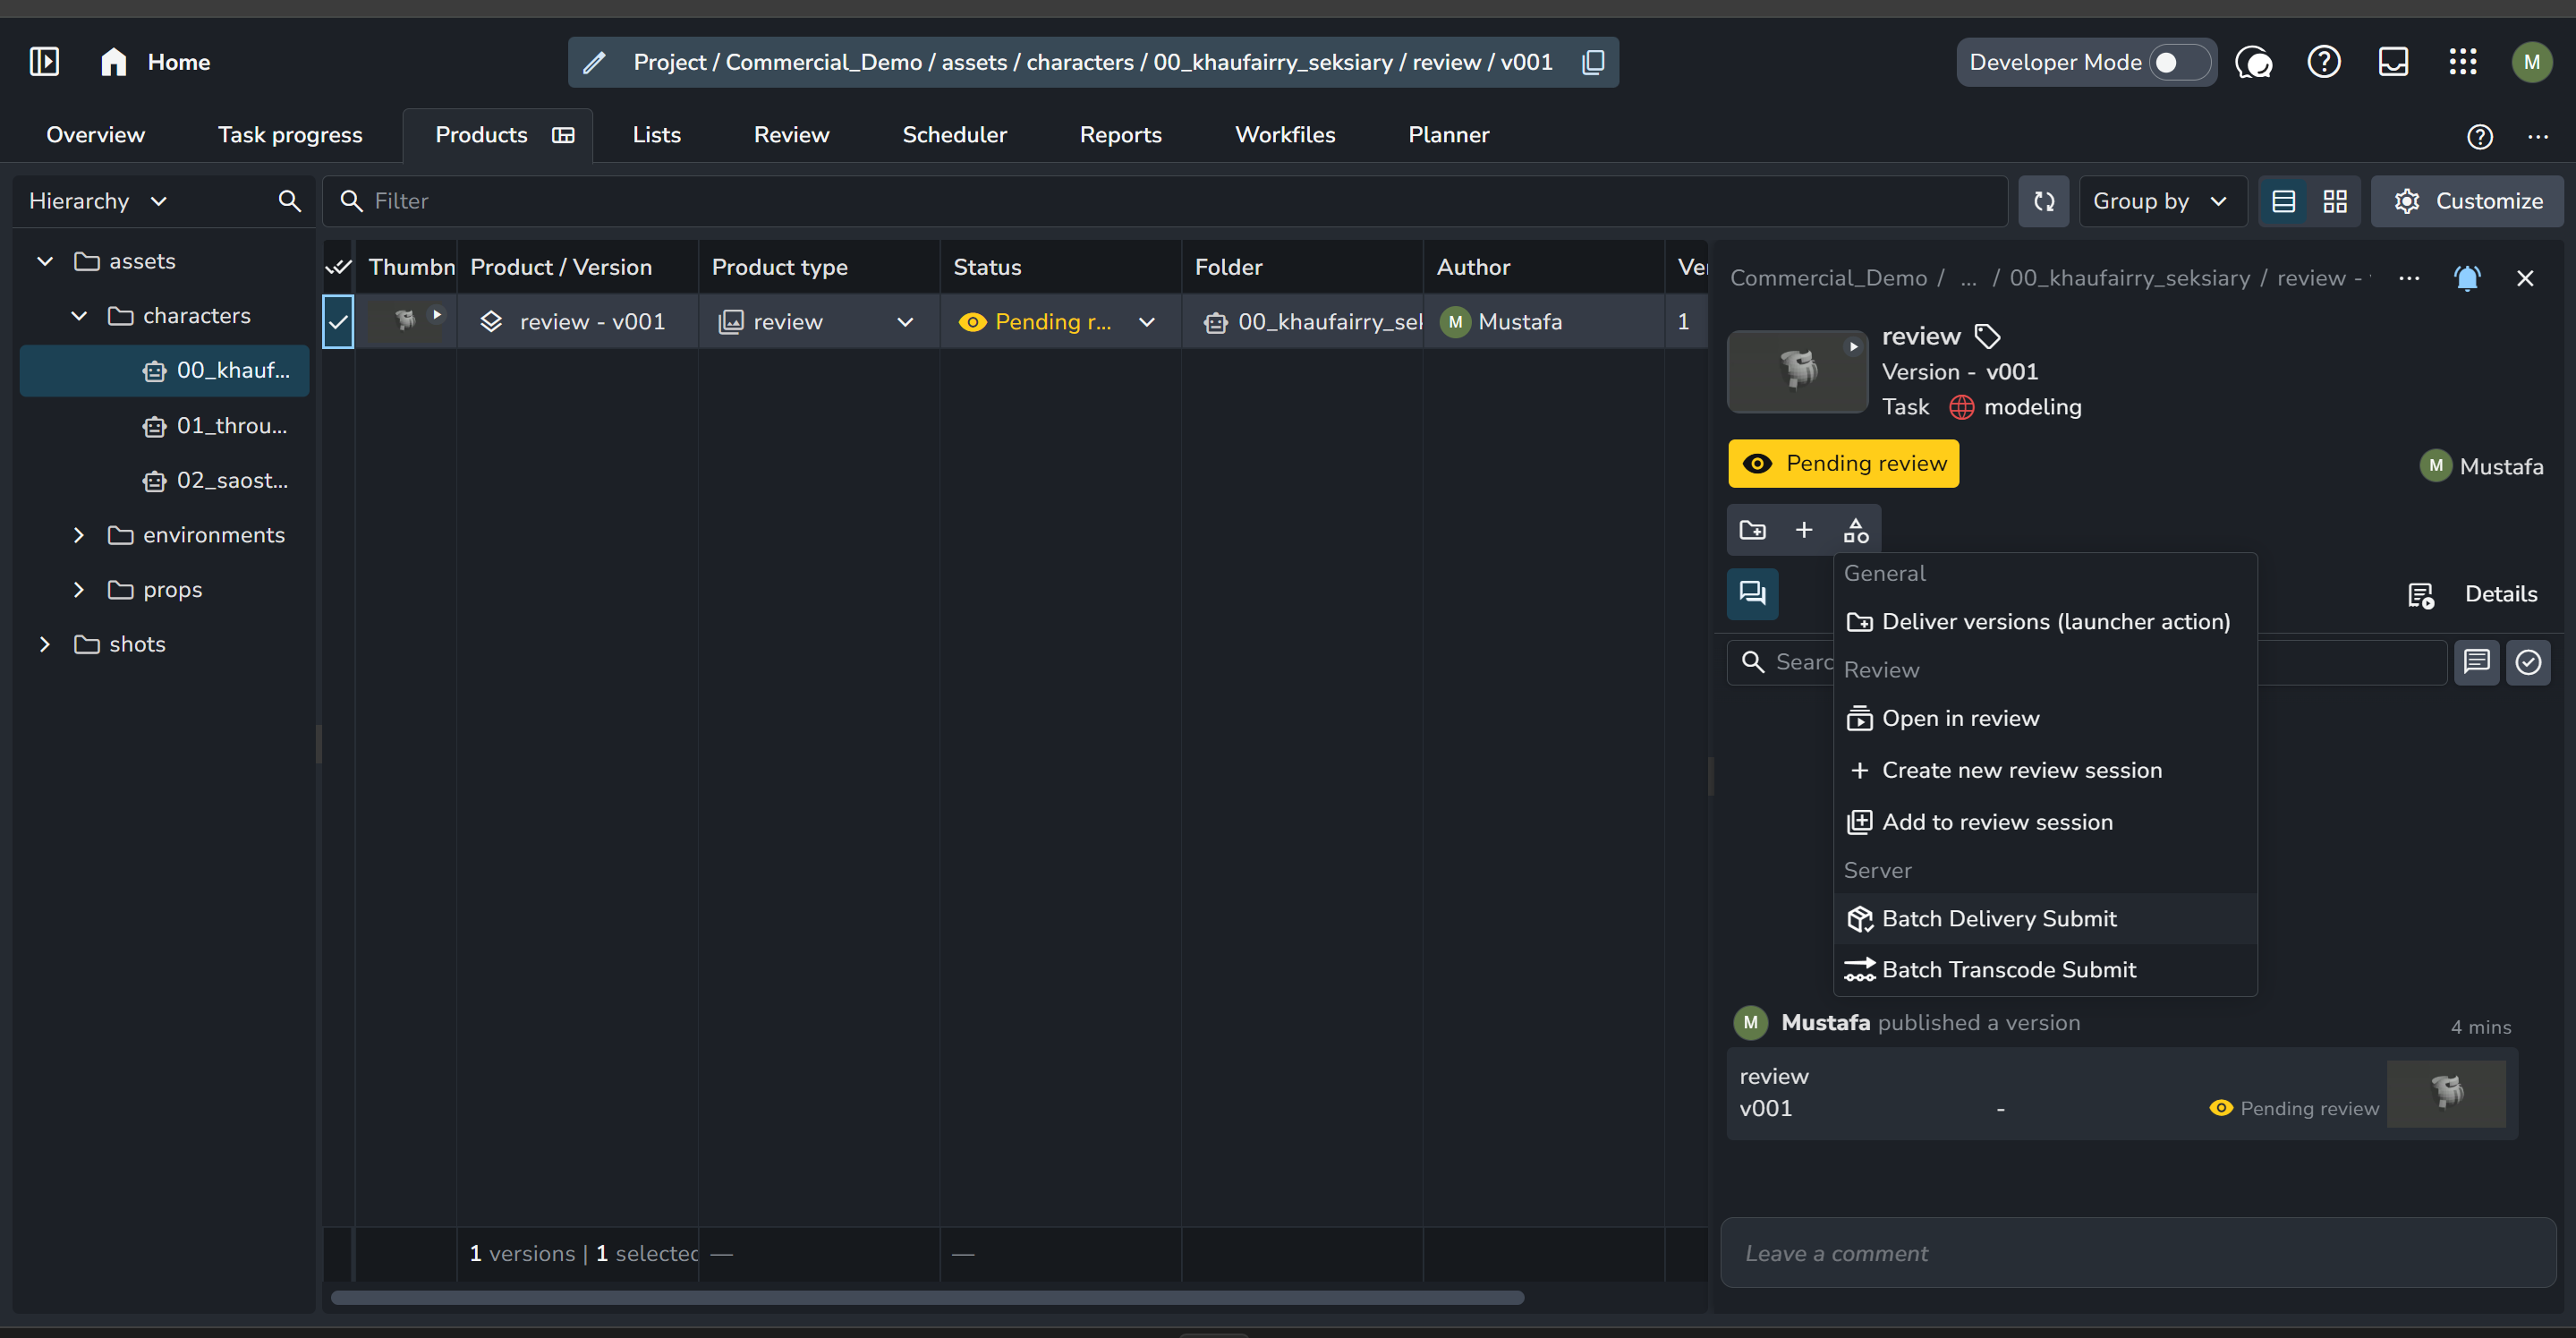
Pipeline Feature Notice:
Delivery workflows rely on published pipeline data (versions must be published through the AYON pipeline). Reviewables uploaded manually directly through the web UI cannot be packaged or processed using these delivery tools.
At key production checkpoints or when wrapping up a show, delivering files to clients or external vendors is a critical step. AYON provides two functionalities for delivery:
Deliver Versions (Launcher Action / Browser): AYON's built-in delivery tool. It functions as a straightforward file copier that collects, renames, and packages published assets based on your project's delivery templates. To learn more, check out Delivery Action.
Batch Delivery (Submit Action): A premium, high-performance automation addon designed for heavy production. Instead of copying files on your local machine, it offloads heavy transcoding (Nuke-based), color conversions, LUT applications, and burn-ins directly to your Deadline render farm. To learn more, check out Introduction: AYON Batch Delivery.
Further Steps
You’ve set up your server, configured your production tracking, and run through a complete pipeline cycle. you're well on your way to mastering AYON! But this is just the starting point.
Here are more ways to keep exploring and growing your studio:
Self-Hosting: Want to host the AYON server on-premise? It’s absolutely possible since AYON is open source. Check out our Self Hosting Guide to get started.
Dive Into Advanced Topics: Explore setting environment variables and tools configuration, fine-tune project anatomy settings, or test out more production addons like Site Sync for multi-facility or freelancer-based studio setups.
Shape AYON Roadmap: Have an idea or need a specific feature? Head over to the Ynput Feedback Portal to submit feature requests, share feedback, and vote on upcoming developments.
Build Custom Code: Ready to extend AYON even further? Dive into the official AYON Developer Docs to learn how to write custom server plugins and pipeline integrations.
Join the Community: Hop onto the official AYON Community Forum and Discord to connect with other artists, TDs, and pipeline TDs to ask questions and share tips.
Get Support: Need dedicated help scaling up your studio infrastructure or setting up custom workflows? Visit our Contact Page to reach out to the Ynput team directly for technical support and consulting.