AYON Maya OpenUSD Workflow
Last updated 3 months ago
The AYON USD Workflow should maintain consistency across various DCC integrations. However, we may enhance its features in specific DCC integrations based on client and community feedback.
We encourage you to join USD discussions on forums or share your feedback with us through our Feedback Portal.
Maya and MayaUSD Compatibility
To ensure a smooth AYON OpenUSD workflow, we recommend using Maya 2023 or later combined with MayaUSD plugin version 0.21.0 or later. While older versions may work, their functionality and stability within the pipeline are not guaranteed.
Mandatory Requirement for Maya 2026.2
Maya 2026.2 is shipped with multiple USD versions: v24.11 and v25.05.
The AYON Resolver specifically requires USD v25.05 to function. If Maya remains on the default version (v24.11), the resolver will fail to resolve entity URIs.
How to Force USD v25.05
To ensure the correct version is used, you must set the following environment variable for your Maya 2026.2 variant in the AYON Applications Addon:
"MULTI_USD_VERSION": "0.25.5"Alternatively, you can add the -usdVersion 0.25.5 flag to your Maya launch parameters, though the environment variable is recommended for consistent pipeline deployment across the studio.
Publishing USD Products
Publishing follows the same process outlined in About AYON Pipeline and Working with Maya in AYON. Artists use the Creator / Publisher tool to create publish instances in the scene, add their work, and click the publish button.
Supported Product Types
Generic USD Product Type

These are general-purpose USD creators in Maya.
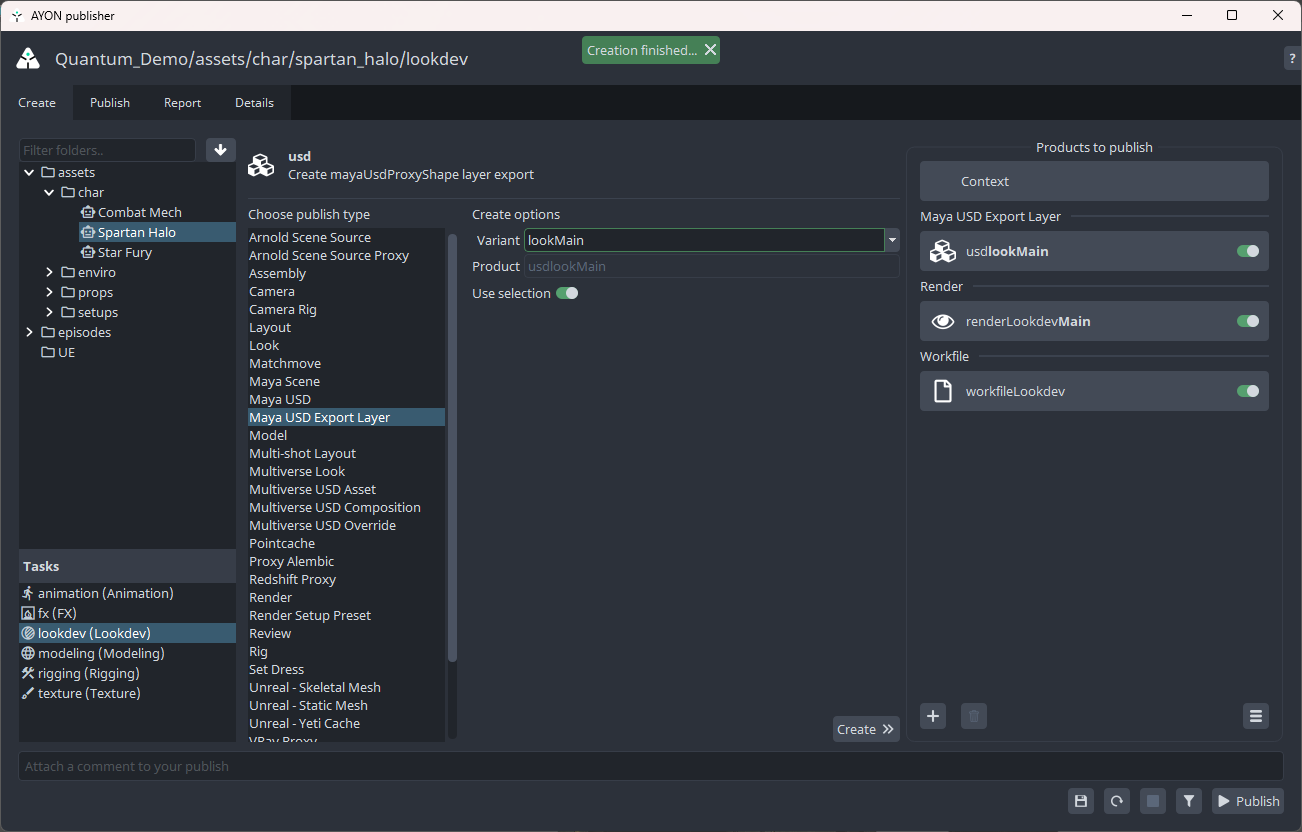
Maya USD: Used for publishing geometry as USD, primarily for models, props or sets. For an example, refer to Publish a Model.Maya USD Export Layer: Used for publishing USD layers and departmental edits, such as shot layout, lighting, or asset look development. For an example, refer to Publish a Look.Using
Maya USD Export Layerrequires Maya addon version 0.4.10 or later to work properly.
Since these creators are generic, USD publish options are not pre-initialized. Artists need to specify details such as the target usd product, department layer, and whether to add as variant.
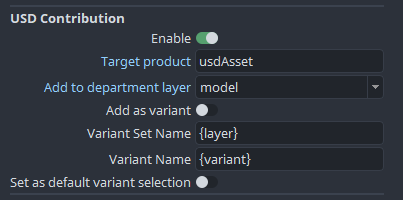
Additionally, the resulting products will have the generic usd product type.
Dedicated USD Product Types
Dedicated product types enable more precise categorization and better product naming within the creator. They also allow for dedicated publishing plugins tailored to specific types, such as model validators or look plugins that handle textures.
For example, when publishing a model contribution to a usdAsset, the product type would be set to "model." This would automatically trigger model-specific validators during the publishing process.
Available dedicated USD product types:

Maya USD: Model: Use this for publishing models (clean geometry with UVs) as USD asset.
In the future, additional creators with more defined product types (e.g., look, groom, and assembly) may be introduced, aligning with the AYON Houdini OpenUSD Workflow.
Note that the department layers and asset or shot layers should continue to use the generic USD type usd.
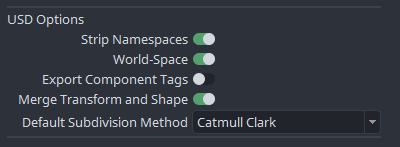
Additional USD Publish Options
Key USD export options are exposed in the publisher UI, giving artists greater control. e.g. it exposes the defaut subdivision method option.
Publishing Tutorials
Publish a Model
The Maya USD: Model Creator publishes geometry as USD, making it an easy option for publishing USD models and usdAssets.
Steps:
Open the Creator / Publisher tool by navigating to AYON > Create.
Select your geometry in the Outliner and
Maya USD: Modelin the creator tool.Set the Variant name, for example,
Main.Enable the
Create Asset Hierarchytoggle if you want AYON to organize your geometry into the proper structure for publishing USD model contributions.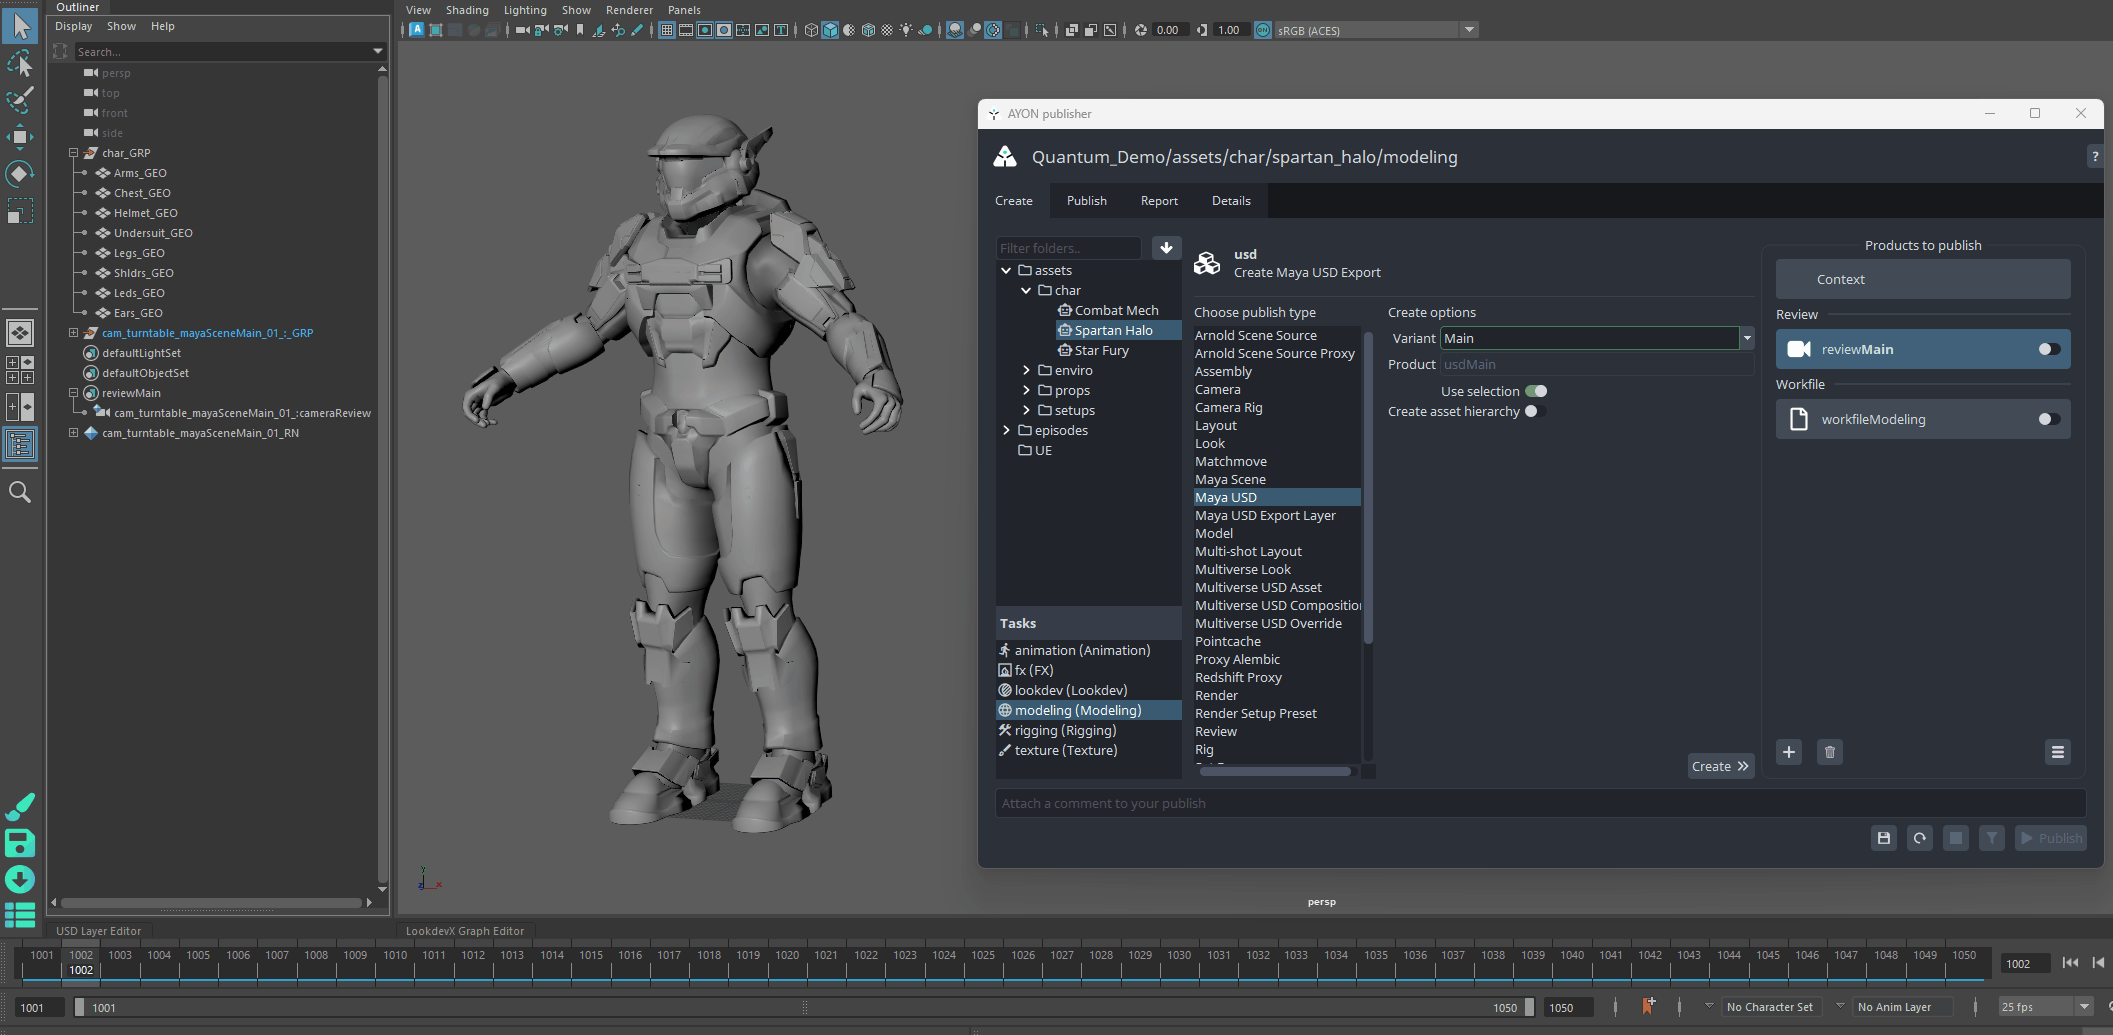
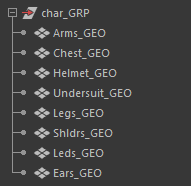
My geo
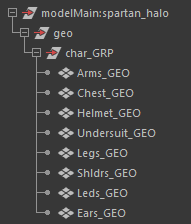
My geo after creating asset hierarchy
Set the USD publish options e.g. set the Target product to
usdAssetsince you are publishing a model.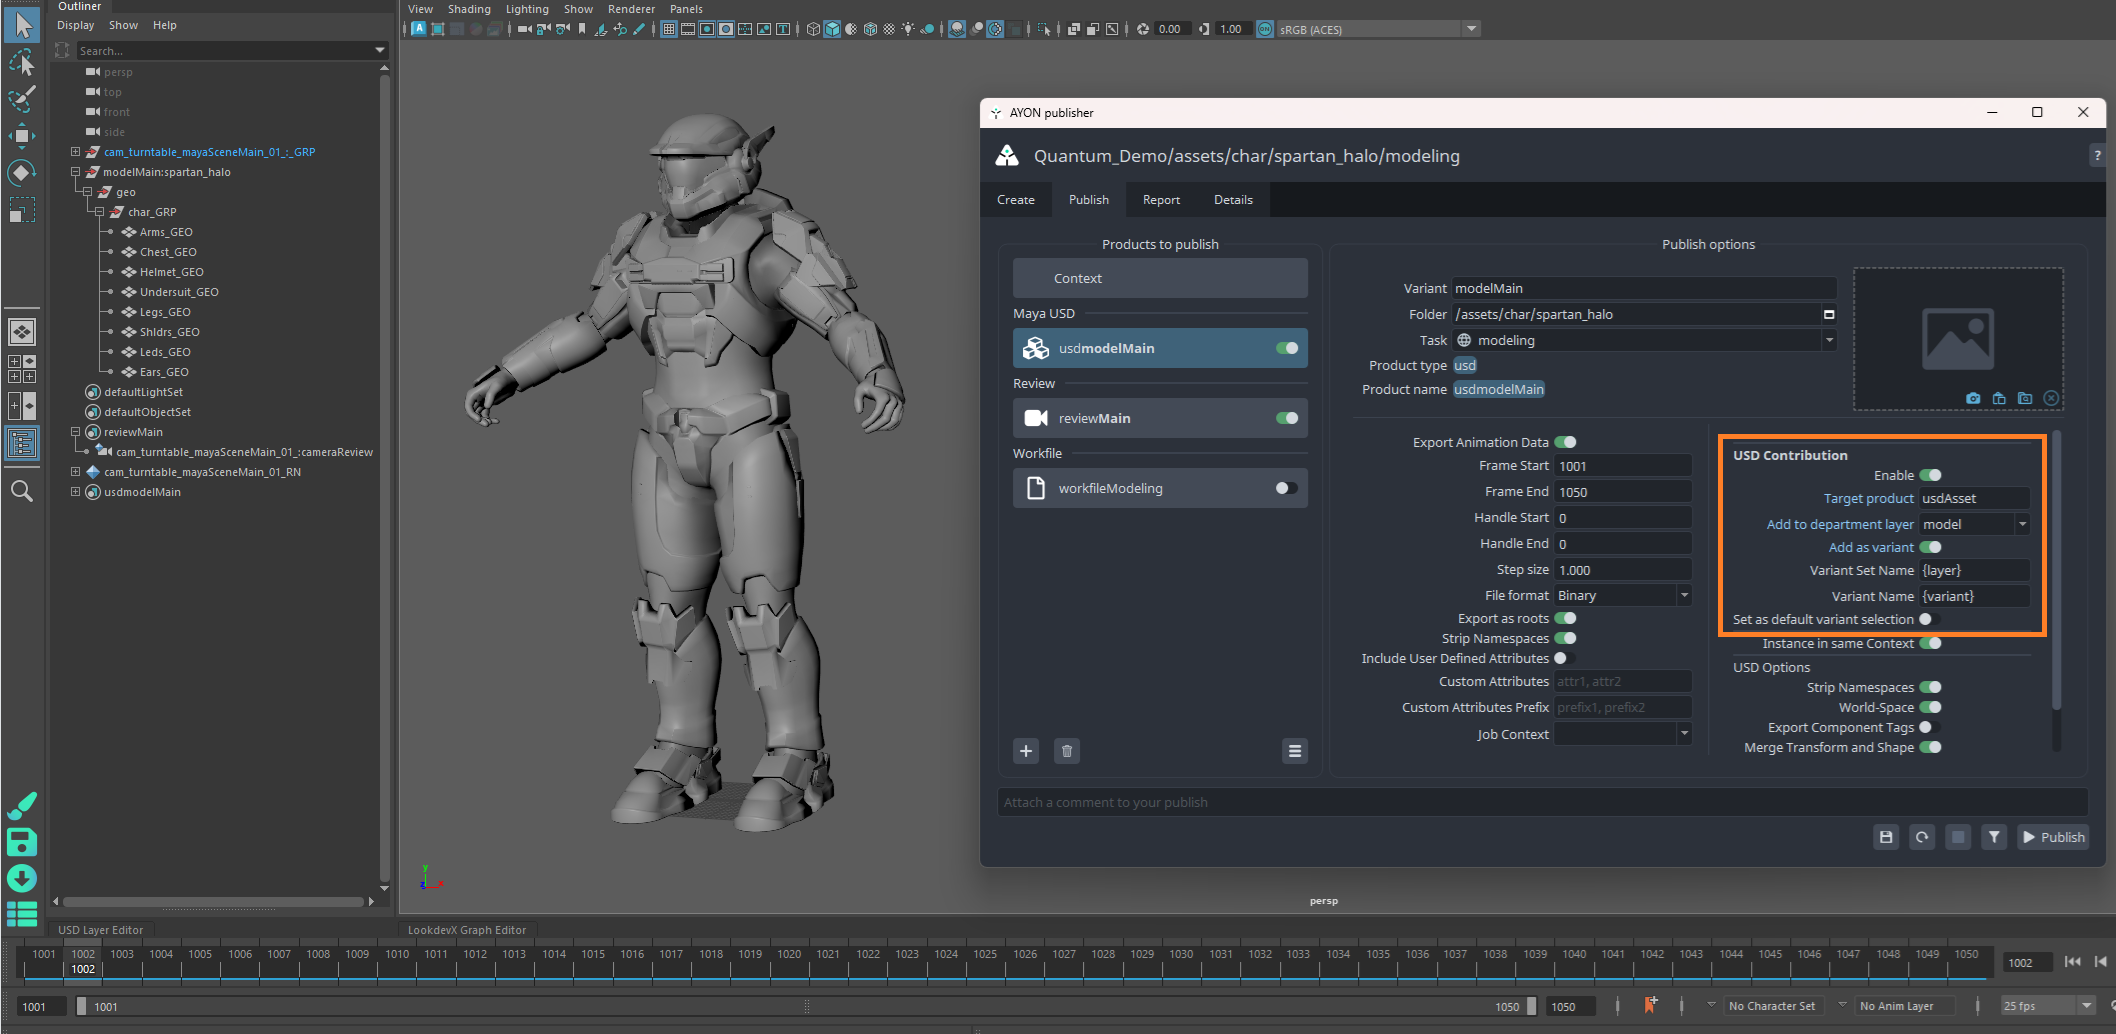
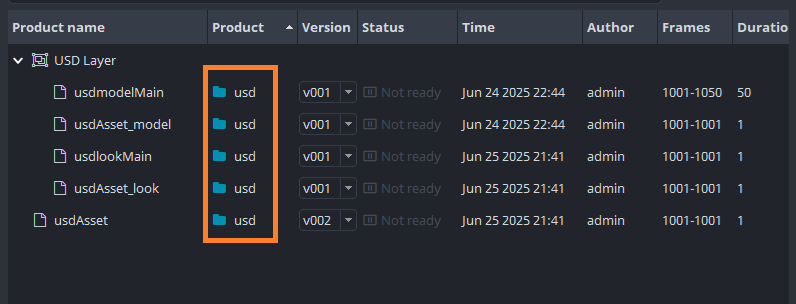
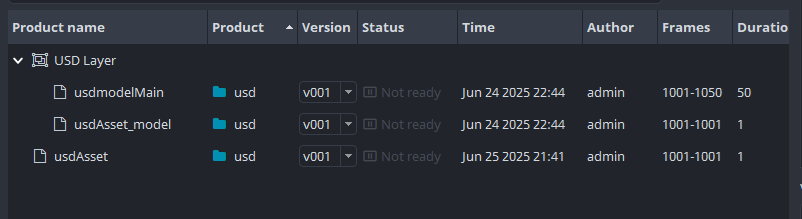
Finally, click Publish. The process will result in three USD layers. Their names will look similar to:
usdmodelMain: This layer holds your geometry.usdAsset_model: This is an intermediate department layer used to organize the USD layer structure.usdAsset: This is the asset layer, which is typically the one you will load into your scenes.
Publish a Look
Look products involve adding materials and material assignments to your models.
Steps:
Create a New USD Layer for Edits:
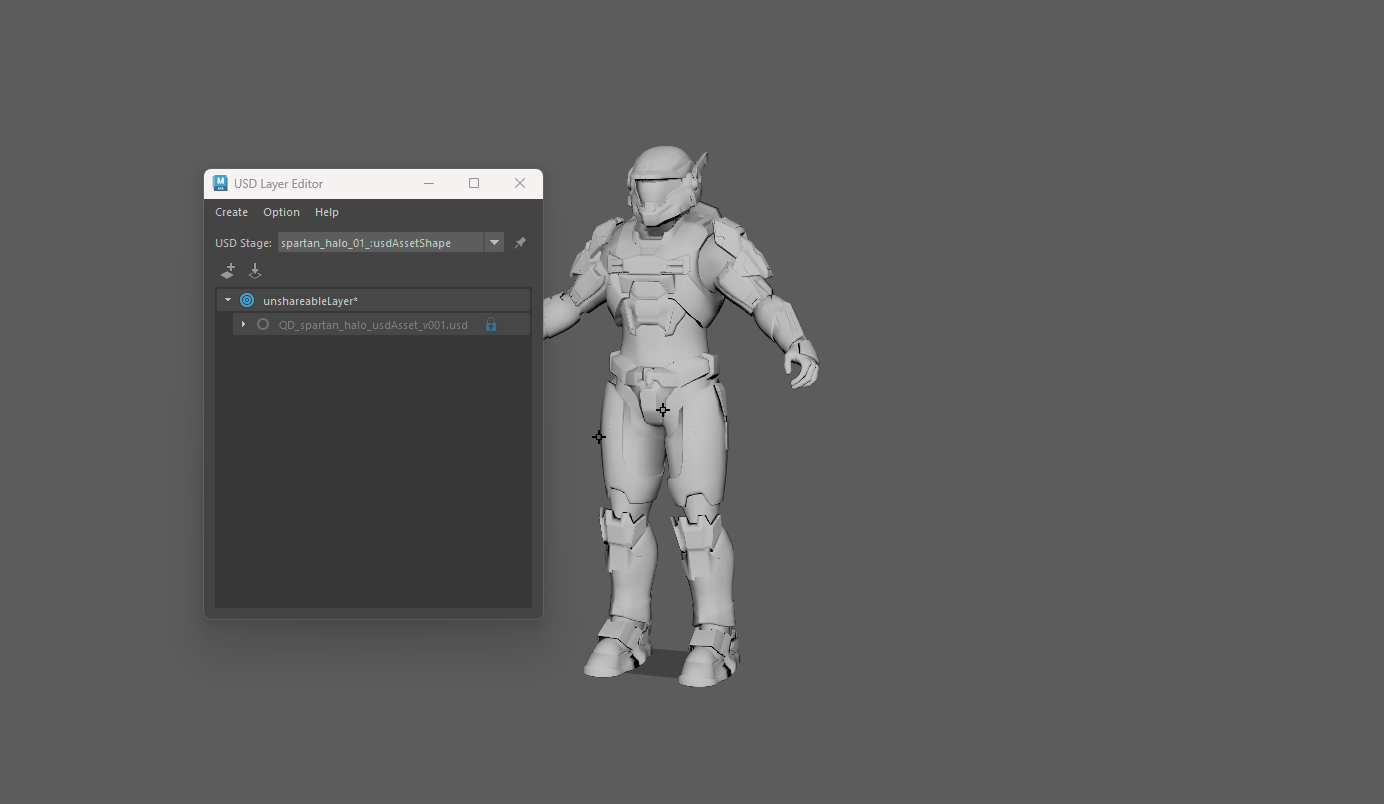
Navigate to the USD Layer Editor and click Create > Stage with New Layer.
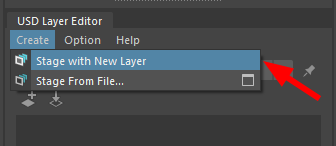
Double-click the new layer or click the save icon to save it.
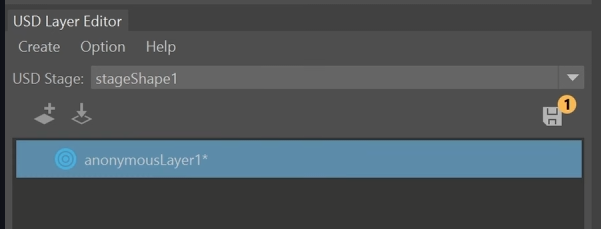
(Optional but recommended) Name the new layer in the Outliner (e.g.,
lookdevmain) for easy identification.(when working with a
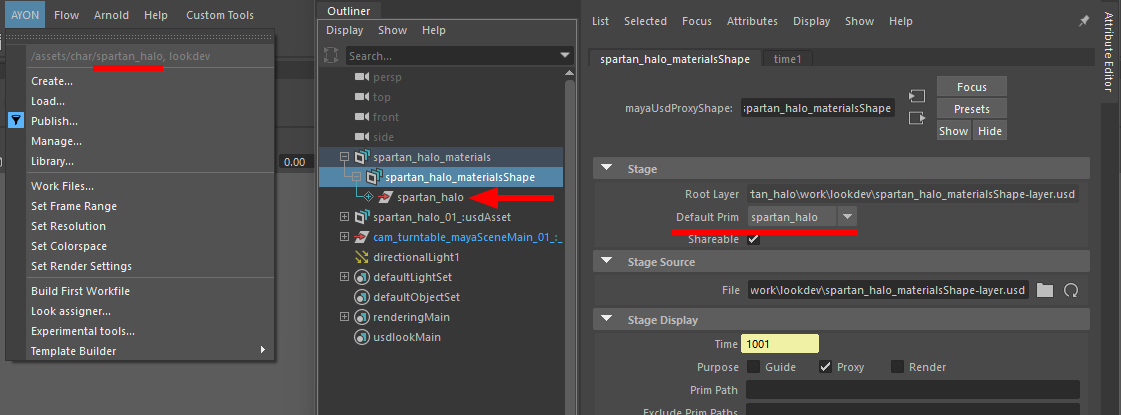
usdAsset) Create a root prim:Expand your USD stage in the Outliner, right-click it, and select Add New Prim > Xform.
Rename the new prim to match the current AYON folder.
Select your stage shape and, in the Attribute Editor, set the default prim to your new root prim.
Load the
usdAsset:Navigate to the Loader tool via AYON > Load.
Bring your
usdAssetinto the scene using the Load USD to Maya Proxy loader.
Set the Target Layer:
In the USD Layer Editor, select your
usdAsset.Right-click and select Load Sublayers….
Select the new layer you created in Step 1.
Click the gray target icon next to the new layer to set it as the target.
Work on the Lookdev:
You are now ready to work on the lookdev by adding new prims, materials, and other edits.
(When working with a
usdAsset) Ensure your new prims are placed under the root prim from Step 1.

Ensure that all prims related to your asset are organized under this root prim. Otherwise, you may encounter an "
Unresolved reference prim path" warning when loading the asset after publishing.When adding material prims, you can preview and edit them in Maya LookDevX where you can link textures and modify material properties. Any changes made here will be saved in the target layer from Step 1 since it’s the target layer.

Create Publish Instance:
Navigate to AYON > Create to open the Creator / Publisher tool:
Select
Maya USD Export Layer. You do not need to select anything in the Outliner.Set the Variant name, for example,
lookMain.In the Maya USD workflow, since dedicated USD product types are not yet implemented in the Maya addon.
It's a good practice to name your variant descriptively to indicate the type of product you're creating. e.g., when publishing a look and it's the Main variant, it's recommended to name itlookMain.Click Create.
Configure Publishing Options:
In the Publish tab of the Creator / Publisher, select your target layer from step 1 in the “Stage and Layer Identifier” option.
Set the USD publish options e.g. set the Target product to
usdAssetsince you are publishing a look for yourusdAsset.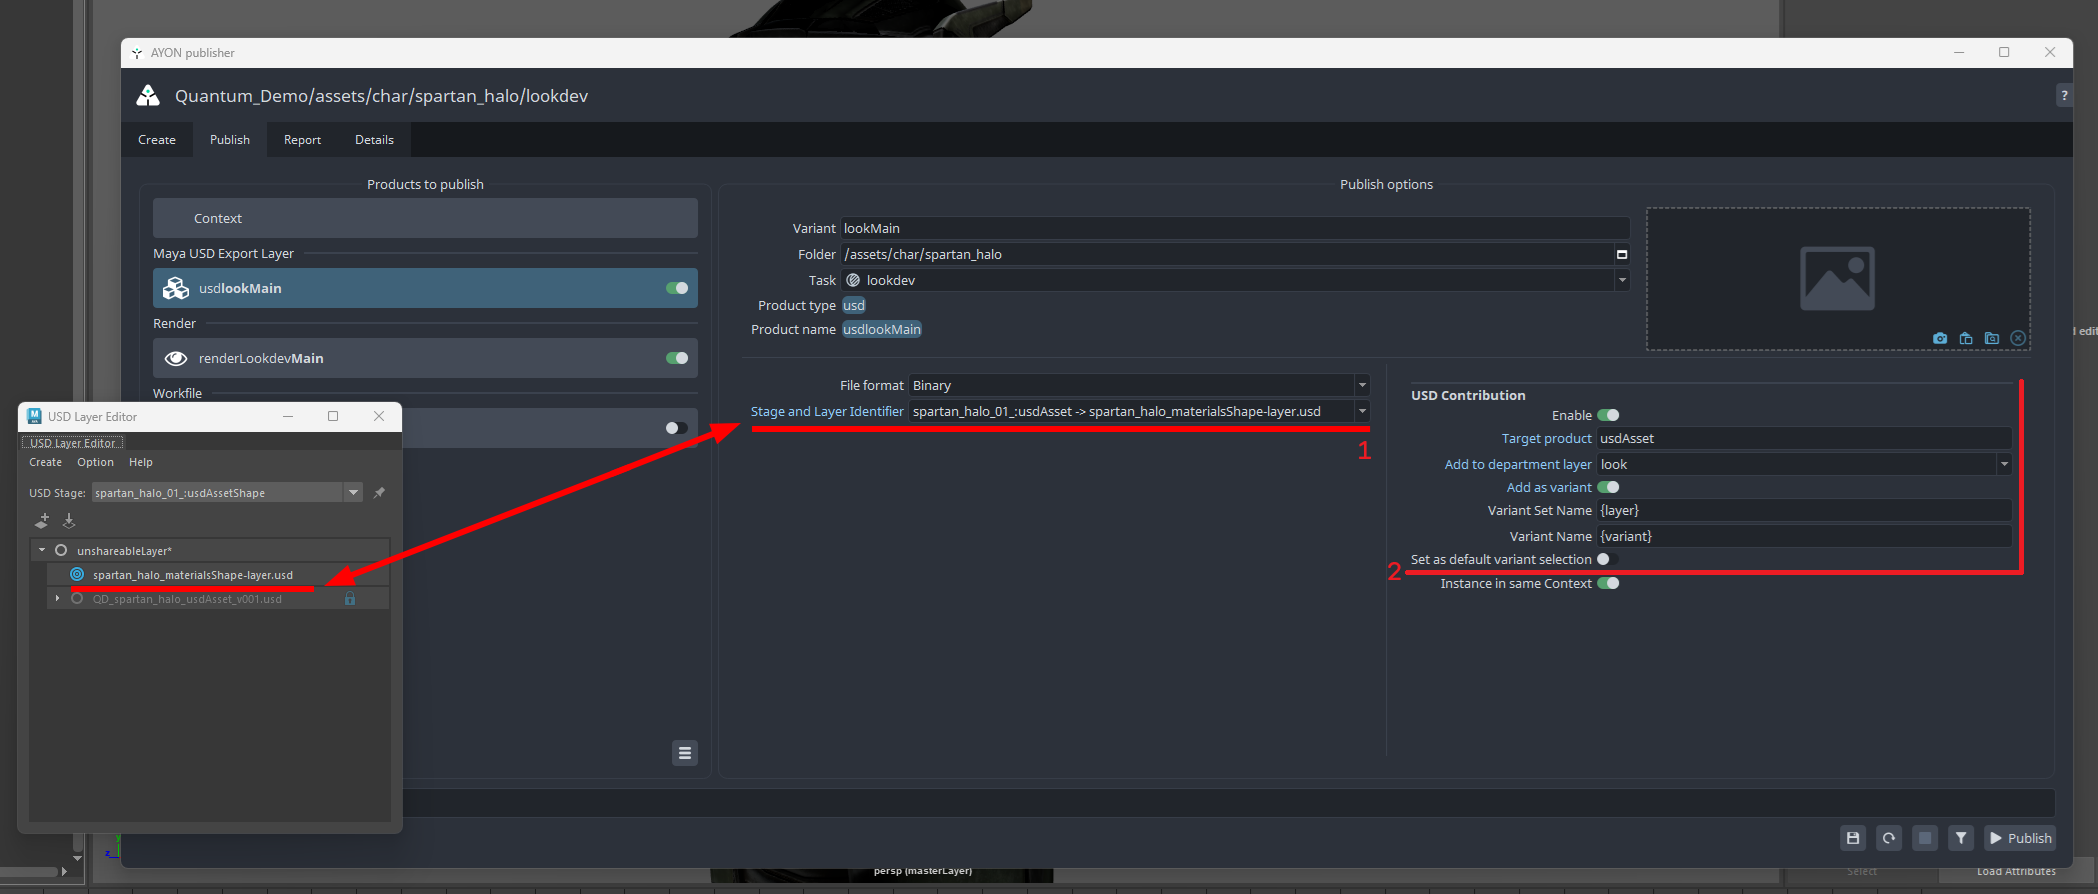
Publish:
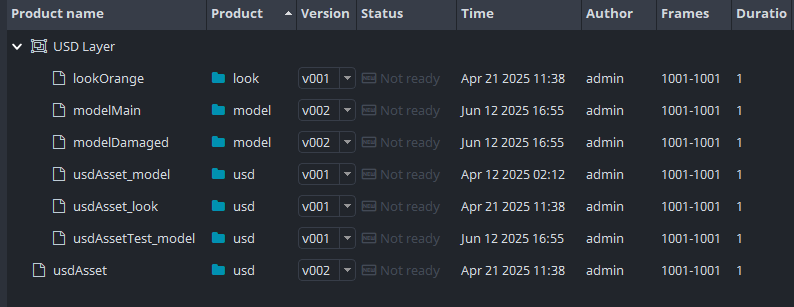
Click Publish. The process will result in three USD layers with names similar to the following:
usdlookMain: This layer holds the edits you made in Step 4.usdAsset_look: This is an intermediate department layer used to organize the USD layer structure.A new version of
usdAssetasset layer which includes both your model and look.

Currently, when publishing to look department layer, the textures won't be copied along with your published look layer. This feature will become available once dedicated product types are implemented in Maya.
Publish a Rig
This is not yet possible.
For additional Info, See Maya USD: Rig in USD Asset as MayaReference prim.
Publish An Assembly
An assembly is an asset that combines other assets.
Publishing USD assemblies will be possible once a new feature is implemented that allows you to load assets as Maya proxy references within the current layer. For additional information, please see Additional USD Loaders in Maya.
Publish a New Shot
When working on a new shot, start by creating a new layer for your task, such as publishing a lighting layer in the lighting department. Then, use the Maya USD Export Layer creator to create a publish instance for it.

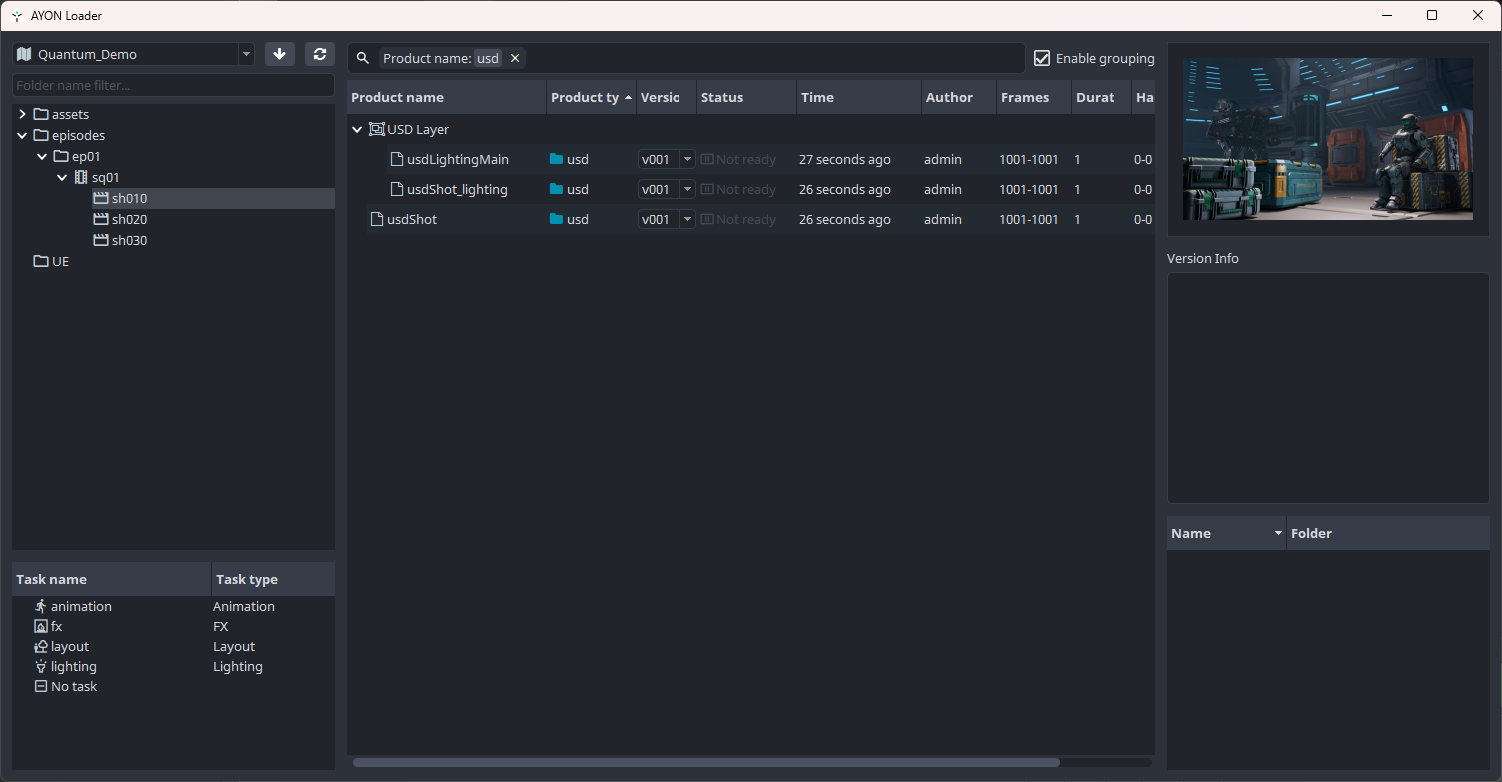
Once published, you’ll see three products generated:
usdShot (Target Product)
usdShot_lighting (Department Layer)
usdLightingMain (Layer created in Maya)
Publish to a Published Shot
Publishing to an existing shot follows the same steps as outlined in the Publish a Look section, except you may not need to set a default prim.
Begin by loading your usdShot, creating a new layer, adding it to your shot, and setting it as the target layer. Finally, create a publish instance for it. Once your work is complete, you can publish it back to your usdShot.
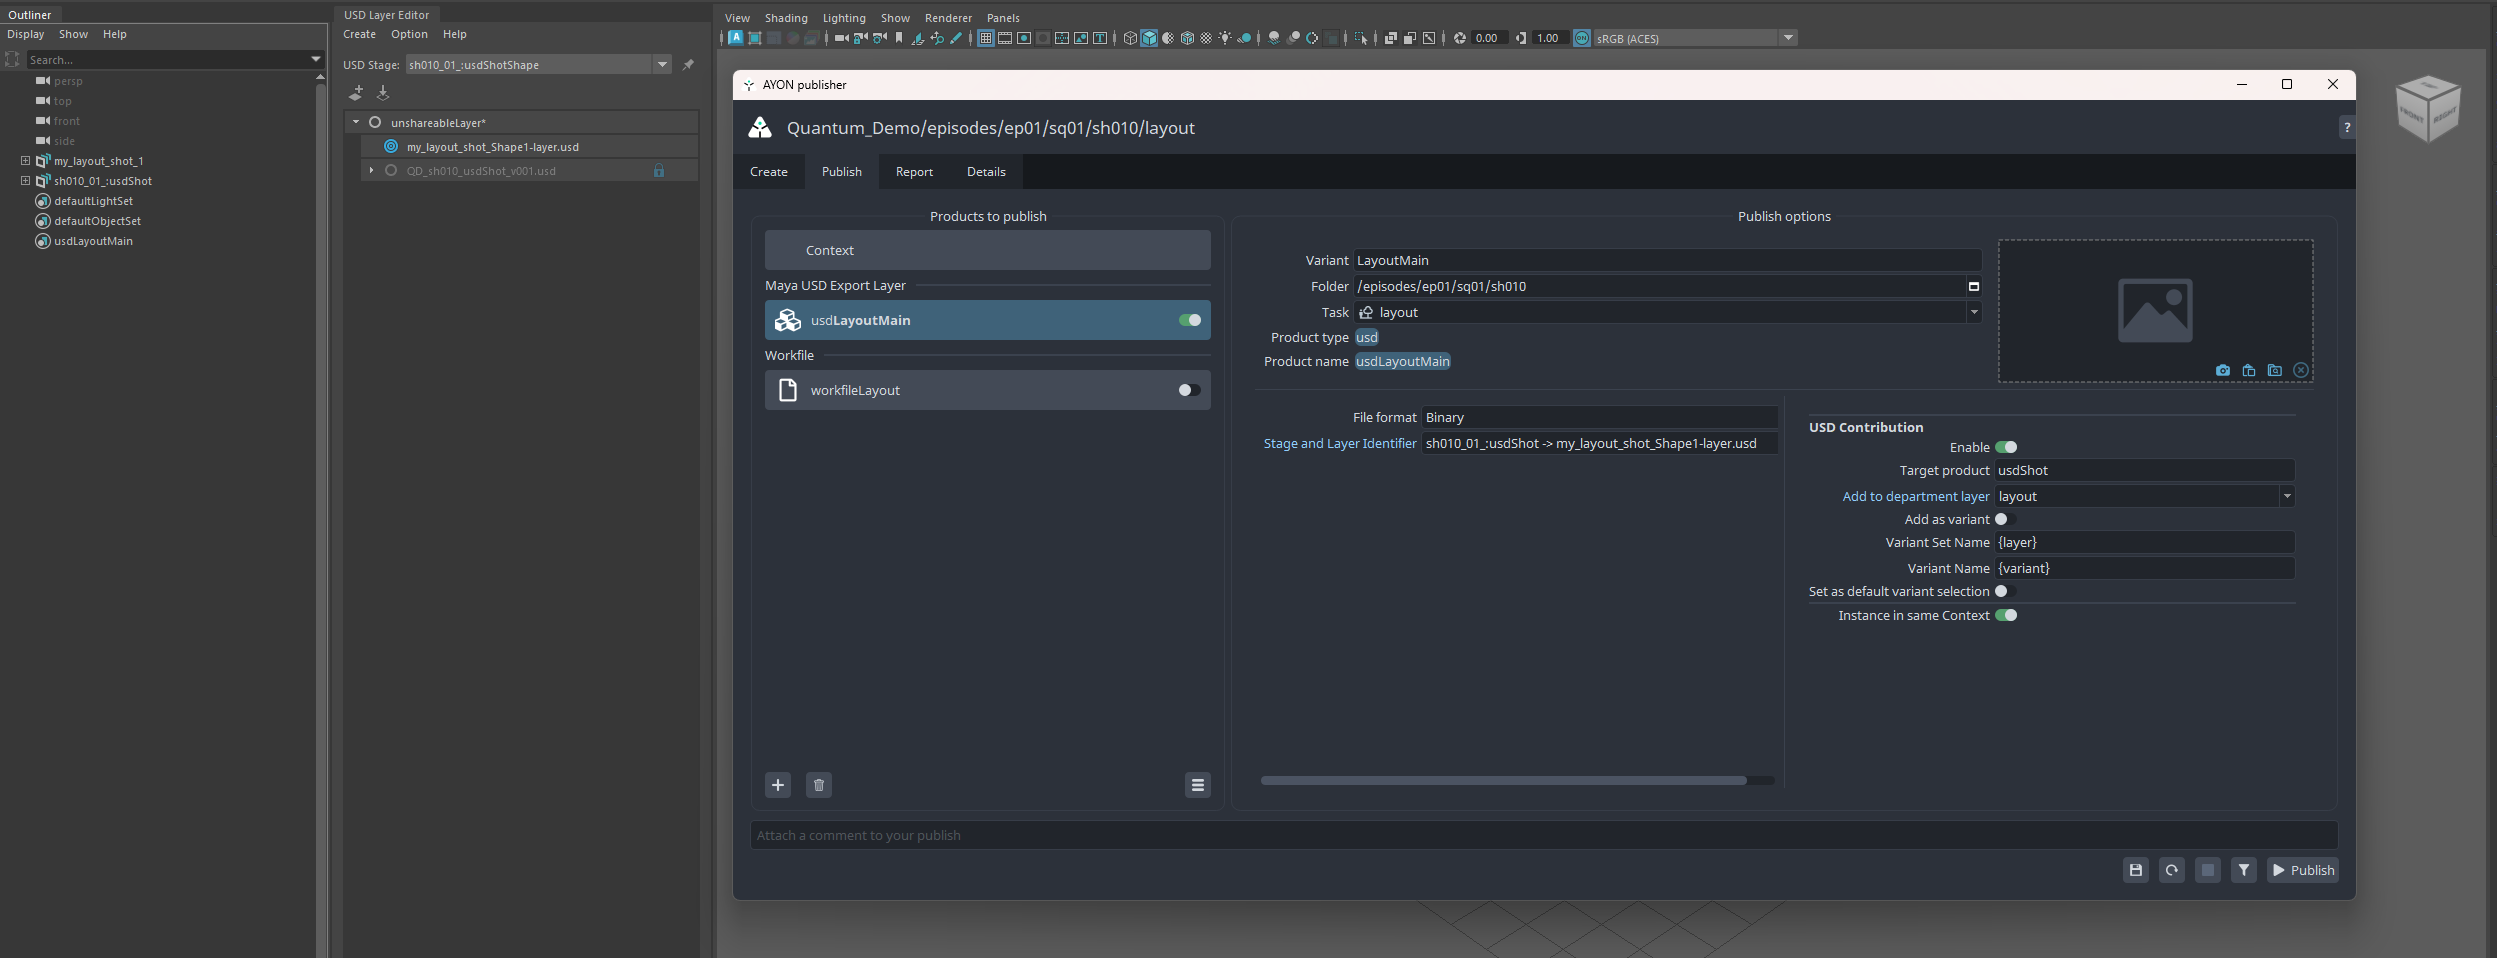
When working with Layout layer, it’s almost the same as Publishing Assemblies except the root prim is not required.
Loading USD Products
Loading follows the regular process for publishing where artists use Loader tool and select relevant USD loader.

Available Loaders
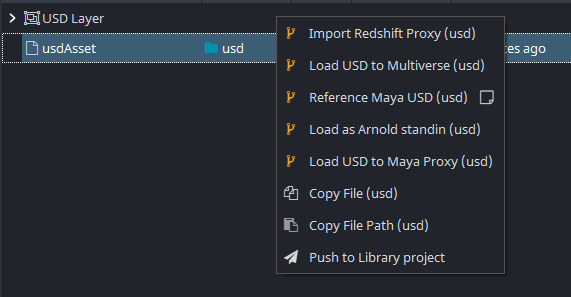
There are different loaders Import Redshift Proxy (usd), Load USD to Multiverse (usd), Reference Maya USD (usd) which opens a popup to specify your options, Load as Arnold standin(usd) and Load USD to Maya Proxy (usd).
Looking for loaders like referencing the data as regular maya geometry or "referencing" directly into an existing Maya USD Proxy, See Additional USD Loaders in Maya request .
Load USD to Maya Proxy
The "Load USD to Maya Proxy" loader is the most popular option when working with AYON USD workflow in Maya. You can use it to load your usdAssets and usdShots into a scene, allowing you to continue working on them by adding more variants or departmental edits.