AYON OpenUSD Contribution Workflow
Last updated 5 months ago
USD Adoption and Workflow Walkthrough
FMX 2024 talk by @Roy Nieterau demonstrates OpenUSD adoption in studios, lurks and perks of having a USD pipeline and and AYON OpenUSD workflow walkthrough.
Introduction
One of the main challenges is developing artist-friendly tools that streamline interactions with USD while enabling artists to use USD in line with recommended guidelines without worrying about the technical complexities. These tools must also maintain consistency across different DCCs.
The AYON USD Contribution Workflow was created to tackle this challenge, offering an intuitive, accessible, and consistent workflow across all DCCs.
Keep in mind, there might be some inherited limitations coming from how the creators of each DCC chose to adopt the USD. Some DCCs might feel cumbersome to work with USD or USD data.
Before You Dive In
This section covers key information, including:
The difference between Assets and Shots, with examples.
An overview of the AYON USD Contribution Workflow, its main features, and expected outputs.
Assets Vs. Shots
The first thing to know is the distinction between Assets and Shots.
The Why and What is OpenUSD? article explains this difference nicely. However, in this section, we’ll dive a bit deeper.
Assets
The hierarchy of any USD Asset must fall under a single root primitive, which is typically set as the default prim.
USD Assets are usually referenced or payloaded into your scene, allowing you to position that single root on any prim path in your scene (USD referencing). Since USD Assets have a single root primitive, referencing them into a scene will only overlay that specific prim.
In AYON, the folder name is used as the name of the single root prim.
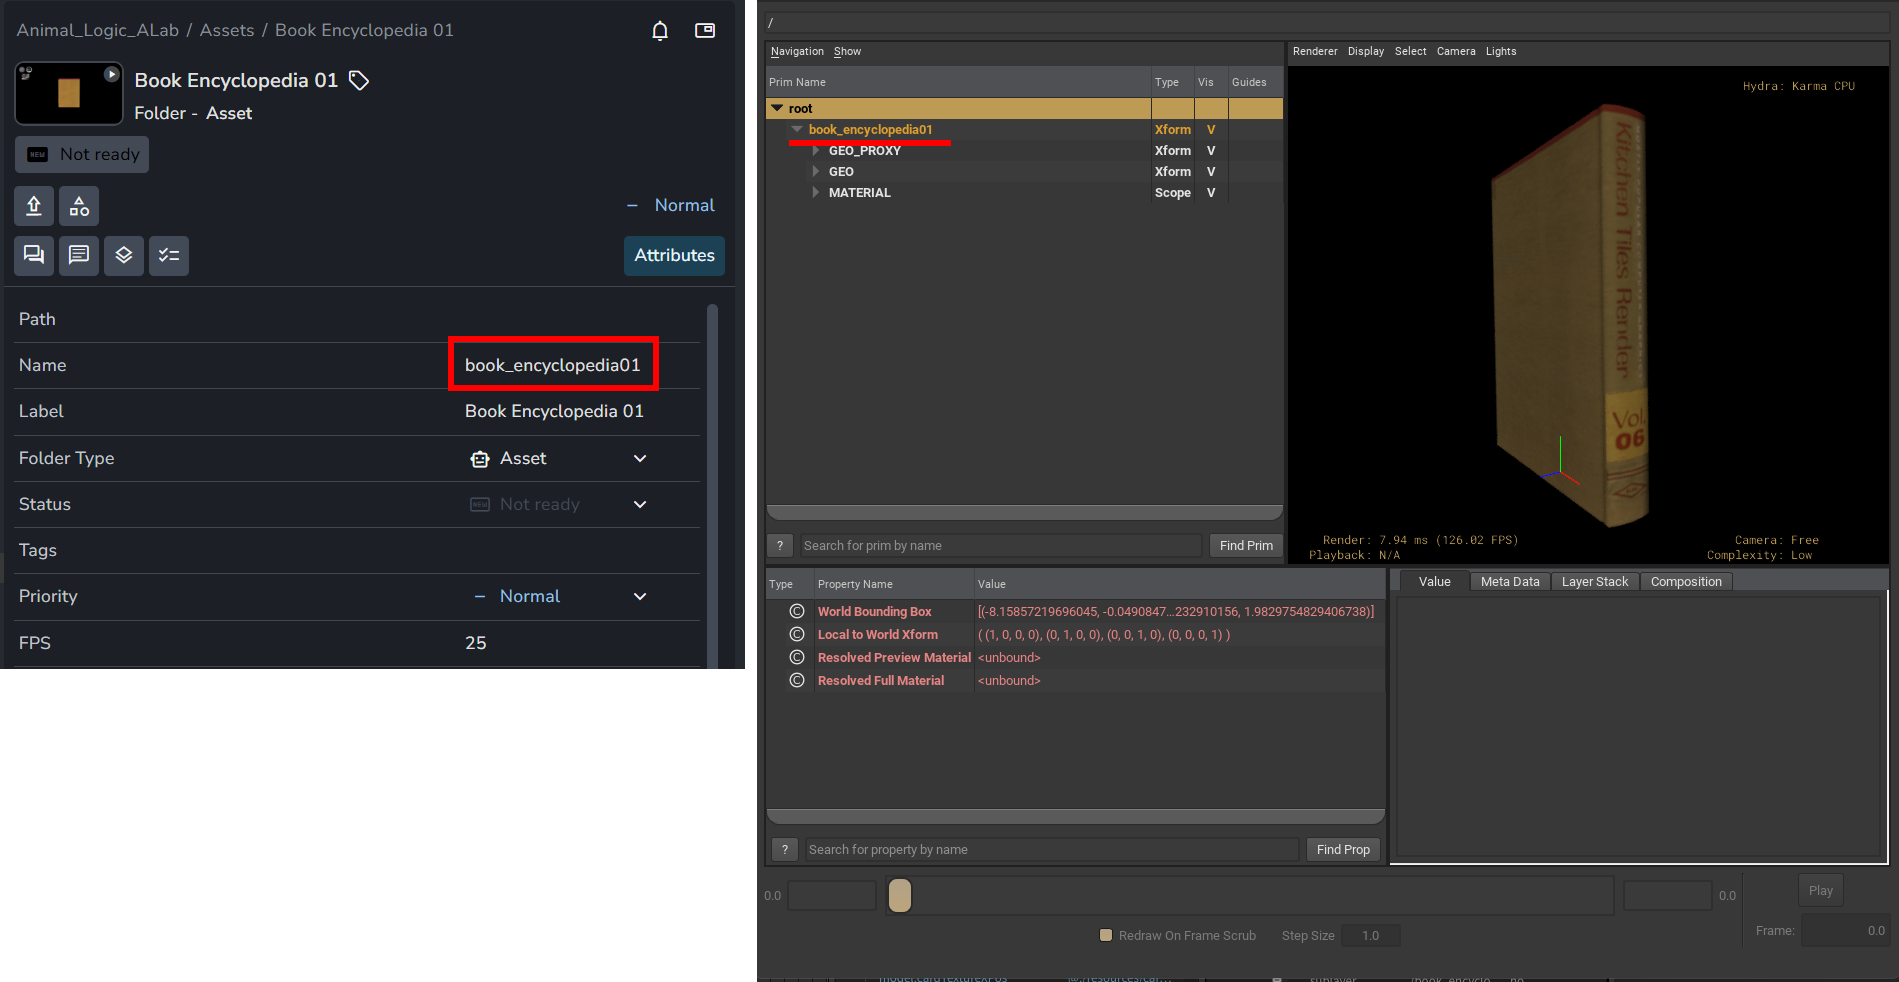
Therefore a typical prim hierarchy for a usdAsset is as follows:
/asset_nameFor more details on referencing, check out: SideFX: USD Referencing explained.
Shots
In contrast, Shots often contain multiple root prims, including referenced assets, lights, render settings, and etc.
USD Shots are typically sublayered into your current scene (or opened as the root layer). This means that when you load a Shot, the full stage hierarchy is included without rearranging elements (USD sublayers).
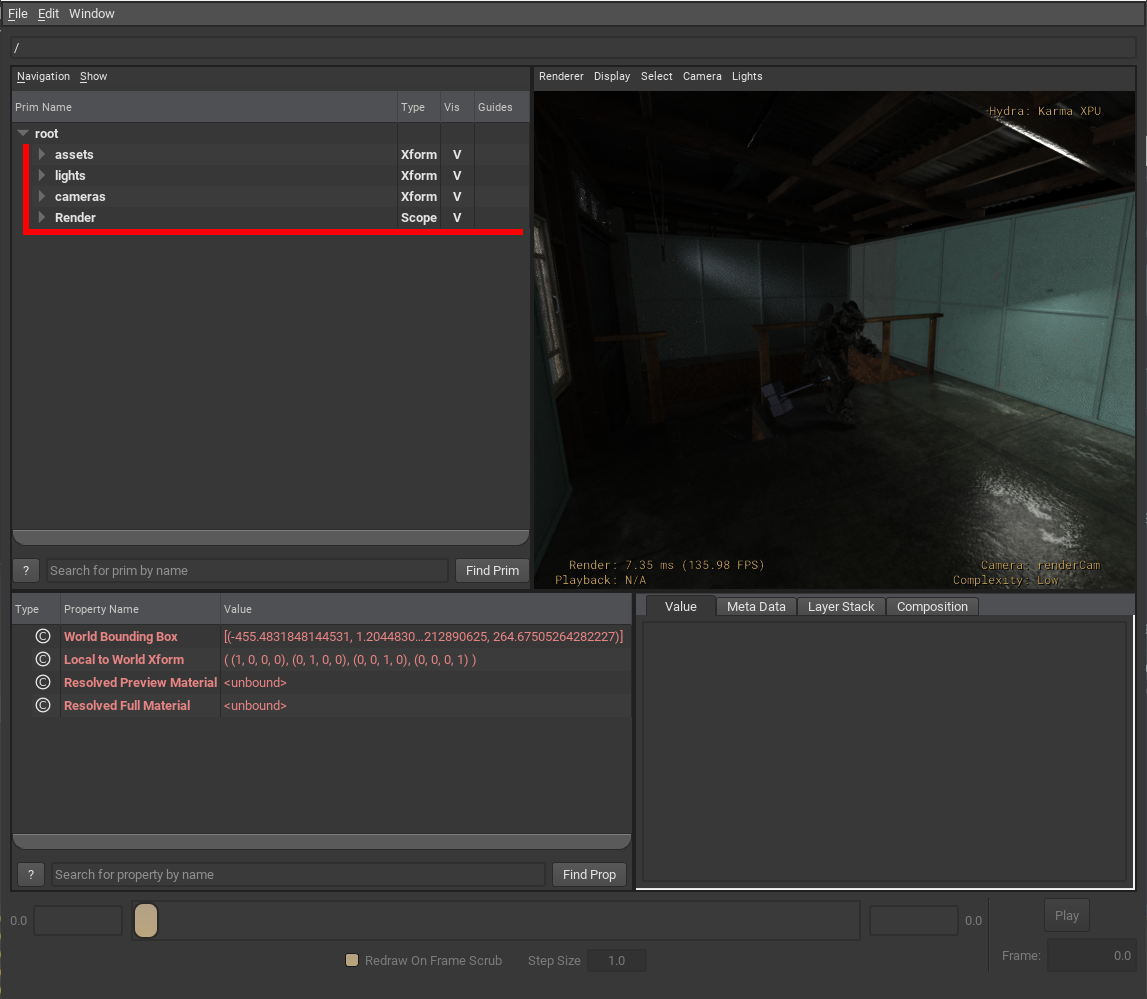
For more details on sublayering, check out: SideFX: USD Sublayering explained.
AYON USD Contribution Workflow Overview
This workflow simplifies the process of transforming artists' input into a USD structure, allowing them to focus on their creative work without worrying about the technicalities of USD.
The contribution workflow includes the following steps:
Create a USD product from your selected object or layer and make it a variant based on the specified variant options.
Create a USD product from your selected
department layerand place the previous product inside it.Create a USD product from your
target productand embed the department product within it.
Generaly speaking, The result has this main structure:
(Target AYON Product)
     └── (Department Layer)
             └── (Your published work)
It’s worth mentioning that the USD layer structure is different from the USD prim hierarchy within a USD layer.
The USD layer (file) structure, as shown in the example above, refers to the organization of files on disk. In contrast, the USD prim hierarchy describes the data contained within each layer.
Example: For the following published USD Asset
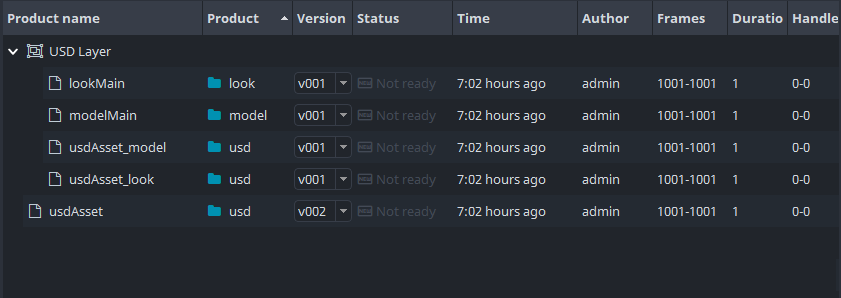
The previous image shows the published products within an asset in my project.
modelMainandlookMainare my published products.usdAsset_modelandusdAsset_lookare the USD department layers created by AYON, which contain the published products.usdAssetis the target product specified in my publish options, created by AYON, and it contains the published department layers.
These published layers follow this structure:
usdAsset                 (Target Product: Product named usdAsset)
  ├── usdAsset_model     (Department layer: with model layer selected)
  |     └── usdModelMain (single contribution product: your work from the workfile)
  └── usdAsset_look      (Department layer: with look layer selected)
        └── usdLookMain  (single contribution product: your work from the workfile))
Working with Contribution Workflow
This section offers general guidance for artists on using the contribution workflow.
For DCC-specific details, please visit the relevant page.
Preparing your work for publishing
Here’s a key point to remember:
When working with assets, ensure everything is within one root prim.
When working with shots, you can use as many root prims as needed.
This section is expanded for each DCC to provide detailed guidance on handling asset and shot contributions.
USD is additive. When publishing a new asset or shot, it builds upon the last published version.
For example, if you referenced an asset in the first published version of shot_01, publishing a second version will still include that asset, even if it’s removed from your scene. In such cases, you should turn its visibility off.
Publishing
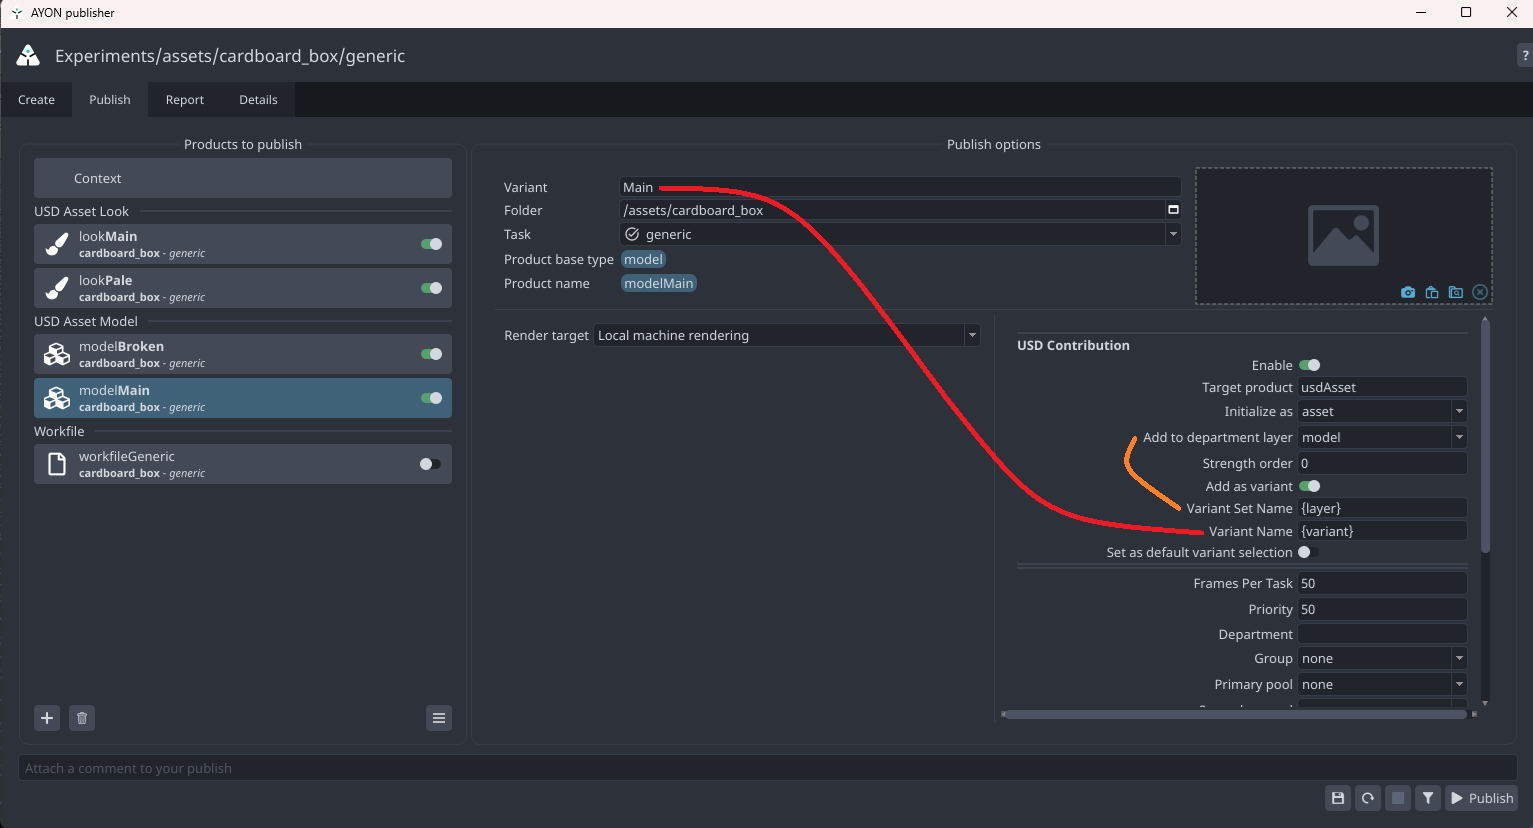
The Creator / Publisher shows USD Contribution options for USD products
These options are the same across different DCC Integrations.
Once you activate the Enable toggle, the AYON USD Contribution options will appear.
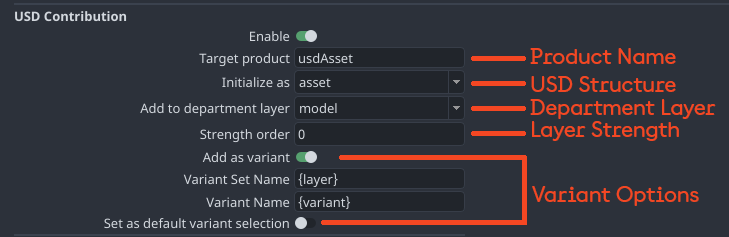
Target Product
The Target Product is the top-level USD Asset or Shot you aim to build, where AYON will place department layers. If the Target Product doesn’t exist, AYON will create it automatically.
While default names like usdAsset and usdShot are commonly used, you can name the target product whatever you want.
AYON plugins don’t make assumptions or take additional actions based on the name.
USD Structure
The USD structure of the target product is determined by the Initialize as option, where you tell AYON whether you are publishing to a shot or an asset.
Department Layers
Department Layers are used to organise work within the target product. They allow you to separate different types of work into their respective layers. For example, models are placed in the model department layer, while looks are placed in the look department layer.
AYON enables admins to customize the list of department layers and their orders in the USD Contribution Workflow settings.
By default, the following department layers are available:
Typically, some layers are intended for USD asset products, while others are intended for USD shot products.
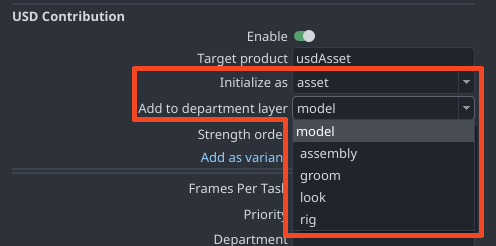
Used with Asset products
model:
100assembly:
150groom:
175look:
200rig:
300
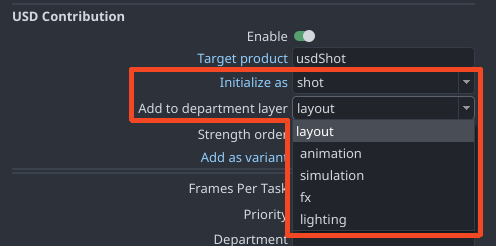
Used with Shot products
layout:
200animation:
300simulation:
400fx:
500lighting:
600
What if a department layer is intended for shots, can I still use it for assets? e.g. animation department layer.
It's best to have separate, dedicated department layers for each type to avoid unexpected results. For example, if you want to use an animation layer in your usdAsset, you should have a differently named department layer than the one used for usdShot, such as assetAnim.
Reach out to your admin to set up a specific department layer for assets.
We don’t currently validate if a department layer is used incorrectly or if it contains irrelevant prims. However, this might change in the future with Validate department layer is used with the intended target product.
Please consult your admin to clarify the intended usage of the available department layers in your studio, specifying which layers should be used for assets and which for shots.
Layer Strength
Specify an integer strength ordering offset per instance.
When multiple instances are targeting the same department layer, e.g. like when the department layer will hold a "proxy", "lods" and the main contribution we may want to nudge e.g. the proxy to have a slightly lower layer strength than the others, etc.
Variant Options
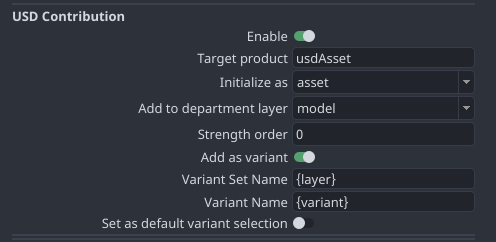
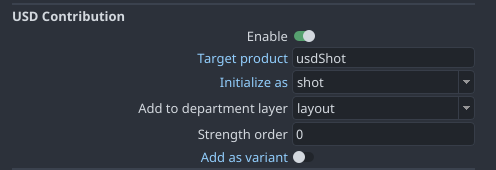
In the majority of cases when contributing to a shot you want to disable Add as variant.
Every DCC offers dedicated methods for creating USD assets with variants. However, AYON simplifies this process by handling it for you. All you need to do is provide the object, specify the variant name, and the variant set it belongs to.
By default, the variant set name is set to the department layer name, and the variant name is set to the AYON variant name.
This approach allows you to publish multiple USD variants effortlessly, without relying on the native DCC methods.
This section expands on each DCC, offering detailed guidance on managing asset and shot contributions.
The AYON USD workflow is additive. All previous variants remain, and if a variant set already exists, the new variant will be added to the existing set.
Example:
Imagine you want to publish two model variants: modelMain and modelDamaged. You only need to create these two models separately. During publishing, AYON will automatically add them to the model department layer as two variants and then place the department layer into the usdAsset product.
usdAsset                 (Target Product: Final Product)
  └── usdAsset_model     (Department Layer: Model Department Layer)
        └── model        (Variant Set Name: Named after the department layer name)
              ├── ModelMain (Single contribution product: Main)
              └── ModelDamaged (Single contribution product: Damaged)
Loading
The Loader toolhandles the loading process, allowing you to load published usdAsset(s) and usdShot(s).
All AYON USD loaders either reference or sublayer the product into your scene. Generally, referencing is used for usdAsset(s), while sublayering is used for usdShot(s).
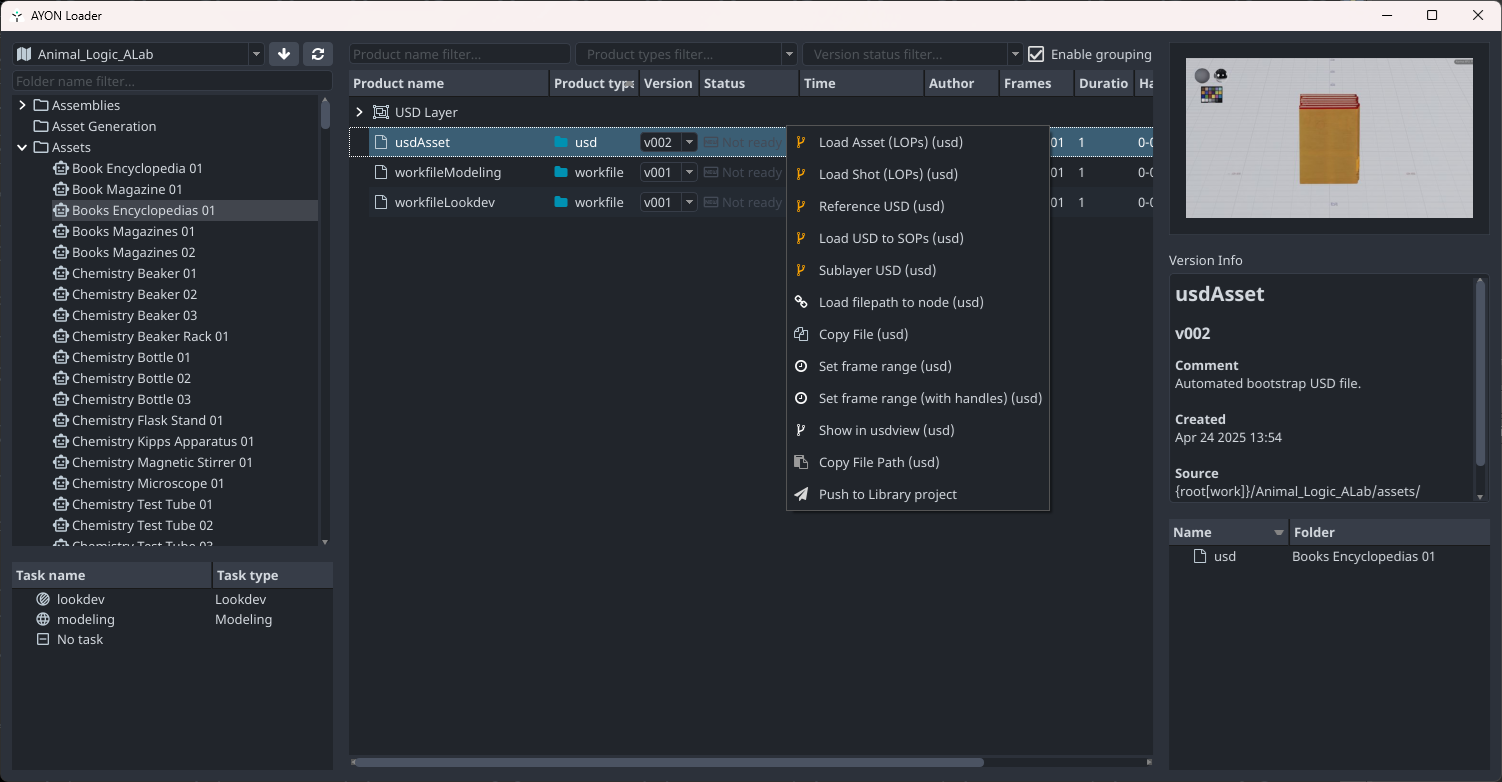
In the example above, the focus is solely on a published usdAsset.
Manage Loaded Products
The Scene Inventory tool helps you manage loaded products, including loaded usdAsset(s) and usdShot(s).
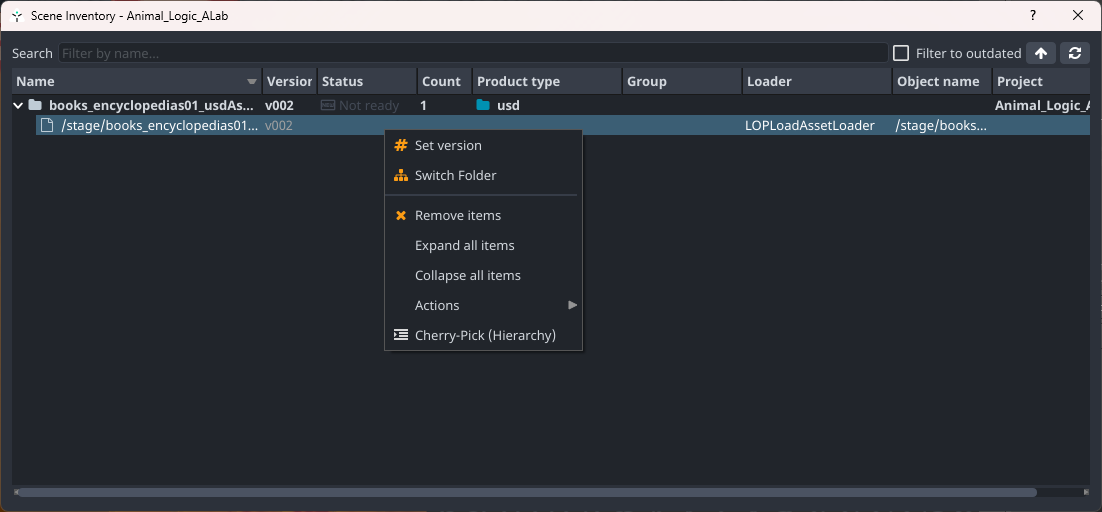
When dealing with assemblies and layouts, usdAsset(s) and usdShot(s) may reference other products published within AYON, such as another asset. In these cases, the Scene Inventory only displays the outer target product, not the referenced products.
Modify Published Products
Due to the additive nature of USD, you can only extend existing assets and shots. This allows you to add new contributions, override, or hide previous ones. However, you cannot fully remove any contributions through publishing.
Alternatively, you can directly edit the USD layer files on your disk.
Be cautious with this approach, as it can be risky if you're not familiar with the process. For more details, refer to the next section: Remove Contributions.
Remove Contributions
Danger Zone
To remove contributions, you must manually modify the files on disk.
This is a technical process that requires caution, as improper handling may leave your USD files in a broken state.
Removing a department layer from the target product
Your published usdAsset may include department layers in its payload.
In the ../publish/usd/usdAsset/v001/payload.usd file, you might see different layers like model and look.
You can remove one of the subLayers entries to completely eliminate a department layer from the published file. For instance, removing the look layer achieves this.
Example#usda 1.0
(
defaultPrim = "hero"
metersPerUnit = 1
upAxis = "Y"
subLayers = [
@C:\projects\ayontest\asset\hero\publish\usd\usdAsset_look\v001\ynts_hero_usdAsset_look_v001.usd:SDF_FORMAT_ARGS:layer_id=look&order=300@,
@C:\projects\ayontest\asset\hero\publish\usd\usdAsset_model\v002\ynts_hero_usdAsset_model_v002.usd:SDF_FORMAT_ARGS:layer_id=model&order=100@
]
)Removing a single contribution in a department layer
Your published usdAsset_model may contain many contributions, such as different variants and variant sets.
In the ../publish/usd/usdAsset_model/v001/..._usdAsset_model_v001.usd file, you might see variants like ModelMain and ModelPhotoreal.
To remove a single variant, like
ModelMain, delete that block. Also, check the default variant selection at the top of the file, as you may need to update it if you removed that variant from the file.Alternatively, you can remove the variant set entirely, leaving the root prim empty.
Example#usda 1.0
(
defaultPrim = "hero"
metersPerUnit = 1
upAxis = "Y"
)
def Xform "hero" (
variants = {
string model = "ModelMain"
}
prepend variantSets = "model"
)
{
variantSet "model" = {
"ModelMain" (
prepend references = [
@C:\projects\ayontest\asset\hero\publish\usd\usdModelMain\v001\ynts_hero_usdModelMain_v001.usd@ (
customData = {
int ayon_order = 100
string ayon_uri = "ayon://ayontest//asset/hero?product=usdModelMain&version=1&representation=usd"
}
)
]
)
{}
"ModelPhotoreal" (
prepend references = [
@C:\projects\ayontest\asset\hero\publish\usd\usdModelPhotoreal\v001\ynts_hero_usdModelPhotoreal_v001.usd@ (
customData = {
int ayon_order = 100
string ayon_uri = "ayon://ayontest//asset/hero?product=usdModelPhotoreal&version=1&representation=usd"
}
)
]
)
{}
}
}