Working with 3ds Max in AYON
Last updated 4 months ago
Launch 3ds Max
3ds Max must be launched via the Launcher, as it sets the studio environment when starting apps.
Locate AYON Icon in the OS tray (if hidden dive in the tray toolbar).
If you cannot locate the AYON icon ...it is not probably running so check Getting Started with AYON Pipeline first.
By clicking the icon AYON Menu rolls out.
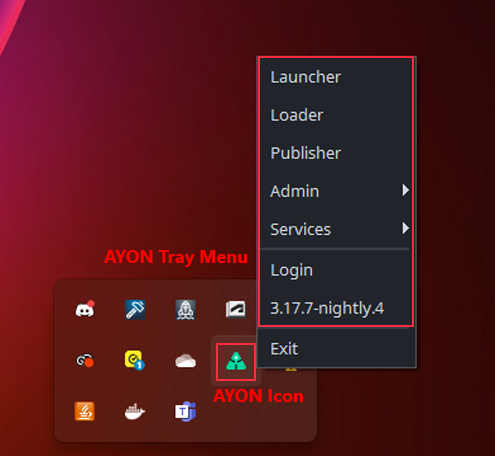
Choose AYON Menu > Launcher to open the Launcher window.
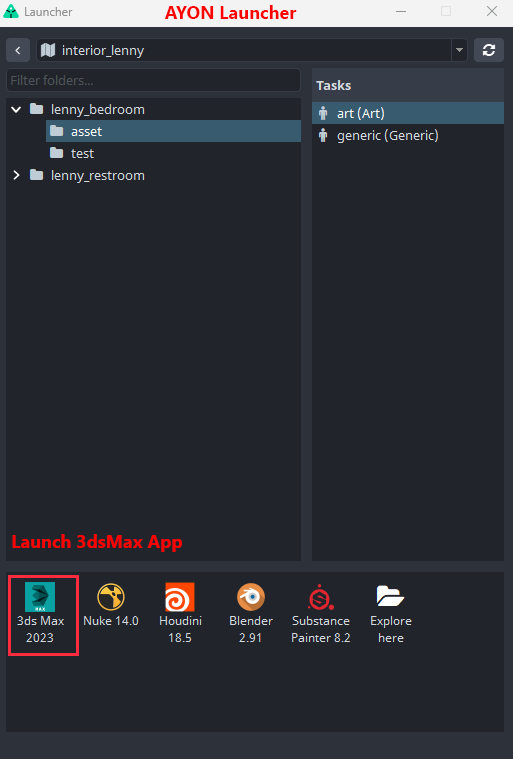
When opened you can choose the project to work in from the list. Then choose the particular asset you want to work on then choose task and finally run 3ds Max by its icon in the tools.
AYON Tools
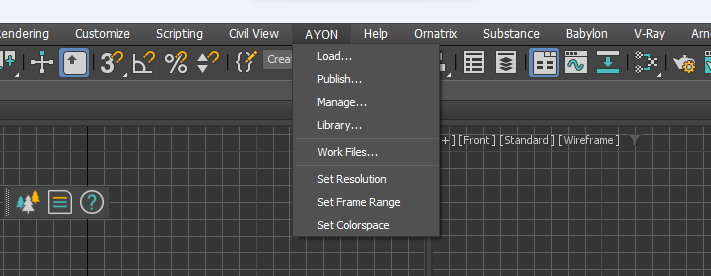
When launching 3ds Max via AYON Launcher there should be AYON Menu visible in 3ds Max top header after start. This is the core functional area for you as a user. Most of your actions will take place here.
AYON Global Tools
Workfile Actions
Set Resolution: Set the render resolution as defined on the current task in AYON.
Set Frame Range: Set the timeline frame range and FPS as defined on the current task in AYON.
Set Colorspace: Set the OCIO conifg as defined on the current task in AYON.
Pipeline Tools
Working With Scene Files
In AYON menu first go to Workfiles menu item so Work Files Window shows up.
Here you can perform Save / Load actions as you would normally do with File Save and File Open in the standard 3ds Max File Menu and navigate to different project components like assets, tasks, workfiles etc.
User should use Workfiles menu exclusively for Opening/Saving when dealing with work files not standard File Menu even though user still being able perform file operations via this menu but preferably just performing quick saves during work session not saving actual workfile versions.
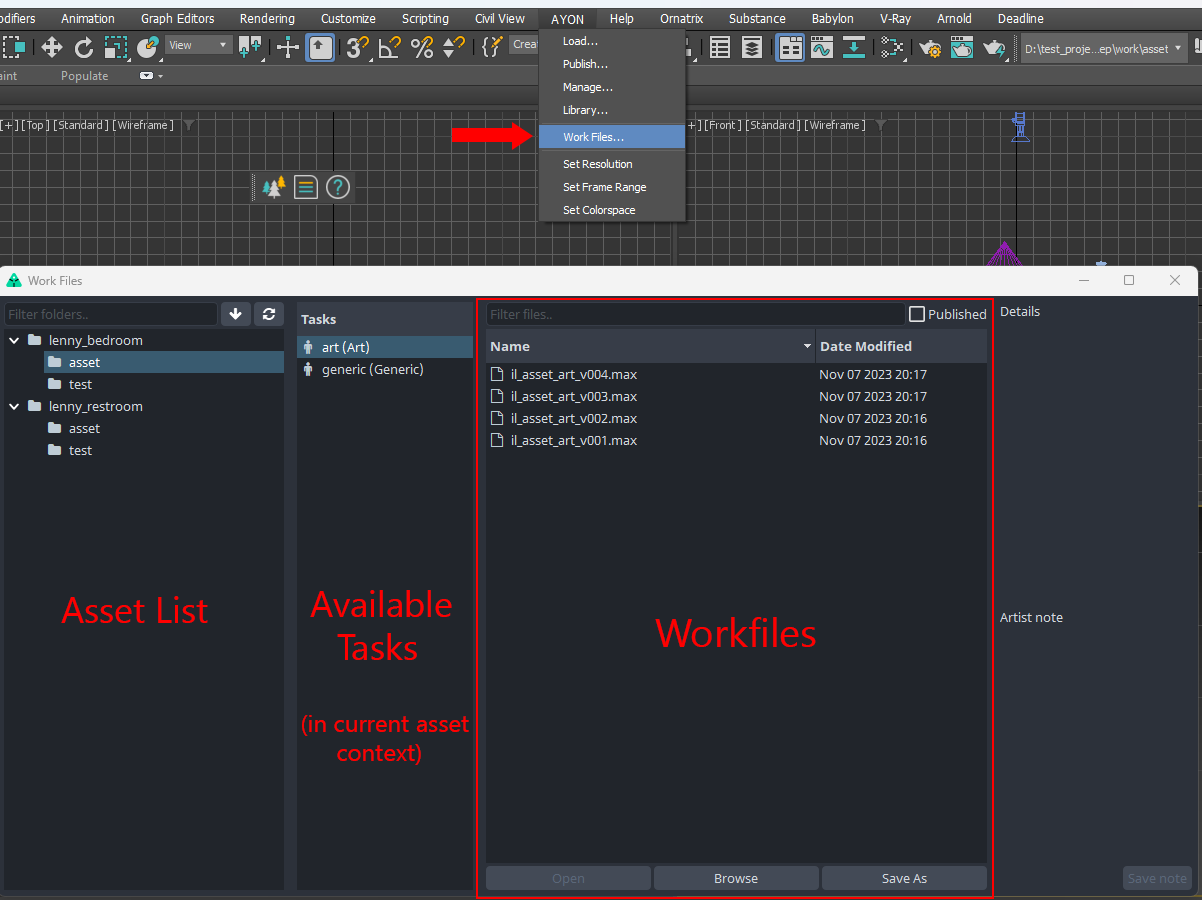
You first choose particular asset and assigned task and corresponding workfile you would like to open.
If not any workfile present simply hit Save As and keep Subversion empty and hit Ok.

AYON correctly names it and add version to the workfile. This basically happens whenever user trigger Save As action. Resulting into incremental version numbers like
workfileName_v001workfileName_v002
Basically meaning user is free of guessing what is the correct naming and other necessities to keep everything in order and managed.
Note: user still has also other options for naming like
Subversion,Artist's Notebut we won't dive into those now.
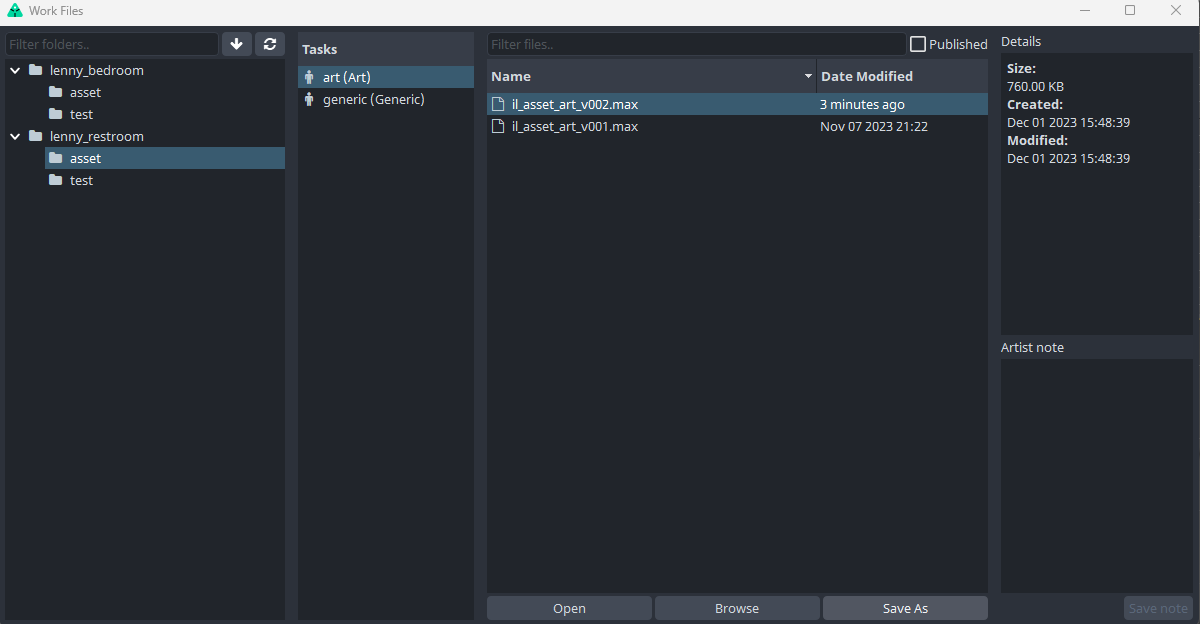
Here you can see resulting work file after Save As action.
Understanding Context
As seen on our example AYON created pretty first workfile and named it il_asset_art_v002.max meaning it sits in the Project il being it asset asset and workfile being art task and obviously v002 telling user its first existing version of this workfile.
It is good to be aware that whenever you as a user choose folder and task you happen to be in so called context meaning that all user actions are in relation with particular asset. This could be quickly seen in host application header and AYON Menu and its accompanying tools.
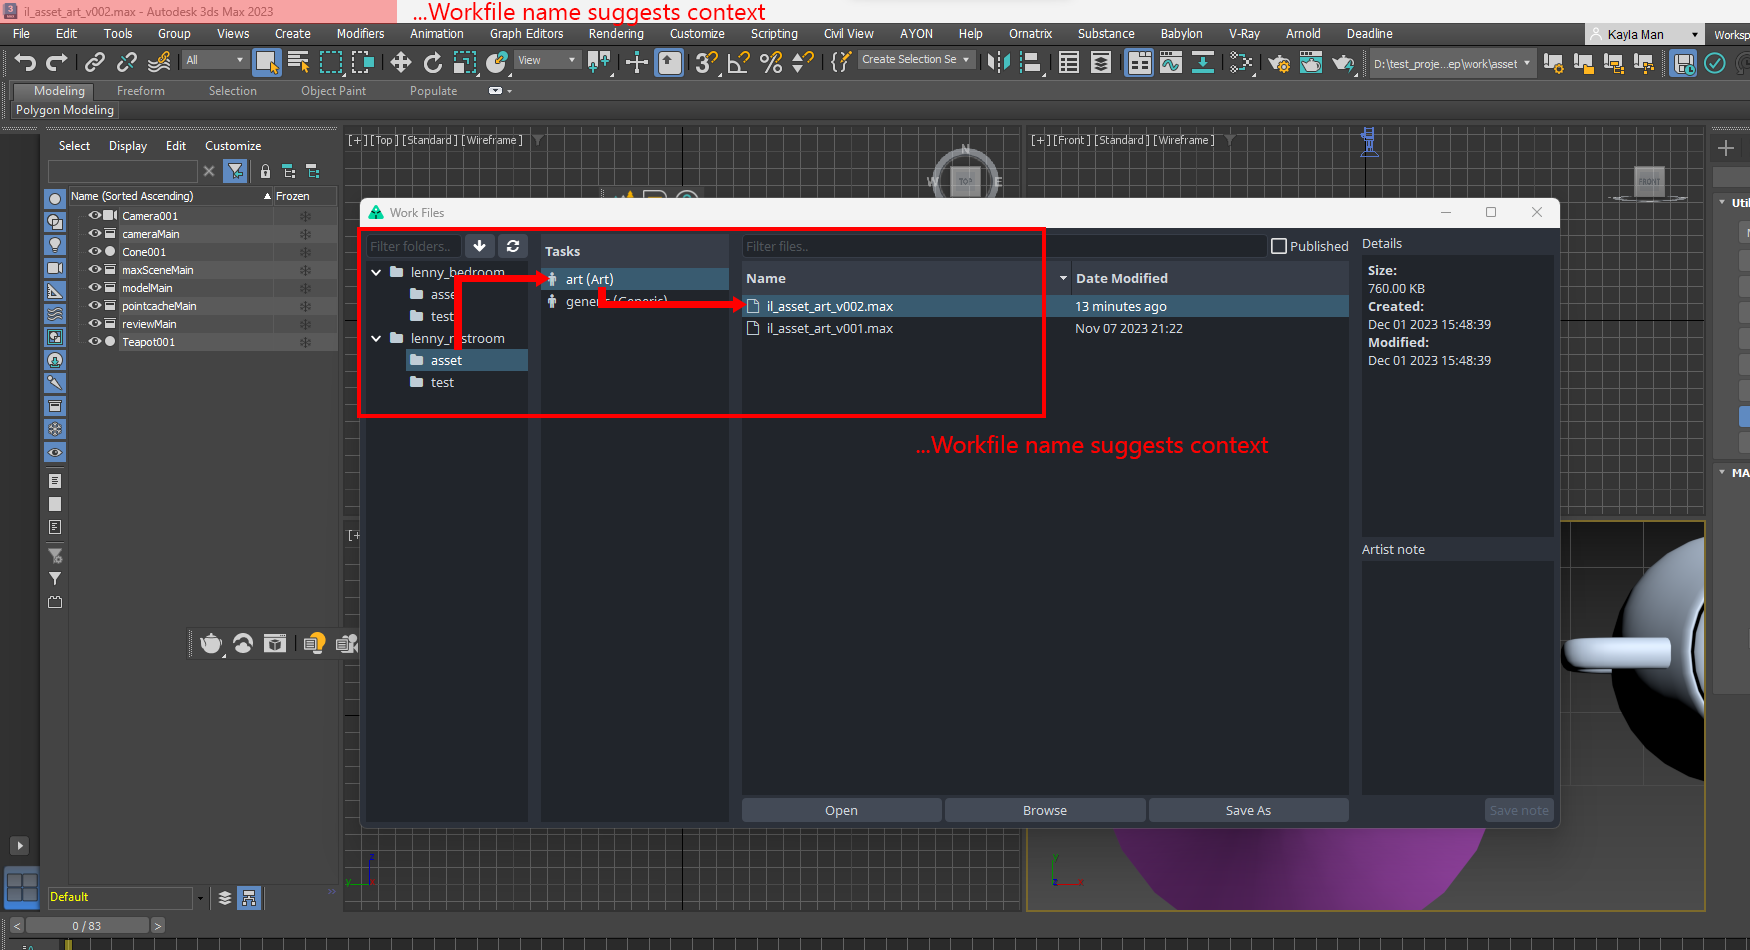
Whenever you choose different
folderand itstaskin Work Files window you are basically changing context to the current asset/task you have chosen.
This concludes the basics of working with workfiles in 3ds Max using AYON and its tools. Following chapters will cover other aspects like creating multiple assets types and their publishing for later usage in the production.
Creating and Publishing Instances
Keep in mind to check AYON Glossary and About AYON Pipeline So you have clear idea about terminology.
Intro
Current AYON integration supports many products such as:
cameraproduct type being 3ds Max Camera object with/without animation outputted as native .max, FBX, Alembic formatmaxSceneproduct type being 3ds Max scene outputted as native .max formatmodelproduct type basically any geometry outputted as abc, obj, fbx, usd and max scene.Pointcacheproduct type being basically any geometry outputted as Alembic cache (.abc) format.Point Cloud
prtand TyCachetycproduct types being 3ds Max cache generated from tyFlow plugin and outputted as PRT(Pointcloud)/TYC(TyCache) format.
As tyFlow is an external plugin from 3ds Max, make sure to get it install before using the product types.redshiftproxyproduct type being 3ds Max objects converted and outputted as RS format. As Redshift is an external plugin from 3ds Max, user require to install redshift before using the product type.maxrenderproduct type being 3ds Max scene submitted to AWS Thinkbox Deadline. Currently supports 3ds Max standard renderers, Vray and Redshift for multipass submissions. Only supports Arnold for beauty (RGBA) render submission.reviewproduct type being 3ds Max scene creating preview animation and outputted as video and image sequences(if users select keep image sequences)workfileproduct type a copy of your workfile at the moment of publishing.
Publishing Point Cache (Alembic)
Simply select any animated geometry you want to export as alembic format and go AYON -> Create and select Point Cache. Make sure to keep your geometry selected before Publish. The output format of the geometry is Alembic (abc).
Loading Point Cache
When you load the Point Cache via AYON -> Load, it creates the container which includes the Alembic object parented to the point cache object.
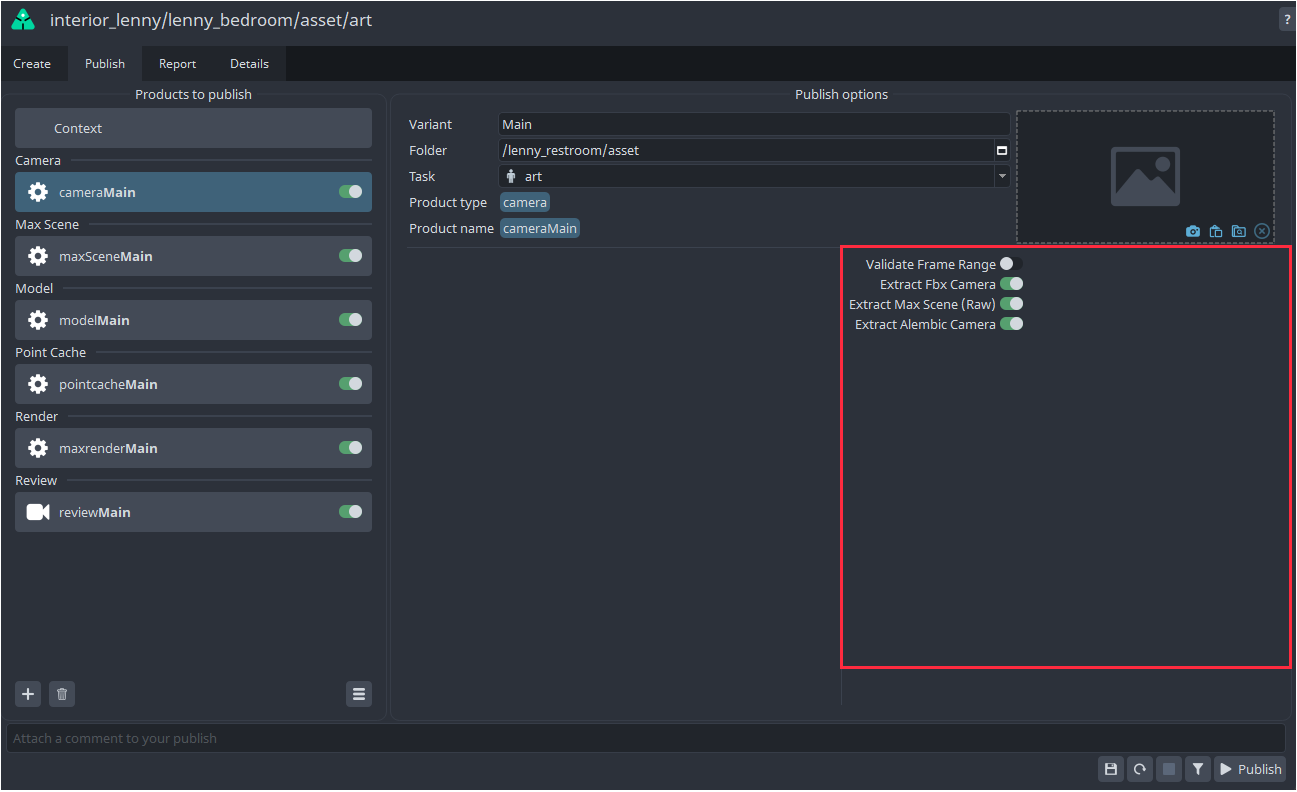
Publishing Camera
Select the camera you want to export and go AYON -> Create and select Camera. User can go Publish and decide the export options by turning on/off the camera extractors.
MAX Alembic compatibility
The exported Alembic from the current alembic extractor may only be loaded in Max. It may not be compatible with the alembic loader in other DCCs such as Maya.
Loading Camera
The Loader provides several options to load camera. You can import camera in either native Max, Fbx and Alembic (abc) format.
Similar to the Point Cache Instance, the Alembic camera loader will creates the container which includes the Alembic object parented to the point cache object.
The Fbx and max scene Loader import the published camera object which is parented to the newly created container.

Publishing MaxScene
Select any type of objects in the scene you want to export and go AYON -> Create and select Max Scene.
Loading MaxScene
Similar to other max scene loader, it will create the new containers which includes the published max scene object.
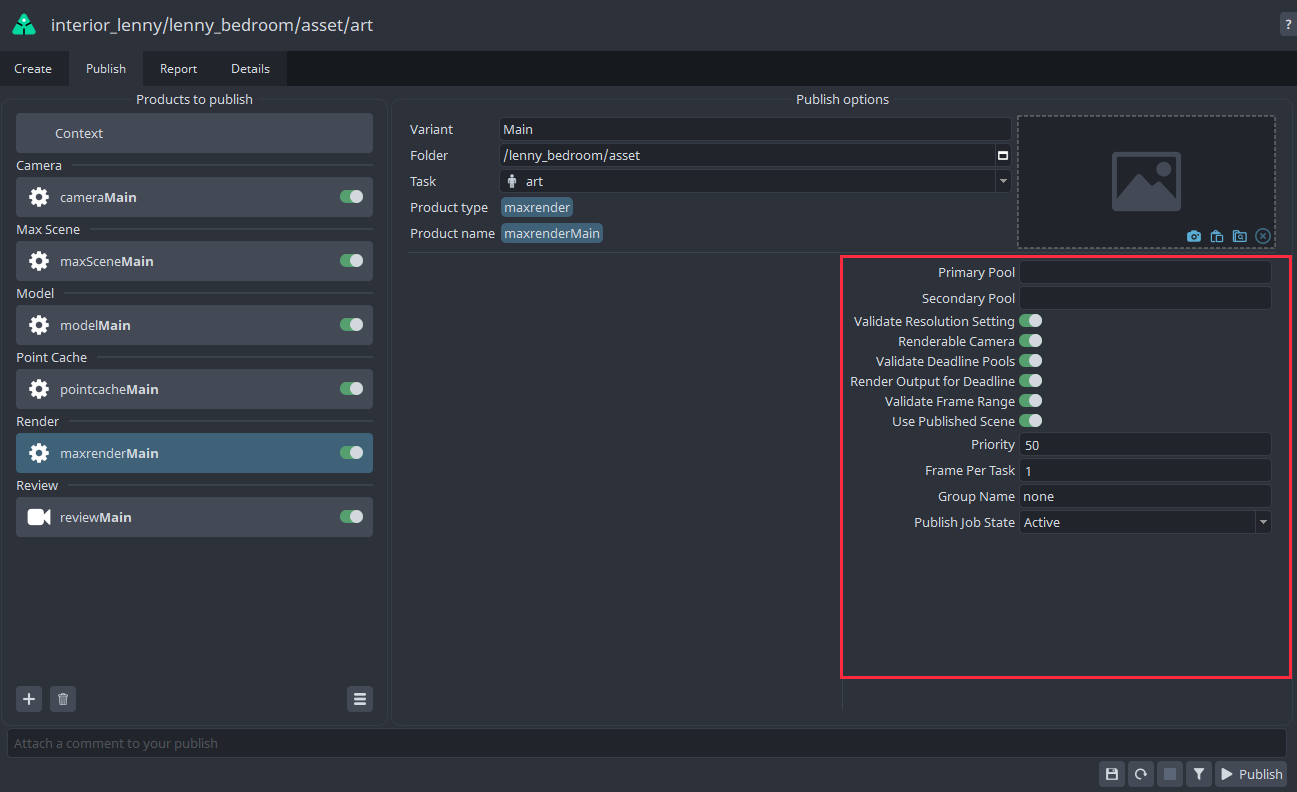
Rendering
After choosing your render setting, select the target camera for rendering in the scene and go AYON -> Create and select Render. When you go to Publish, you can set up the preferences in either creator or AYON setting before the deadline submission.
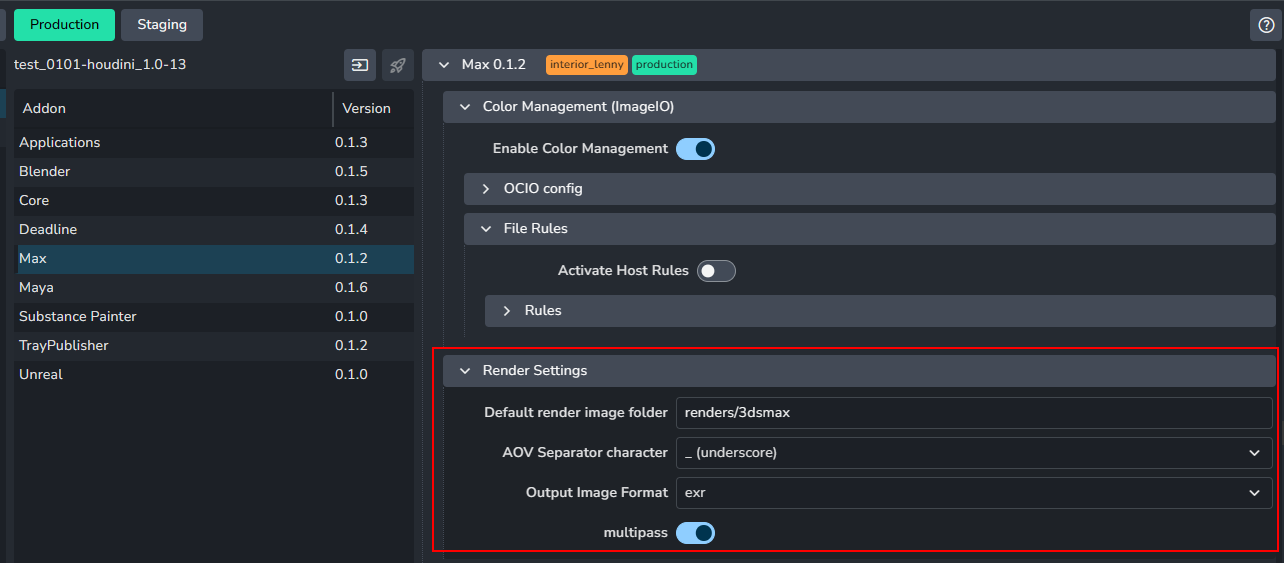
The Render Instance supports AOV renders for VRay, Redshift, and 3ds Max default renderers(i.e QuickSliver Hardware Renderer, ART Renderer, Scanline Renderer, VUE File Renderer). Merely supports beauty render for Arnold due to the pymxs API limitation.
Make sure removing the old render instance and create the new one if you switch from one renderer to another
tyFlow
AYON supports the tyFlow plugin for 3dsmax, allowing you to publish tyFlow and Point Cloud products while using AYON. There are a few prerequisites you need to meet before using this integration.
Apart from deploying the 3dsmax plugin into your work environment you also need to first define new publishing template for tyCache in the Project’s Anatomy / Templates / Publish section as follows to be able to produce any products via AYON:
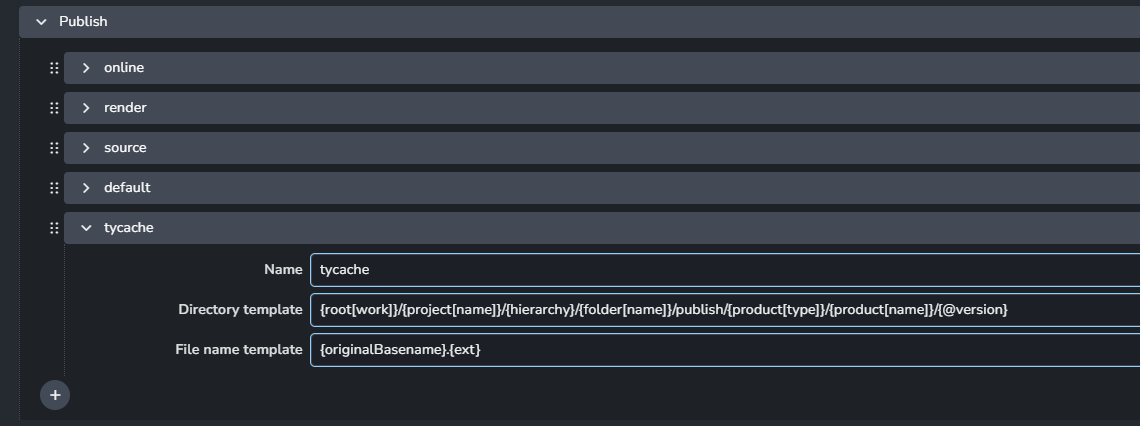
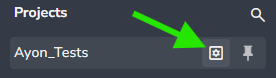
Note: You can enter Project’s Anatomy via cogwheel icon next to a project name within the Projects tab in the AYON frontend and also note that each project having own set of templates so these must be set for each separately.
Working with tyFlow
Create your tyFlow object and develop your tyFlow setup inside tyFlow Editor - also do not forget to include Export Particles (tyCache) node in your setup and give it custom name so AYON can refer it as an unique one later on.
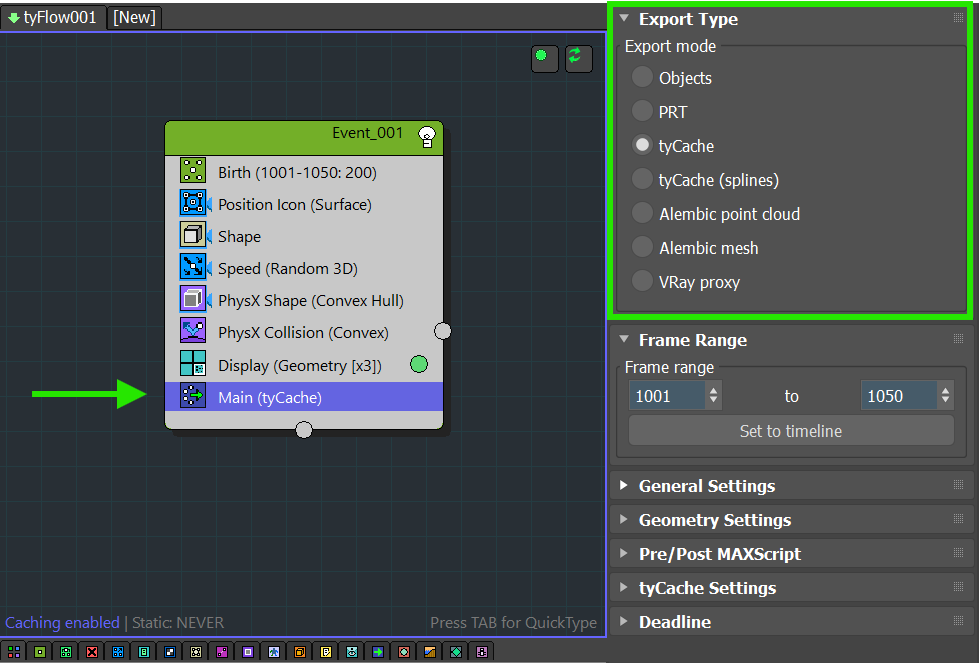
Once ready, navigate in 3dsmax menu to the AYON > Publish / Create tab and select tyFlow product from the available publish types and hit Create.
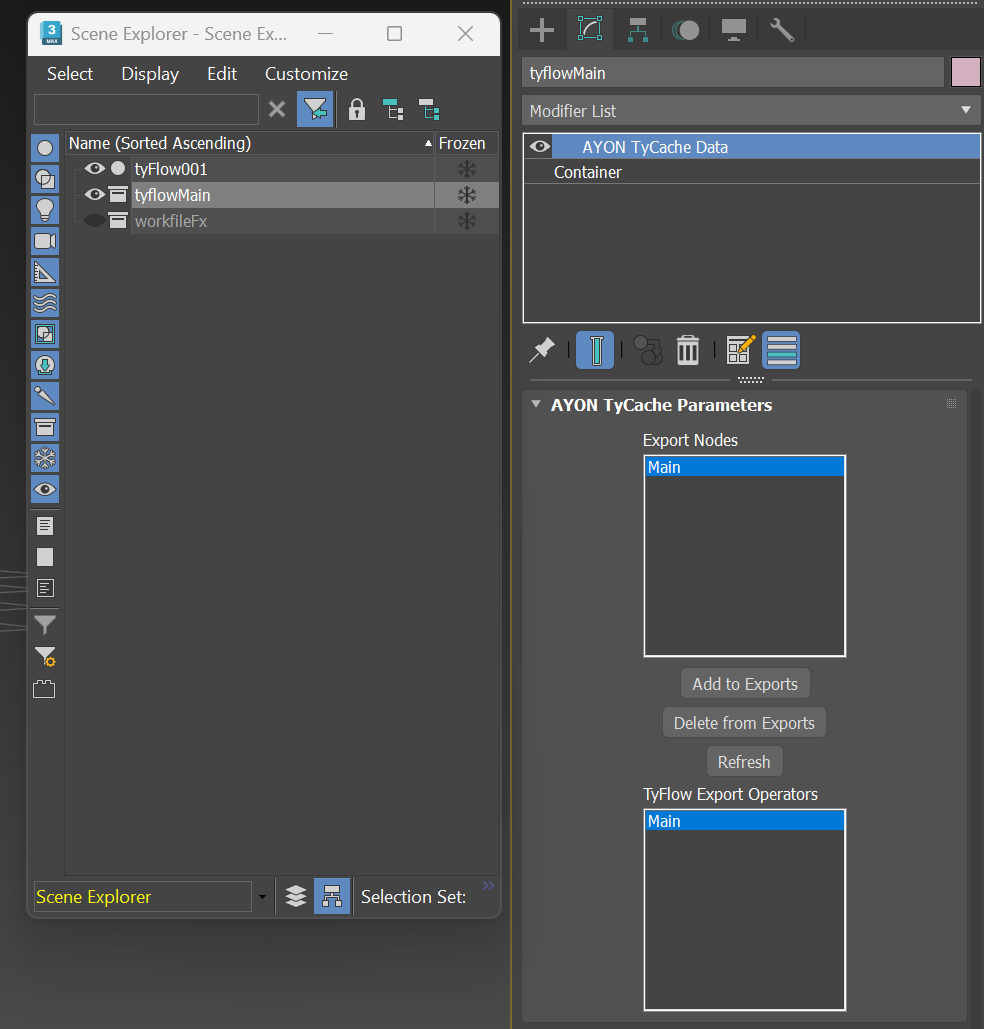
Also don’t forget to check AYON TyCache Data container in the Scene Explorer and Modifier List and its parameters after creation of the tyFlow publish instance if having the proper entity added. It should be matching the name you gave to your Export Particles node within the preceding steps in tyFlow Editor e.g. Main in our example.
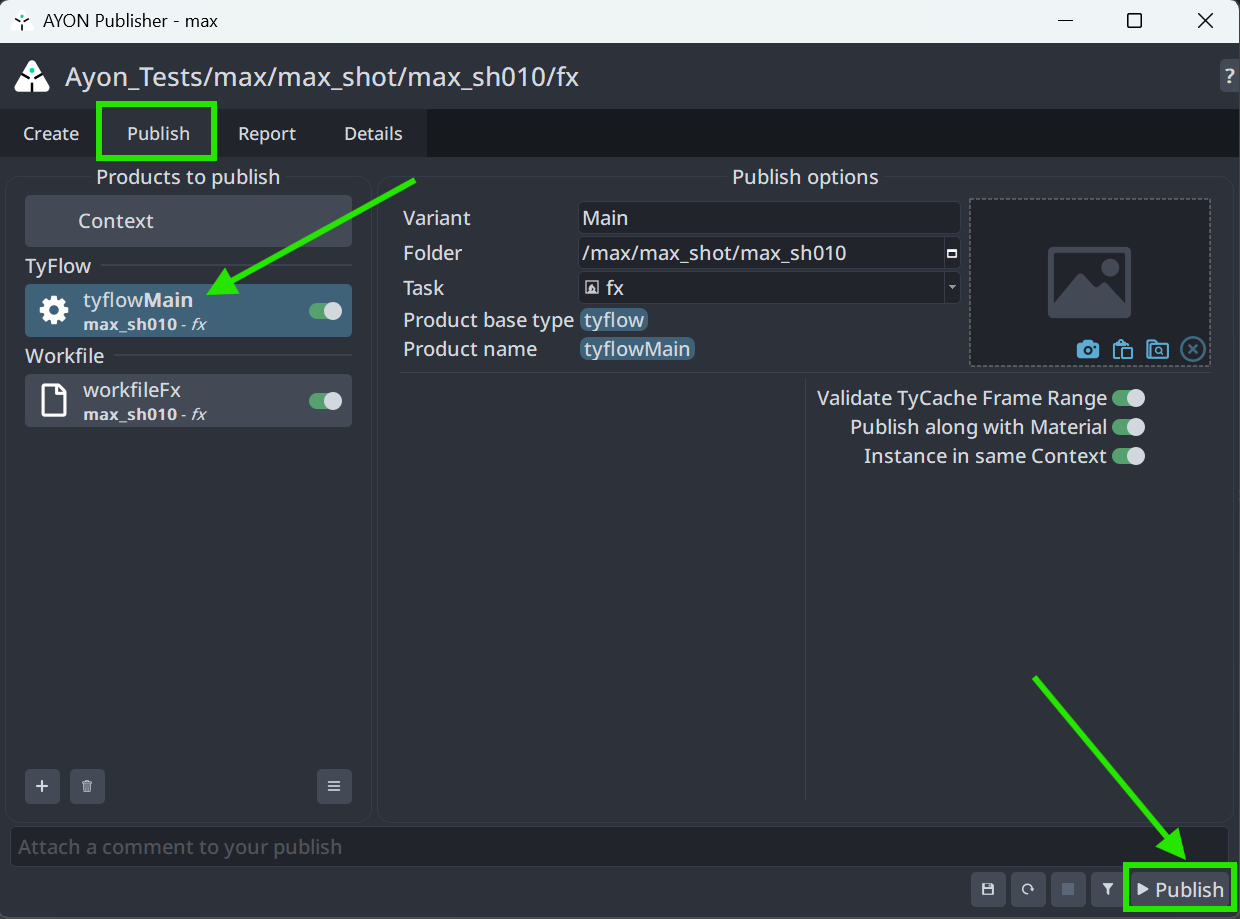
When all correctly set, you are ready to publish your tyFlow product using the Publisher using AYON > Publish tab
TyFlow and Point Cloud
TyFlow integration offers 2 products for usage. TyFlow (cache) and Point Cloud (PRT) which differs in data format, options and licensing.
Note that you need to have tyFlow PRO license to produce TyFlow product while Point Cloud product works also with tyFlow Free edition but only for PRT data.
Publishing Point Cloud
Select the tyFlow object(s) you want to publish and go to AYON -> Create and select Point Cloud. The exported object(s) would be in PRT format You can add the attributes which needs to be exported in Point Cloud Addon setting before publishing.
Publishing TyCache*
*This section been outdated and not valid anymore. TyCache been replaced by the tyFlow product instead and following options aren’t available while in the Publisher UI to the user anymore.
Select the tyFlow object(s) you want to export and go AYON -> Create and select TyCache, you can choose the attribute data of tyCache to be exported in TYC format.
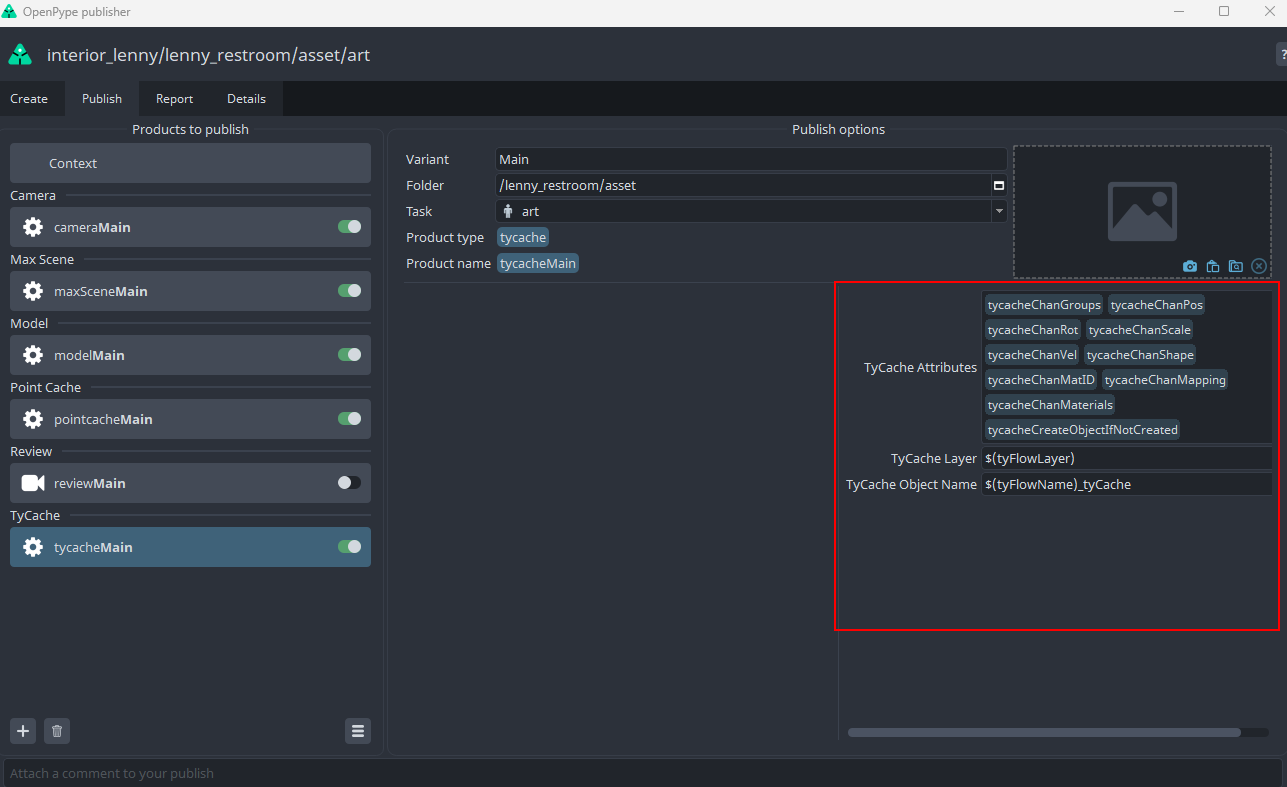
TyCache Attributes Options (N/A and deprecated in the current version)
For users to have more information to know what the attributes they are exporting.
Loading tyFlow / Point Cloud
Once having some tyFlow products published, you can load them via AYON > Load, 3dsmax will create tycache object in the 3ds Max modifier's list and load the published cache / PRT data. You also have all the version control tools AYON offers via AYON > Manage while using tyFlow allowing for version updates, switching, removing etc.
Redshift
You can take advantage of rendering with the Redshift renderer when using AYON, and also when utilizing farm rendering, which is fully supported through the ayon-deadline addon.
Publishing Redshift Proxy
Redshift Proxy only works when Redshift is installed in 3ds Max and it is the current renderer in the scene.
Select the object(s) you want to convert as redshift proxy and go AYON -> Create and select RedshiftProxy. The exported objects will be outputted as RS format.
Loading Redshift Proxy
You can load the redshift proxy through AYON -> Load, it will then load the redshift proxy with the converted object(s).
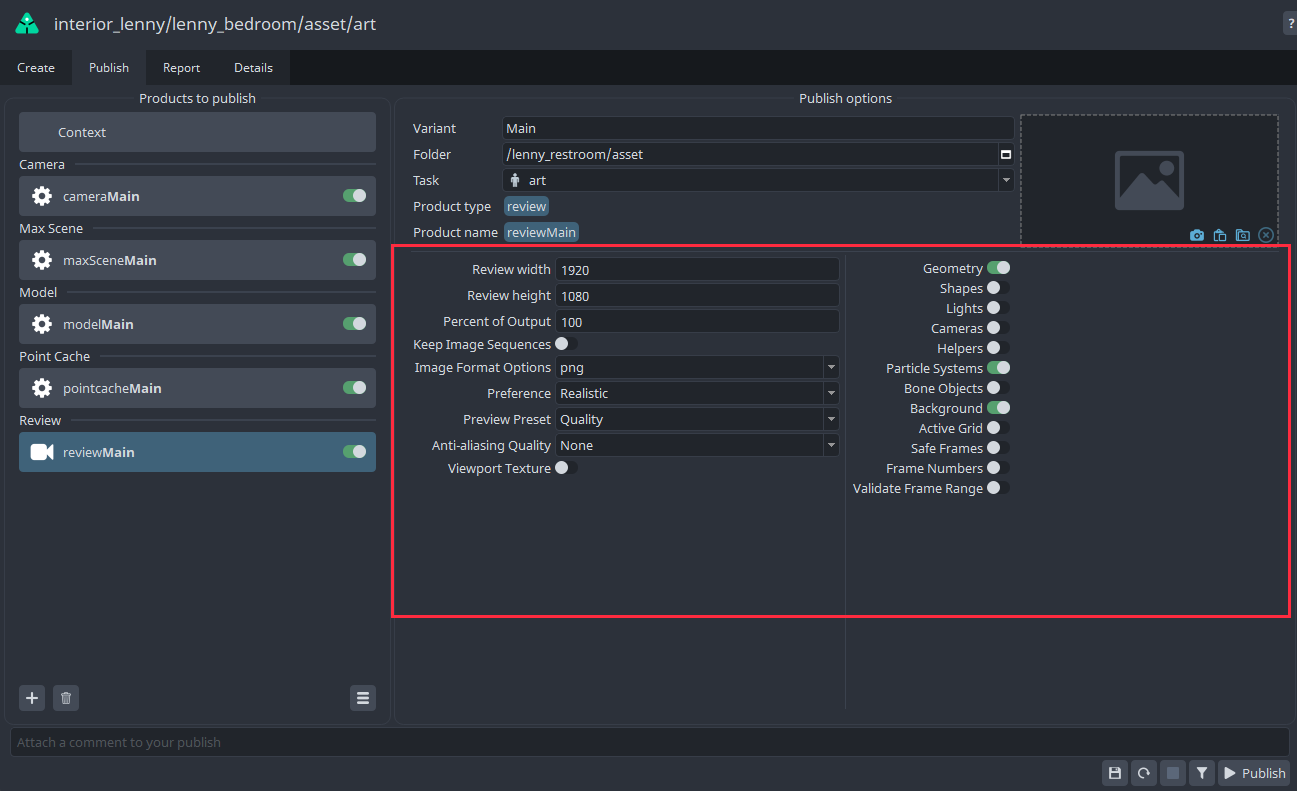
Review
Select the target camera you want to create preview animation and go AYON -> Create and select Review. You can set up the preferences(e.g. resolution) before creating the instance.
Admins can define default values in Create Review addon setting.
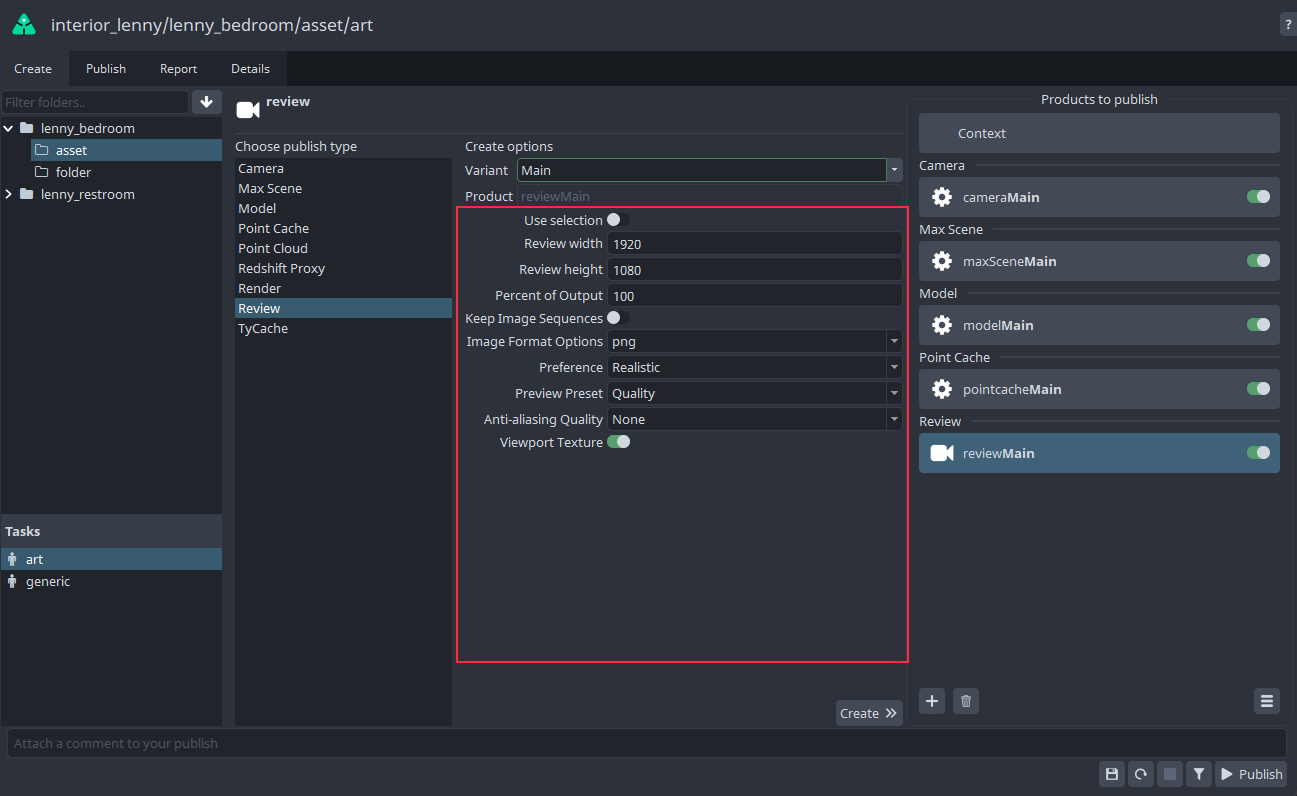
You can always edit if you want to create preview animation with different settings. You can also choose what to include in the preview animation.
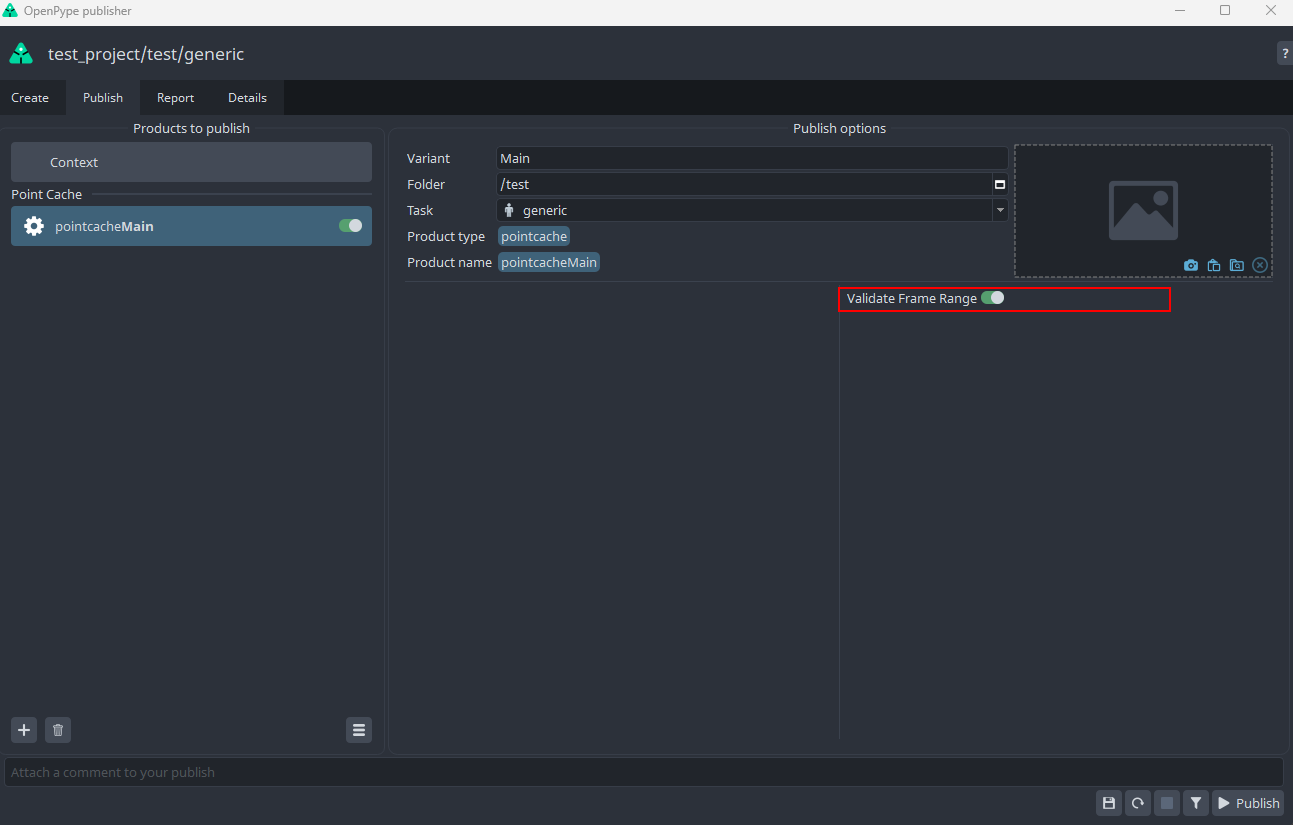
Validators
Validate Frame Range
This validator checks if the frame range in the scene aligns with that in the AYON project settings. Admins can set default value and mark it as an option plugin in Validate Frame Range addon setting.
If the validator is marked as optional. You’ll be able switch on/ off in in the Publisher Tab.