Working with Blender in AYON
Last updated 6 months ago
Introduction
Once you launch Blender via AYON Launcher you will be introduced to AYON Menu present in the menu header which is also a clear indication of running Blender using AYON pipeline environment.

Before starting to use the Blender AYON integration, please check documentation sections to fully understand the core concepts of the AYON toolset and what it offers you as a user, as you will use those tools very frequently.
AYON Tools
AYON Global Tools
AYON Blender Specific Tools
Set Frame Range: Set width and height to blender scene according to AYON folder path attributes.
Set Resolution: Set start and end frame to blender scene according to AYON folder path attributes. Handles are included based on admin configuration here.
Pipeline Tools
Quick Start
AYON streamlines collaborative projects, simplifying tasks like naming conventions, configurations, and file navigation. It employs a "data-driven" approach, meaning the data within a scene dictates the publishing process. To clarify, let's explore some examples.
Setting scene data
Blender settings concerning frame rate, resolution and frame range are fully handled by AYON. If set correctly on the AYON server or in Ftrack, Blender will automatically set the values for you.
You can force a proper resolution and frame range/fps at any time using Set Frame Range and Set Resolution actions sitting in the AYON menu which also uses server database for a given shot/scene context within the active project.
Dealing with workfiles (File Saving / Opening)
When wanting to save your Blender scene aka Workfile, instead of using regular actions File > Save As
...use AYON > Workfiles which opens Workfiles tool instead.
It will make saving, naming and versioning your file a breeze...just hit “Save As” and let Ayon do the job for you setting a proper name and version.
Use additional options when saving your work once you are more familiar with the tool.
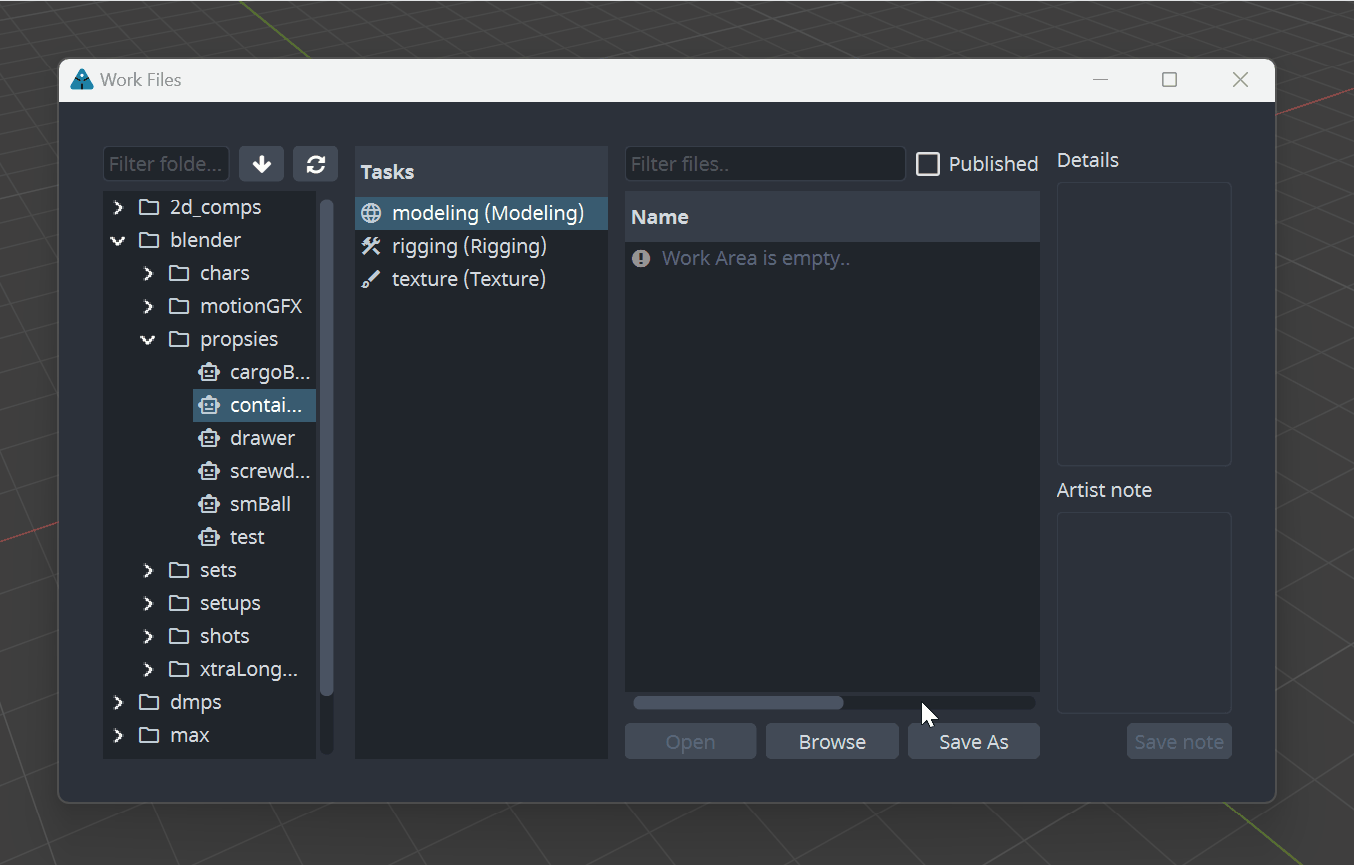
You will use Workfiles tool not just for saving your work but for all .blend file operations like File > Open too.
Just navigate to AYON > Workfiles > Open instead.
For more details and other options available, navigate to Workfiles user's docs section.
Publishing
Publishing is a process of producing data which can be shared across your project and with your team members. This process uses Creator / Publisher tool.
Publishing consists of several steps:
creation of your asset (model, environment, character rig etc.)
creation of AYON publish instance (defines product type to be published)
publishing action (making a product publicly available to others)
How to publish
Let's begin with model product and how to approach publishing process.
Publishing a model product in AYON is very simple. Begin by preparing your model, either from scratch or by importing model(s) into Blender. While studio specifications may vary depending on the project, generally, no additional conventions are needed for your geometry.
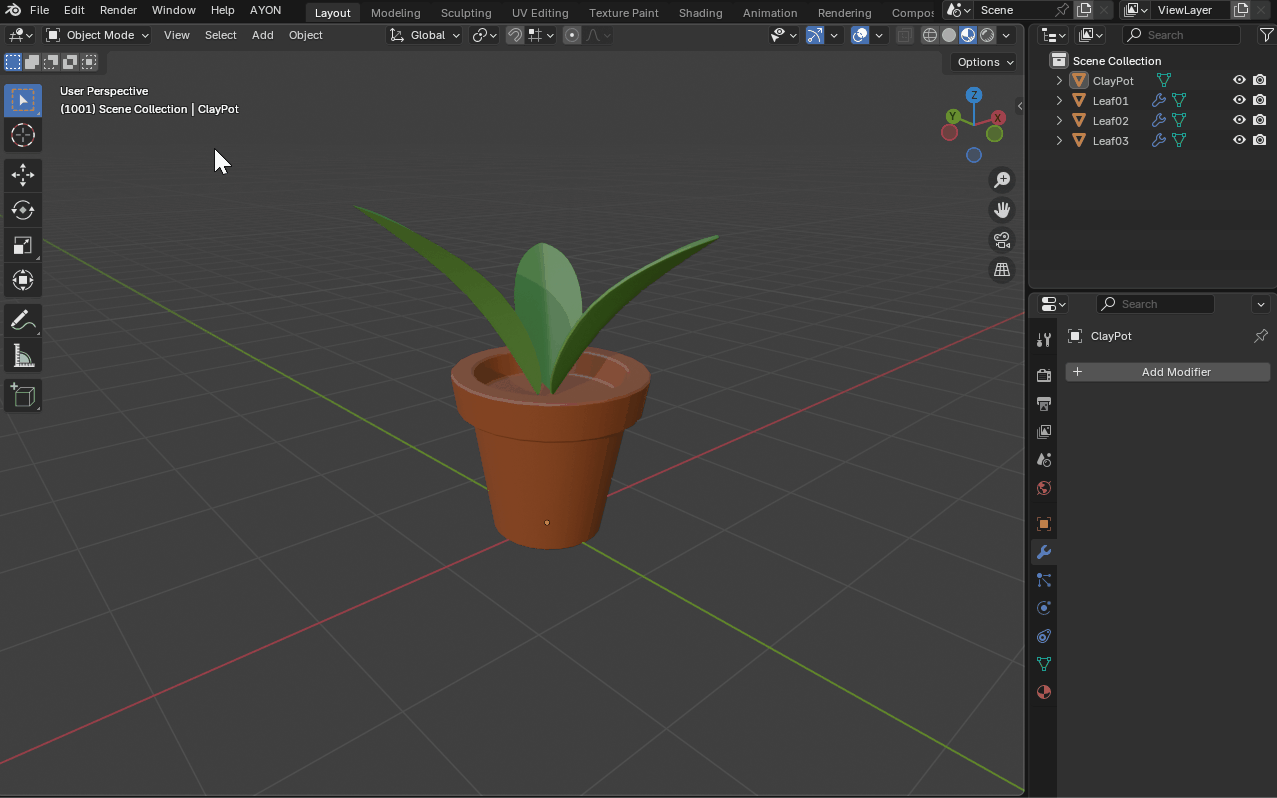
If your model parts having any sort of parenting, select only the top-level parent entity when creating a model publish instance, as there will be a parenting action for the resulting model that could otherwise break your existing children relationships.
Creating Publish Instance
Once your model been ready and all model parts selected, navigate to AYON > Create...
Publisher window with ‘Create’ tab will be introduced to you...
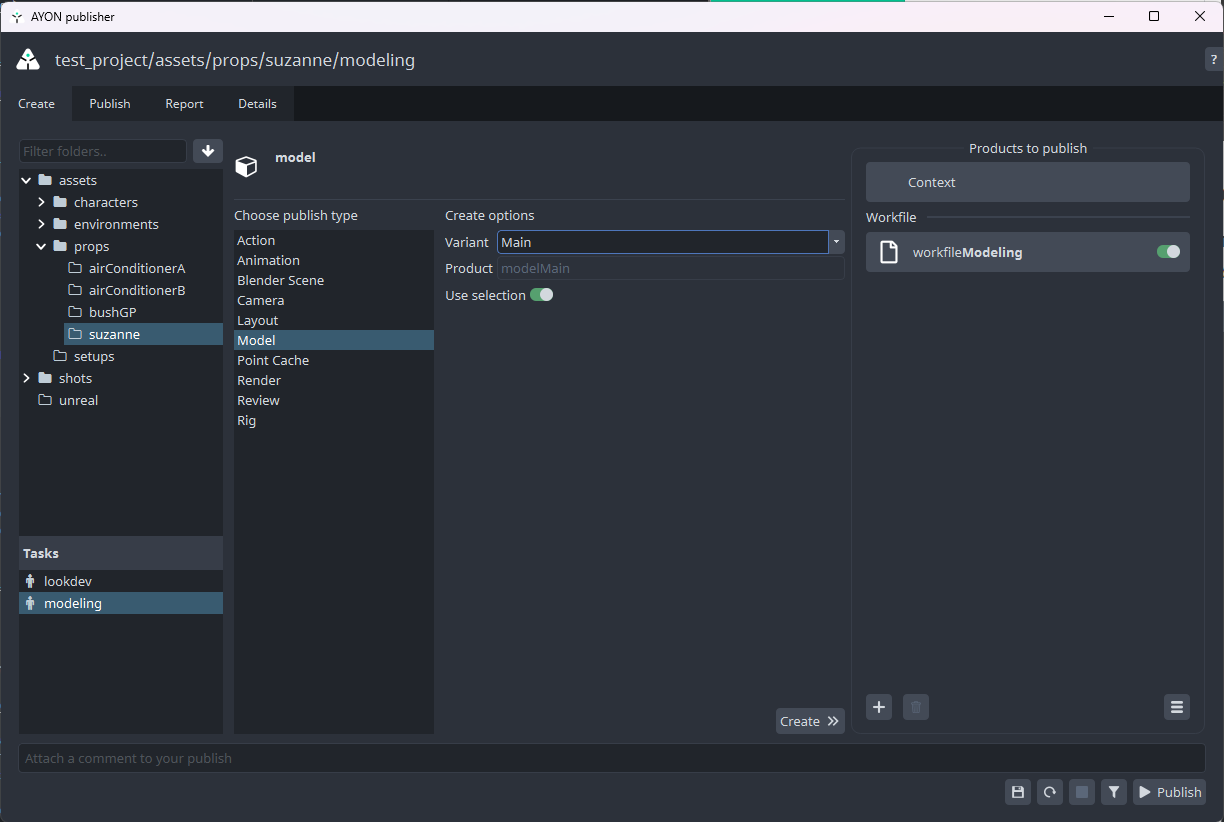
Choose Model publish type and keep the Variant and Use Selection as is.
See AYON Glossary for more detail on what variant and product are and how they are used in AYON.
Use selection toggle will use whatever you have selected in the Blender Outliner before triggering Create... This is usually what you want.
Now click on Create >> button.
You'll notice then after you've created new Model instance, there is a new collection in the Outliner called ‘AYON INSTANCES’ …don’t bother with it as it’s just a metadata holder so don’t remove it!
The model parts used for creating the Model publish also got parented under a locator representing the newly created product.
And that's it, you have your first model ready to be published as model product.
Now save your scene if you didn't already!
...again using AYON > Workfiles > Save As
You are also free to perform an ordinary File > Save aka CTRL+S at any time besides using the Workfiles, which are more suited for Save As, aka creating new versions.
Publishing Model
Finally, let's publish our model! Go to AYON → Publish.... You will be presented with following window:
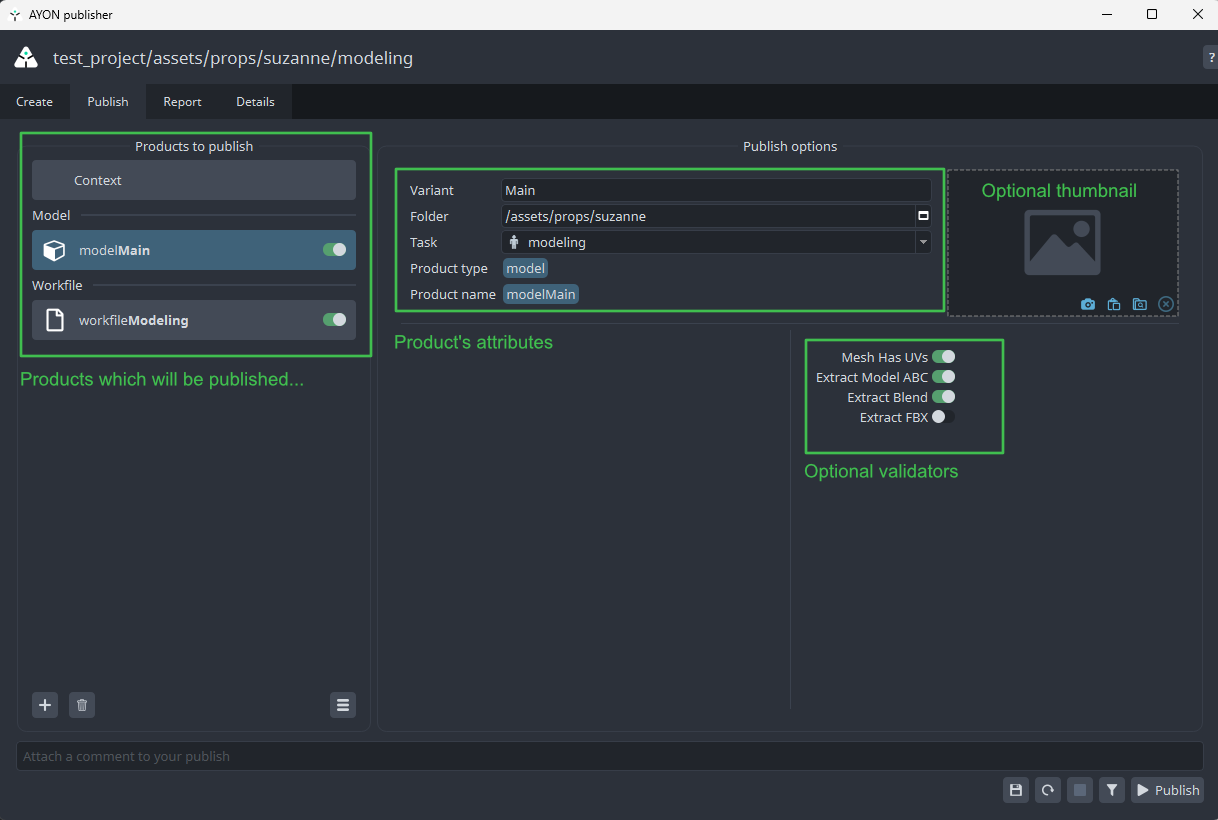
Content of this window can differ depending on your studio's AYON configuration. For more details see Creator / Publisher user's docs section.
Items listed in the left column are instances you will be publishing. You can disable them by clicking on the toggle next to them.
See that in this case we are publishing the Blender model named modelMain and the workfile workfileModeling (its instance is generated automatically for any workfile). Also Context being implicit widget and just resolves the product location within a project aka so called Context. You can't disable this one.
On the right side, you can enable or disable optional validators or extractors for the selected publish instance.
Lets do dry-run on publishing to see if we pass all validators. Click on the funnel icon at the bottom next to the Publish button.
...validators are run.
Fixing Validation Issues
For the sake of demonstration, we intentionally kept the model in Edit Mode, to trigger the validator designed to check if model not being in such a state.
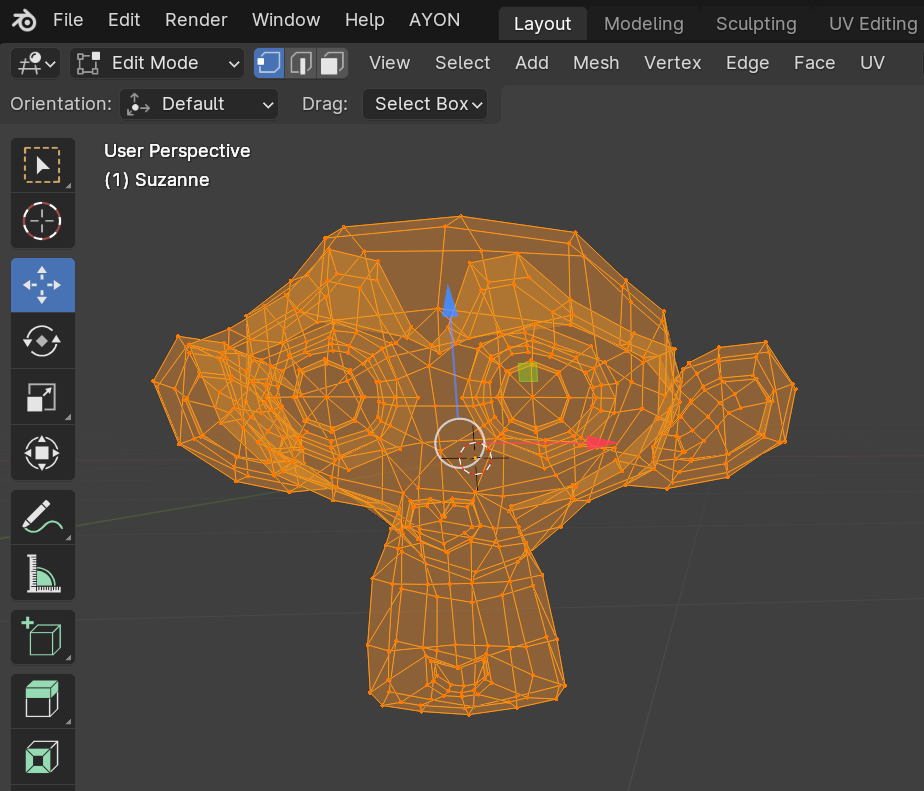
The report tab in the publisher window shows us that we have problem with validator Validate Object Mode.
From there you can see that there is problem with the object Suzanne. Some validators have option to fix problem for you or just select objects that cause trouble. This is the case with our failed validator.
On top you can see a button Select Invalid. This will select offending object in Blender.
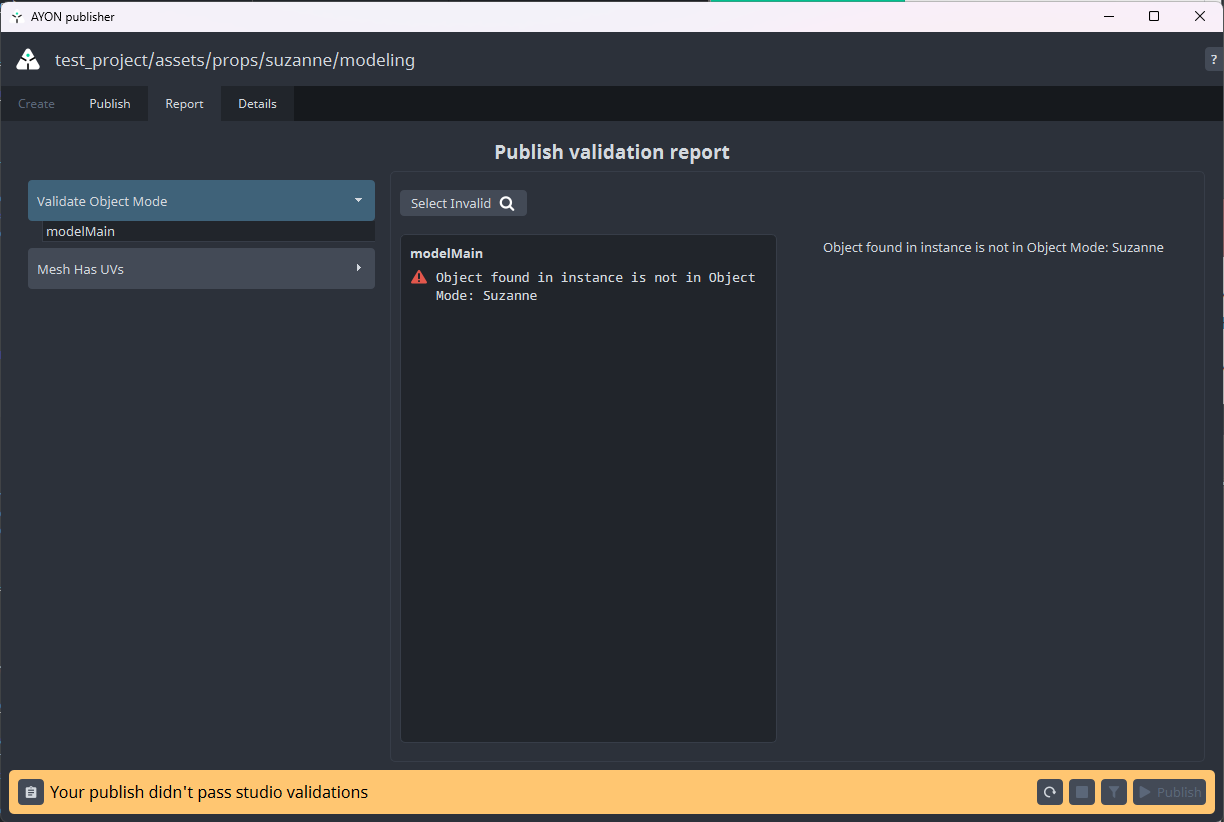
Fix is easy. Without closing the Publisher window we just turn back to Object Mode. Then we need to reset the Publisher to make it notice changes we've made. Click on arrow circle button at the bottom right and reset the Publisher to initial state.
Run validators again (by funnel icon) to see if everything is ok now.
The validation should pass properly without any failures now.
Click the Publish button when ready.
Publish process will now take its course. Depending on data you are publishing it can take a while. You should end up in the report tab of the publisher window, with a success message and information about published data as seen on the picture below.
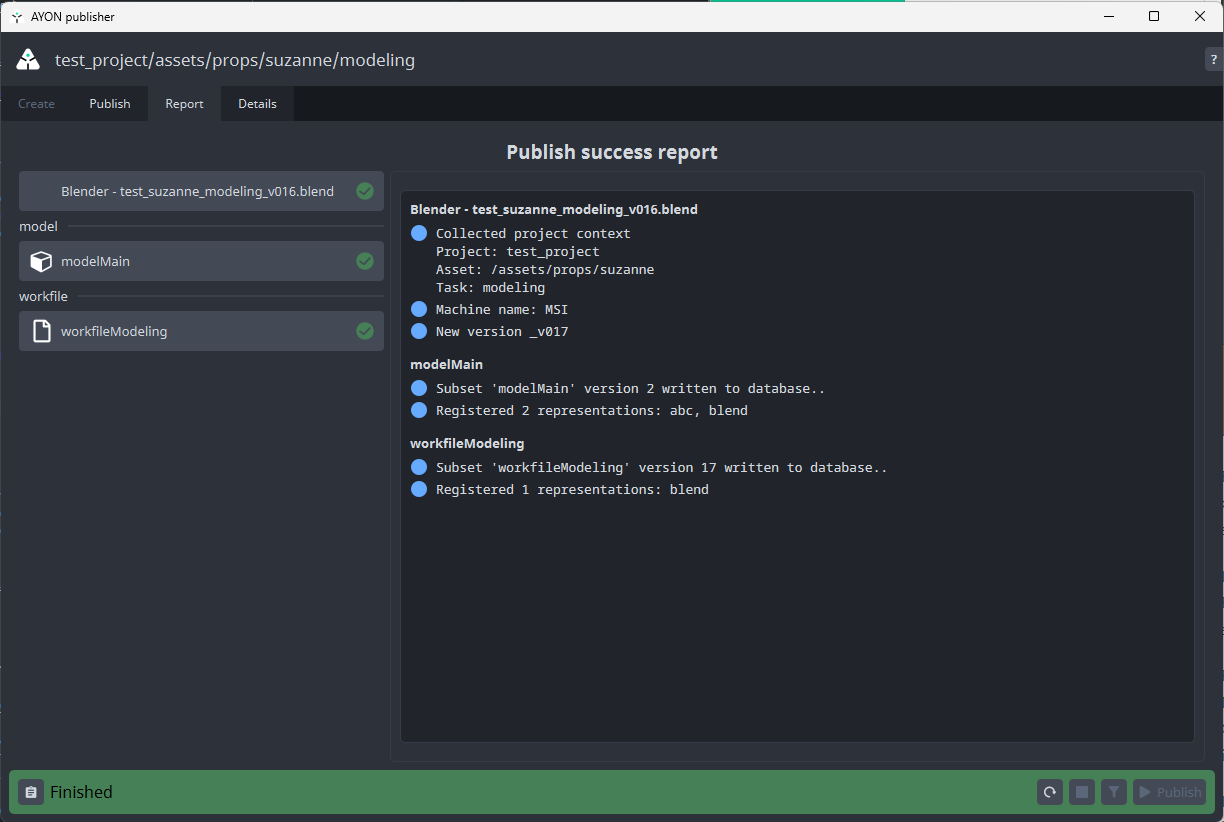
A green status bar means everything has been going well! You can dismiss the publisher window now.
Loading models
Once you have any published product available you can use AYON and its Loader tool to bring such product(s) into your active Blender workfile.
Navigate to AYON → Load...
By selecting your modelMain and performing right click on it and choosing either Append Blend (blend) or Link Blend (blend) action.
Creating Rigs
Creating and publishing rigs with AYON follows similar workflow as e.g. model publishing we have described above.
Simply creating your rig, selecting its parts and creating a rig publish instance via Publisher UI and finally performing Publish action resulting into rigMain product.
Note: While making selections before Rig publishing, select the Armature object only and not any geometry using the modifier (skin binded geometry) as those will be pulled together with the armature object automatically.
Simple object parenting to bones via CTRL+P does not suffice for Rig product - use object constraints instead and don’t forget to select those objects together with the Armature too before creating Rig publish instance otherwise they won’t be part of the resulting Rig product.
Preparing the rig
You don’t need any kind of special setup to create a Rig publish. Every rig should consist of some geometry and a rig setup, such as an Armature or control objects like empties with any sort of object constraints etc.
Let's first create a model and its control rig. For demonstration, We will create a simple model for a robotic arm made of simple boxes.
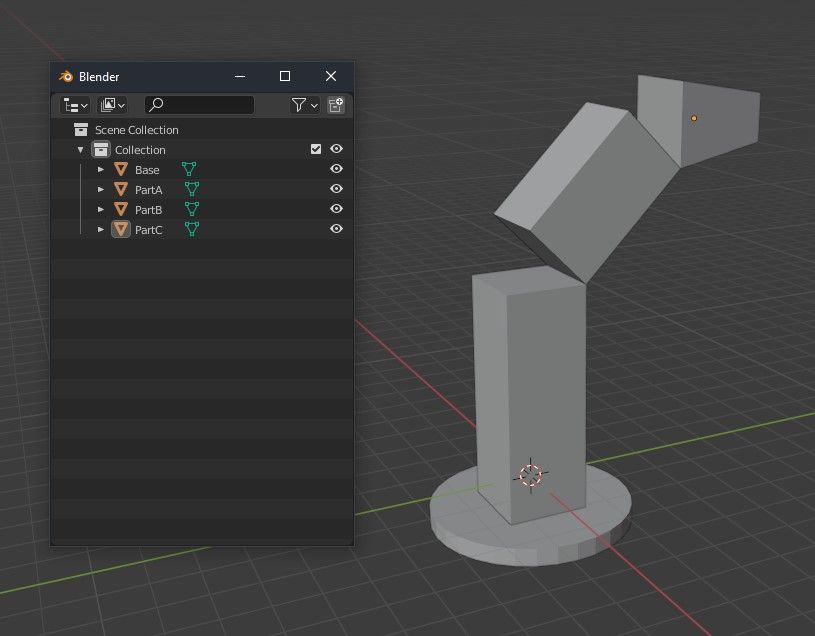
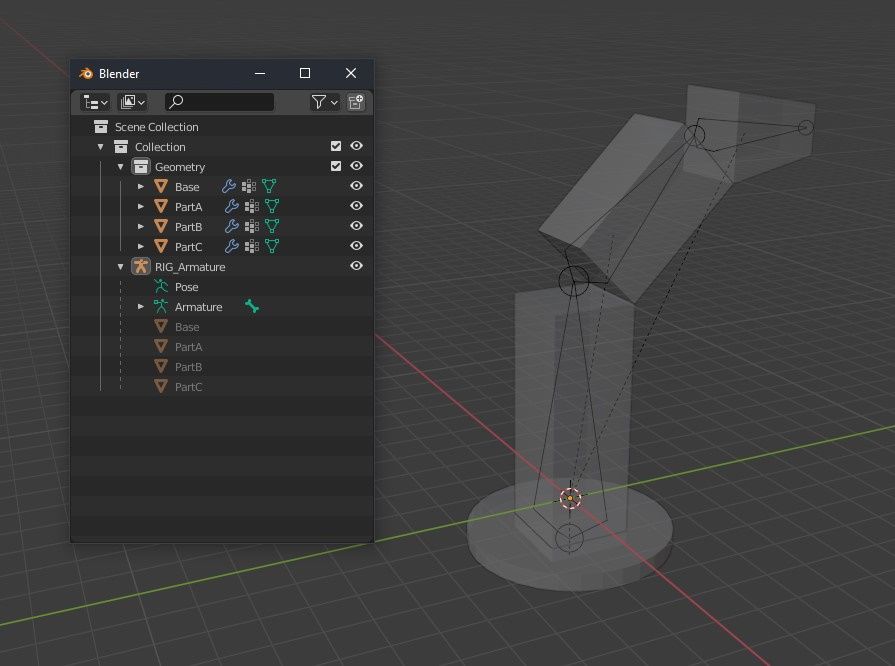
I’ve created the armature called ‘RIG_Armature’. While the name itself isn’t important and you can follow your own naming conventions, the hierarchy is what matters. Organizing entities into collections is optional, so it’s up to you whether to use them or not. In this example, we have a dedicated collection for geometries called “Geometry.”
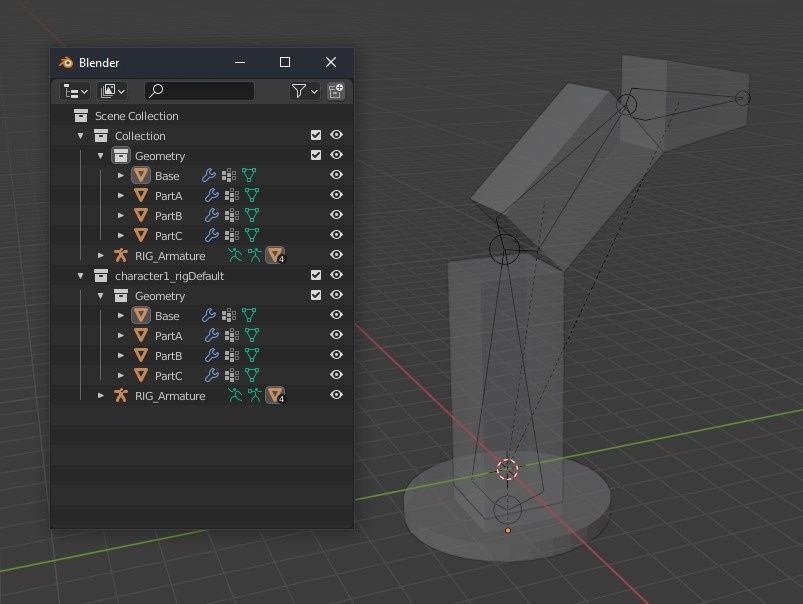
When you are ready with your rig setup, it's time to create Rig instance in AYON. Select your Armature node (manikin icon) and go to AYON → Create.... and choose Rig type.
A new collection named after the selected Product and Variant should have been created. In our case, it is character1_rigDefault. All the selected armature and models have been linked in this new collection. You should end up with something like this:
Publishing rigs
Publishing a rig is done the same way as publishing any other type of product. Save your scene and go AYON → Publish. For more detail see Creator / Publisher .
Loading rigs
You can load a Rig with Loader . Go to AYON → Load..., select your rig, right click on it and pick prefered loader type e.g. Link Blend (blend) or Append Blend.
Note: While using Append Blend loader type which is essentially kind of file import in blender terms you are still able to swap/manage product version via Manage tool without loosing any data aka non-destructively thanks to the Ayon!
Layouts in Blender
A Layout is a set of loaded products that are loaded in your scene. You can produce layout from selected products and version manage such set via AYON toolset using the Manage tool aka Scene Inventory.
Layout has become a bit of a legacy, outdated product. Think of it as a full scene export that includes all loaded products including rigged characters with animation. We recommend using the newer blendScene type instead, which fully supports Blender features like linking and collections and is suitable for pretty much any situation.
Publishing a layout
Working with Layout is easy. Just load your assets into scene with Loader (AYON → Load...). Populate your scene as you wish, translate each piece to fit your need. When ready, select all entities and go AYON → Create... and select Layout. When selecting rigs, you need to select only the Armature, the geometry will automatically be included. This will create set containing your selection and marking it for publishing.
Now you can publish using AYON → Publish action.
Loading layouts
You can load a Layout using Loader (AYON → Load...). Select your layout, right click on it and select Link Layout (blend). This will populate your scene with all those models you've put into layout.
Other products
Action, Animation, Blender Scene, Camera, Point Cache, Render, Review, USD.
This section is still in progress.
Action
This product is great for publishing any type of animation from the selection for later use, as Blender uses this data-block whenever an object has been animated / contains any sort of keyframes in the scene.
Just select single object or Armature in your scene and create Action publish instance type within Publisher UI for publishing as a Blender action.
Use Ayon loader for loading already published Action product so you can assign it to any entity within your active scene.
Once the Action product is loaded, flag it as a “Fake User” to keep Blender from automatically deleting it when saving the scene if it’s not linked to anything, especially if you plan to use it multiple times.
Blender Scene
This type is general purpose or ‘Swiss army knife’ product type for publishing any sort of data from your Blender scene. As this product fully supports Collections and Load Linking, its ideal for most of the situations whether its a single prop, set, character rig or environment layout!
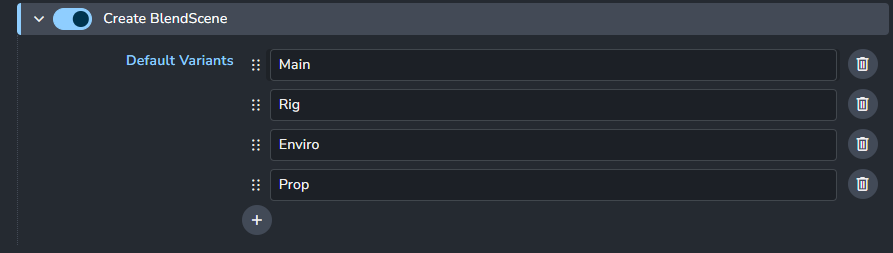
Tip: by changing the variant Main in the product name you are able to achieve different ‘flavours’ of your Blender Scene product e.g. blendSceneRig or blendSceneEnviro if needed. So you are not just stuck to blendSceneMain .
Note: any external data / textures used within scene materials will be packed into the published product by default. It’s also worth noting that packing only happens during publishing and won’t affect your current scene setup.
Render
Ayon offers fully automated render setup for the user by using Compositor and its File Output Nodes with full support of ViewLayers and AOVs and automatic Deadline farm submission while publishing renders from the Blender host app.
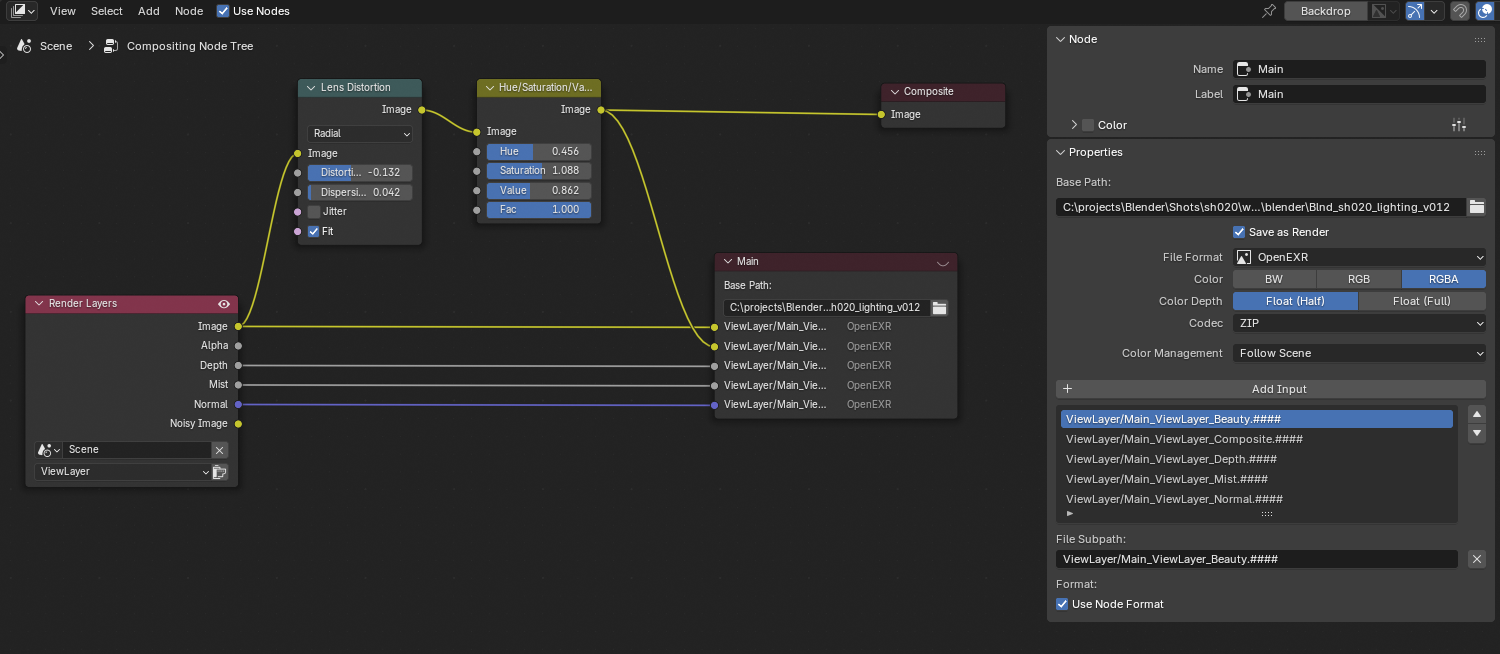
Ayon submission to Deadline consists of two jobs: Render and Publish. While Publish job handle the integration of the renders and creation of any reviewables for the AYON server.
Note: Rendering with AYON is fully supported for Blender 4.5.x LTS and due to core changes in the newer versions 5.x not ready yet. note at Jan, 7th 2026